The rain garden is one of my proudest landscaping achievements and probably the most unqualified success I’ve had. I want to tell you all about it, but if you’re just here for the pretty pictures, I understand. You can skip all the words and get straight to the good stuff.
Why a rain garden?
The idea of a rain garden is to capture runoff from a roof or paved area in a shallow depression where it can soak into the ground instead of reaching storm sewers or waterways. Rain gardens are a great place for plants—the plants are watered for free, and their roots help create pathways for the water to seep into the soil. Contaminants are filtered out as the water passes through the soil and subsoil, and it returns directly to the aquifer, as most rainfall did before we covered so much of the world in impervious surfaces and started funneling runoff into storm sewers.
Storm sewers reflect the era in which we sought to “conquer” nature, believing that if we just kept increasing the scale of our engineering, we could permanently corral and contain natural processes so that they would not not trouble us. This idea has failed, both in the broader stage of human progress, and at the specific level of storm sewers. Water that runs off of impervious surfaces carries all sorts of bad stuff—roof tar, fertilizer, oil and other chemicals washed off roadways—and often drains all this pollution directly into the nearest body of water (in our case, the mighty Mississippi). Storm sewers are often old and crumbling infrastructure, and prone to being overloaded by major rainfalls, sometimes causing failures like the release of raw sewage into waterways (lookin’ at you, Tijuana). Waterways flooded by excess runoff also often suffer major erosion and a host of related problems.
Rain gardens just make a lot of sense. They reflect the approach that has risen to replace the failed mastery of nature: the idea of working with nature rather than against it, of respecting natural processes and fitting them into our anthropocentric world. They also represent a decentralized form of civic engineering that offers the resilience and autonomy centralized systems often fail to provide. Rain gardens are a way to have our cake and eat it too.
Resources
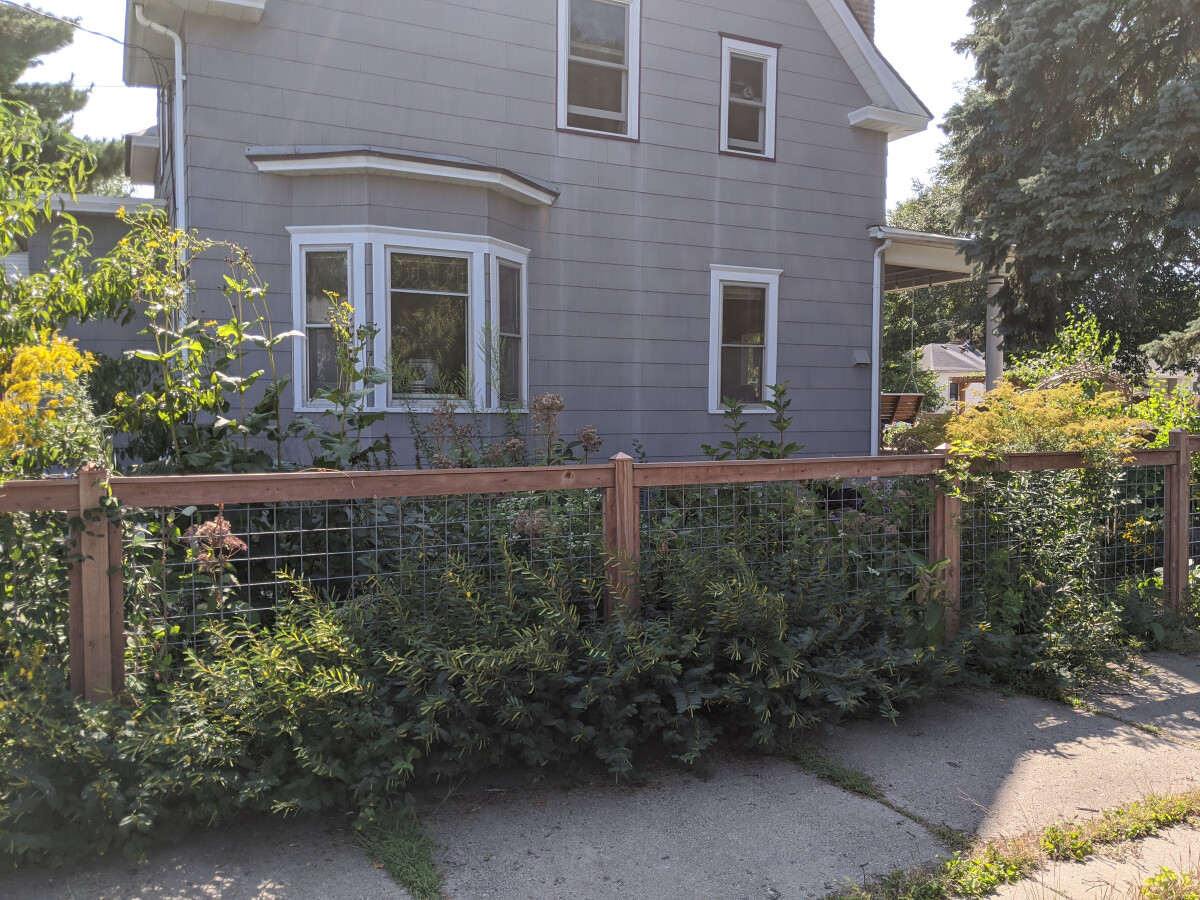
I already had rain gardens on the mind when we bought our house, so I evaluated the suitability of the property pretty early on in my planning process. It was a good match: we had no existing runoff management, and some of the downspouts were causing drainage issues that ought to be addressed. With our large yard and nothing in it but grass, there was plenty of space to accommodate a rain garden.
The best resource I found for rain garden design and installation was this guide from Blue Thumb. It offers a lot of useful information, including a lot of very specific practical advice that is invaluable if you’re going to be doing the installation yourself. Another good resource (that didn’t exist when I did this project) is the Lawn to Legumes planting guide.
Plant lists are also a great way to get started without a lot of prior knowledge. I can’t find the plant list I used the most when making my design—it was especially nice because it was a selection of relatively easy-to-find plants, and it listed not only basic information about the plants but also where in the rain garden (basin, sides, top) they would be best suited. If I were doing the project now, I think I would start with the Lawns to Legumes rain garden template, the UMN Extension rain garden guide and the Xerces Society plant lists.
The other good way to determine the best location for specific plants is Prairie Moon’s excellent plant information. They list moisture preferences for each plant, which is a good approximation of where they’d like to be in a rain garden. Plants listed as “wet” and “medium-wet” will likely be happy in the bottom of the basin. “Dry” or “medium-dry” plants need to be fully outside of the basin. Plants in the medium zone will probably be happy on the sides of the basin.
Plant selection
My plant selection for the rain garden and immediate surroundings is entirely species that are native to Minnesota. I didn’t set out with that as the goal—some people adhere to a very strict natives-only policy just for purity’s sake, but that never particularly called to me. It just turned out that native plants provided the best functional fit for my goals in this space.
Native plants are a very good bet to do well in our climate because they literally evolved to grow here. They provide the highest-quality food and habitat for native insects because those insects evolved in parallel to depend on these plants. Many native plants need very little maintenance, and once established, can outcompete weeds. Native plants often have very deep root systems that help with water infiltration and allow them to tolerate major dry spells without supplemental watering. There is also a very good selection of native plants that will tolerate alternating wet and dry conditions, perfect for planting inside the basin of the rain garden, which may be underwater for some hours after a heavy rain but also may dry out completely after several weeks of no rain.
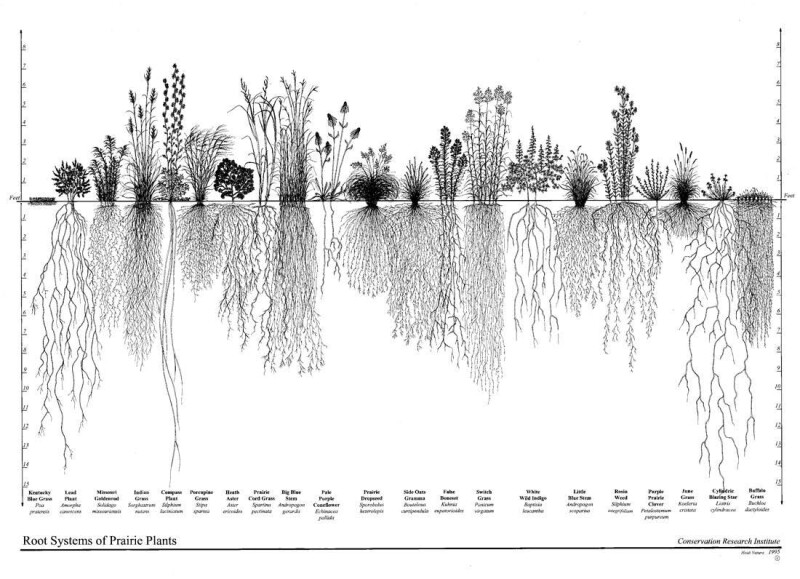
The root systems of some prairie plants. Kentucky Bluegrass (i.e. your lawn) is the pathetic thing you can barely see on the very far left.
As I evaluated candidates for planting in this area, native plants kept rising to the top of the list because they had so much to offer. Many plants exist that could fill the space and look nice, but with those traits being equal, why would I not choose the option that comes with so many additional benefits? The common downsides of natives (that they take a while to get established and that they don’t always lend themselves to a carefully manicured garden aesthetic) were also not concerns for me, and I have access to several vendors of high-quality and ethically-sourced native plant seedlings, so there wasn’t much reason for me to say no.
Once I had settled on about 90% of the plant selection and it was all natives, it seemed like I might as well lean into it and declare the area 100% natives, so that’s what I did. Everything between the existing non-native blue spruce to the west and the non-native peach tree I planted to the east is, to the best of my knowledge, a plant native to Minnesota. The only sections that were a little trickier to design with this constraint were the low groundcovers (along the path and the fenceline) and the areas of full shade (particularly in the house’s shadow and underneath the spruce). Native plants for these conditions do exist, but it took a bit more research to uncover good candidates and sometimes took more effort to source seedlings than it did for more common plants in the other areas. Still, I’m glad I decided to set myself the challenge. It’s been fun to puzzle out how to get everything I want within the palette of native plants, and it has kept the design for this area nice and focused.
Design
Goals for plants in this area:
- Aid infiltration of runoff
- Provide food, shelter, water, and habitat to a variety of wildlife
- Partially screen the view from the sidewalk into the dining room
- Provide beautiful views from the two sets of windows
- Flowers blooming throughout the entire growing season, so people and pollinators will always have something to enjoy
- Lots of different colors, because colors are pretty
- Require few to no inputs (water, mulch, fertilizer) once established
- Require little weeding or other maintenance once established
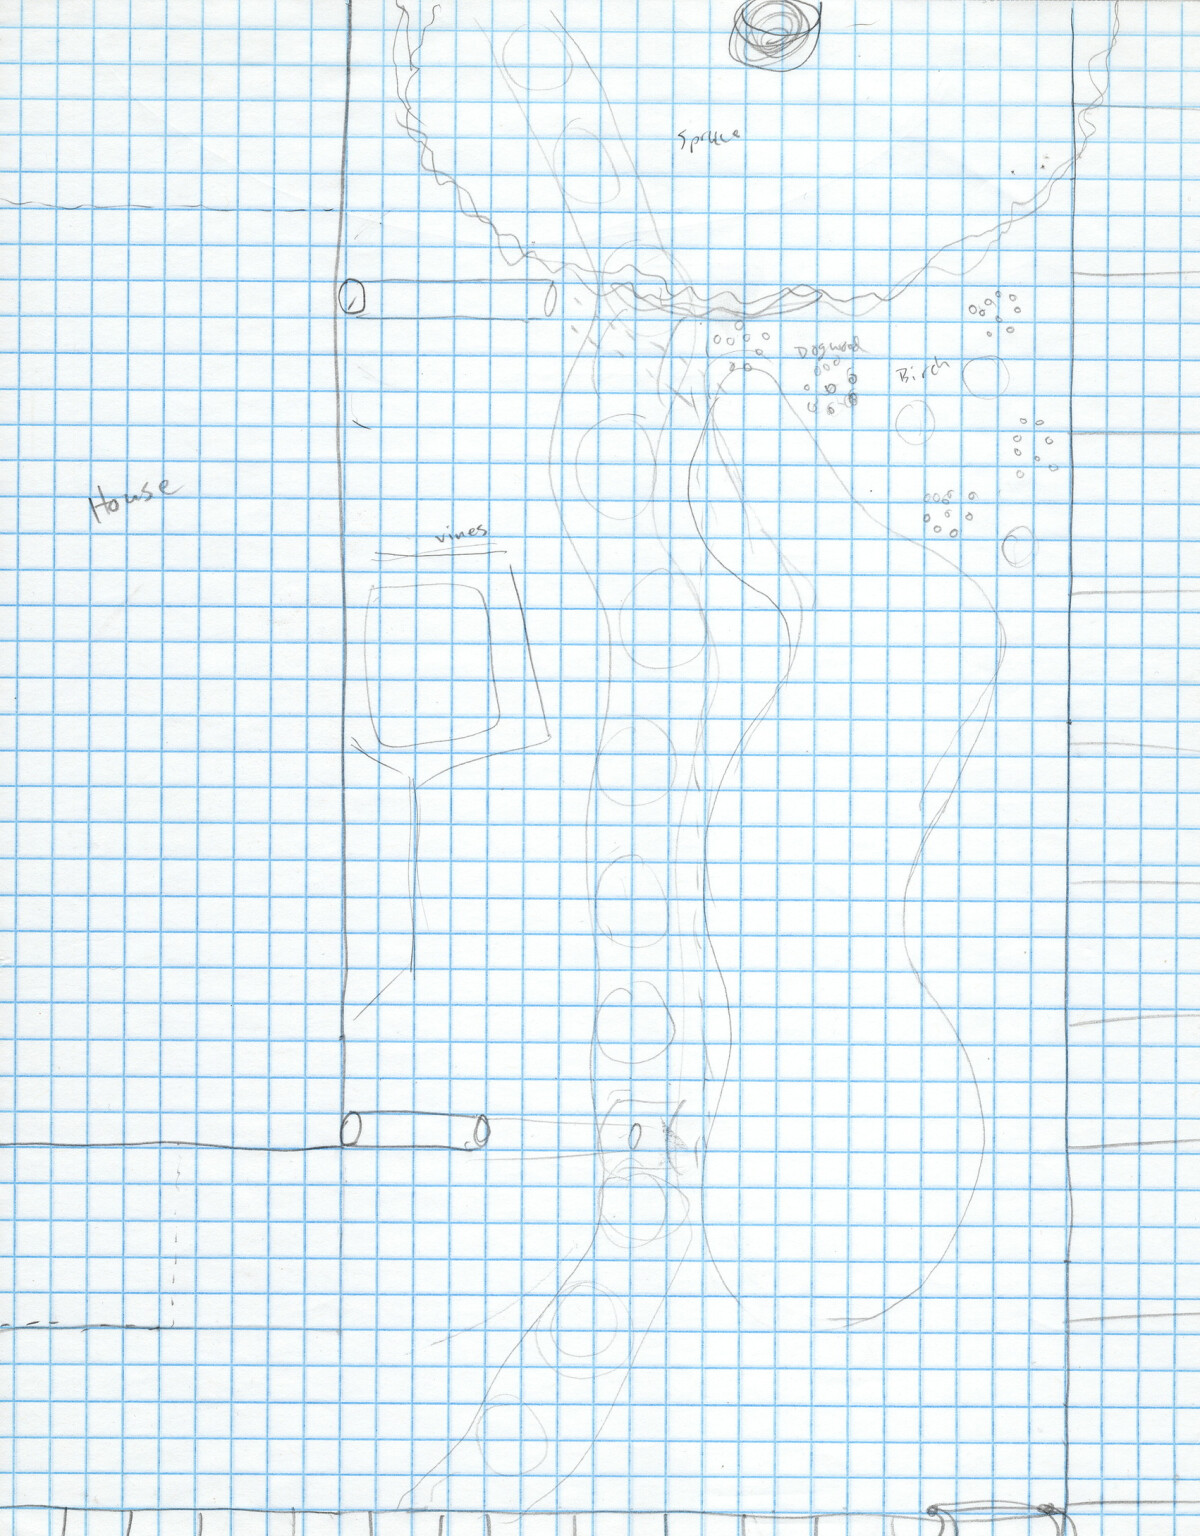
Placing trees and shrubs along the north edge seemed like a good plan, so I started there. These could provide a screen and beautiful views, and putting them on the north side would leave plenty of sunny space for other plants. I came up with a short list by consulting lists of native woody plants that enjoy a fair amount of moisture, cross referenced with lists of plants that provide benefits to birds and pollinators. Then I sketched a ton of different layouts, evaluating each one for how well it provided screening and views, and if it left room for a good rainwater basin and lots of sun for wildflowers.
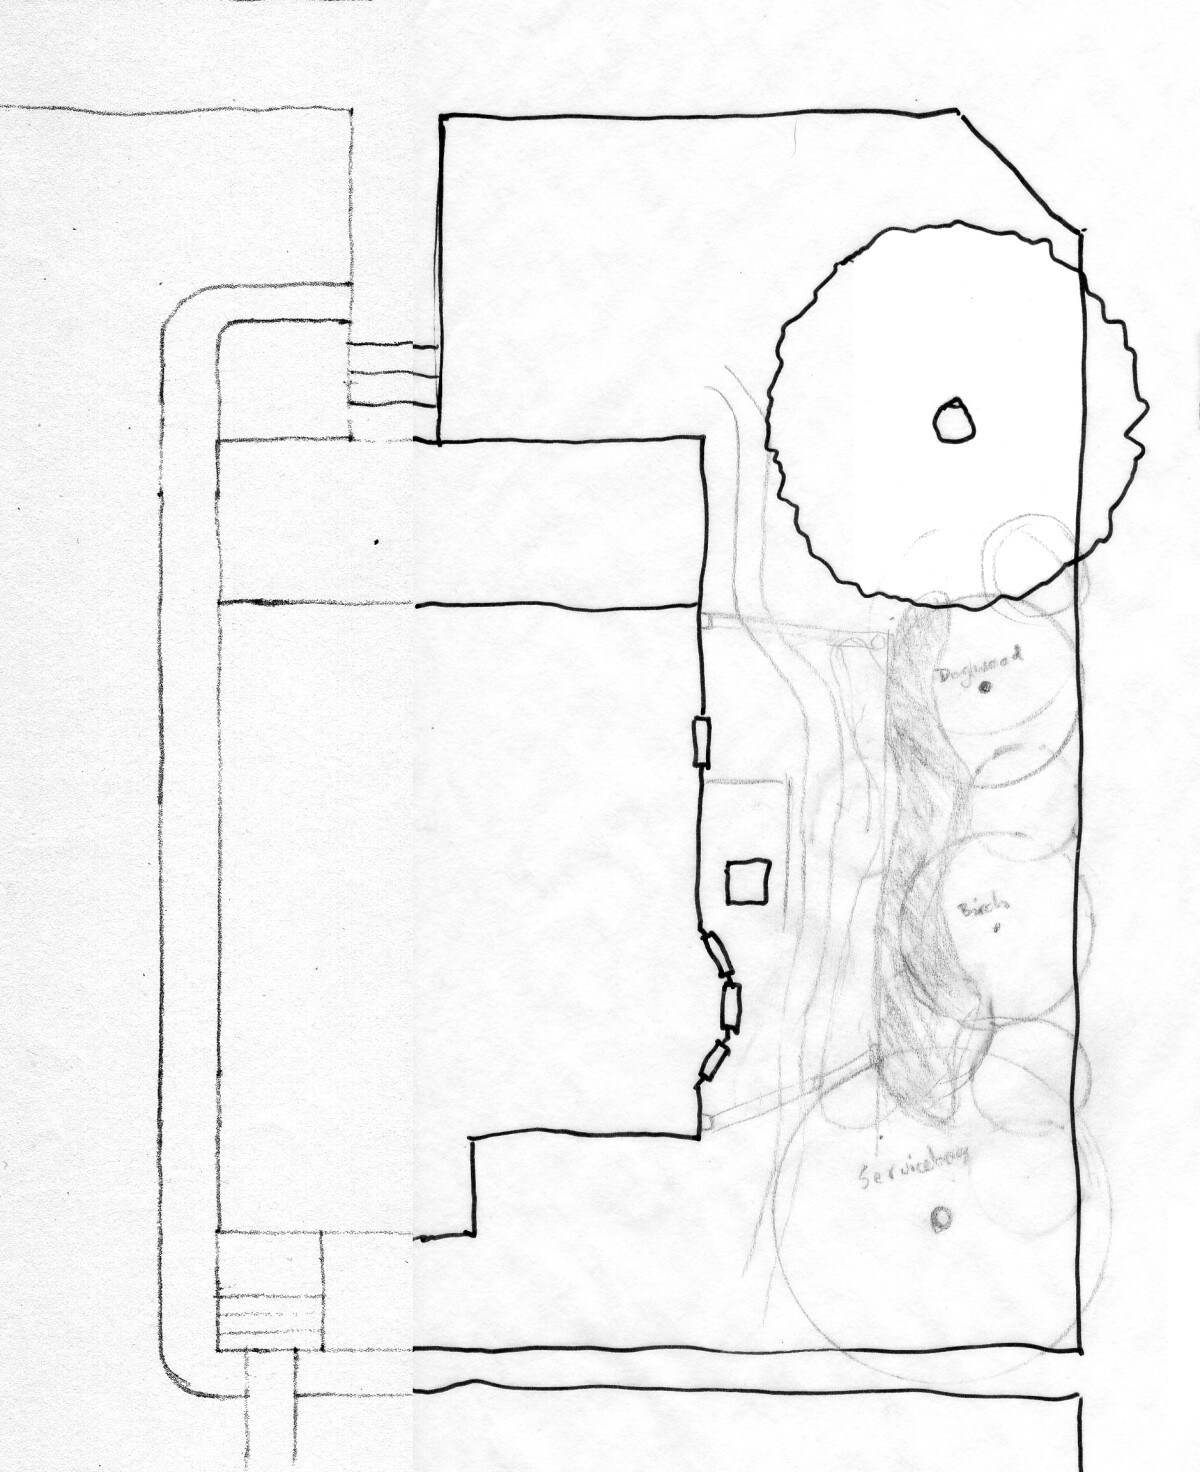
-
An early concept exploring basin shape and putting a birch in the rain garden
-
An early concept with the broad strokes of what would become the winning design. I was still figuring stuff out here so some of the sizes are off.
-
Moving the serviceberry to the end and filling in with a few medium shrubs, including a dogwood of some sort and a dwarf bog birch. This concept was fine but didn't wow me, and only did an okay job with screening and nice views.
-
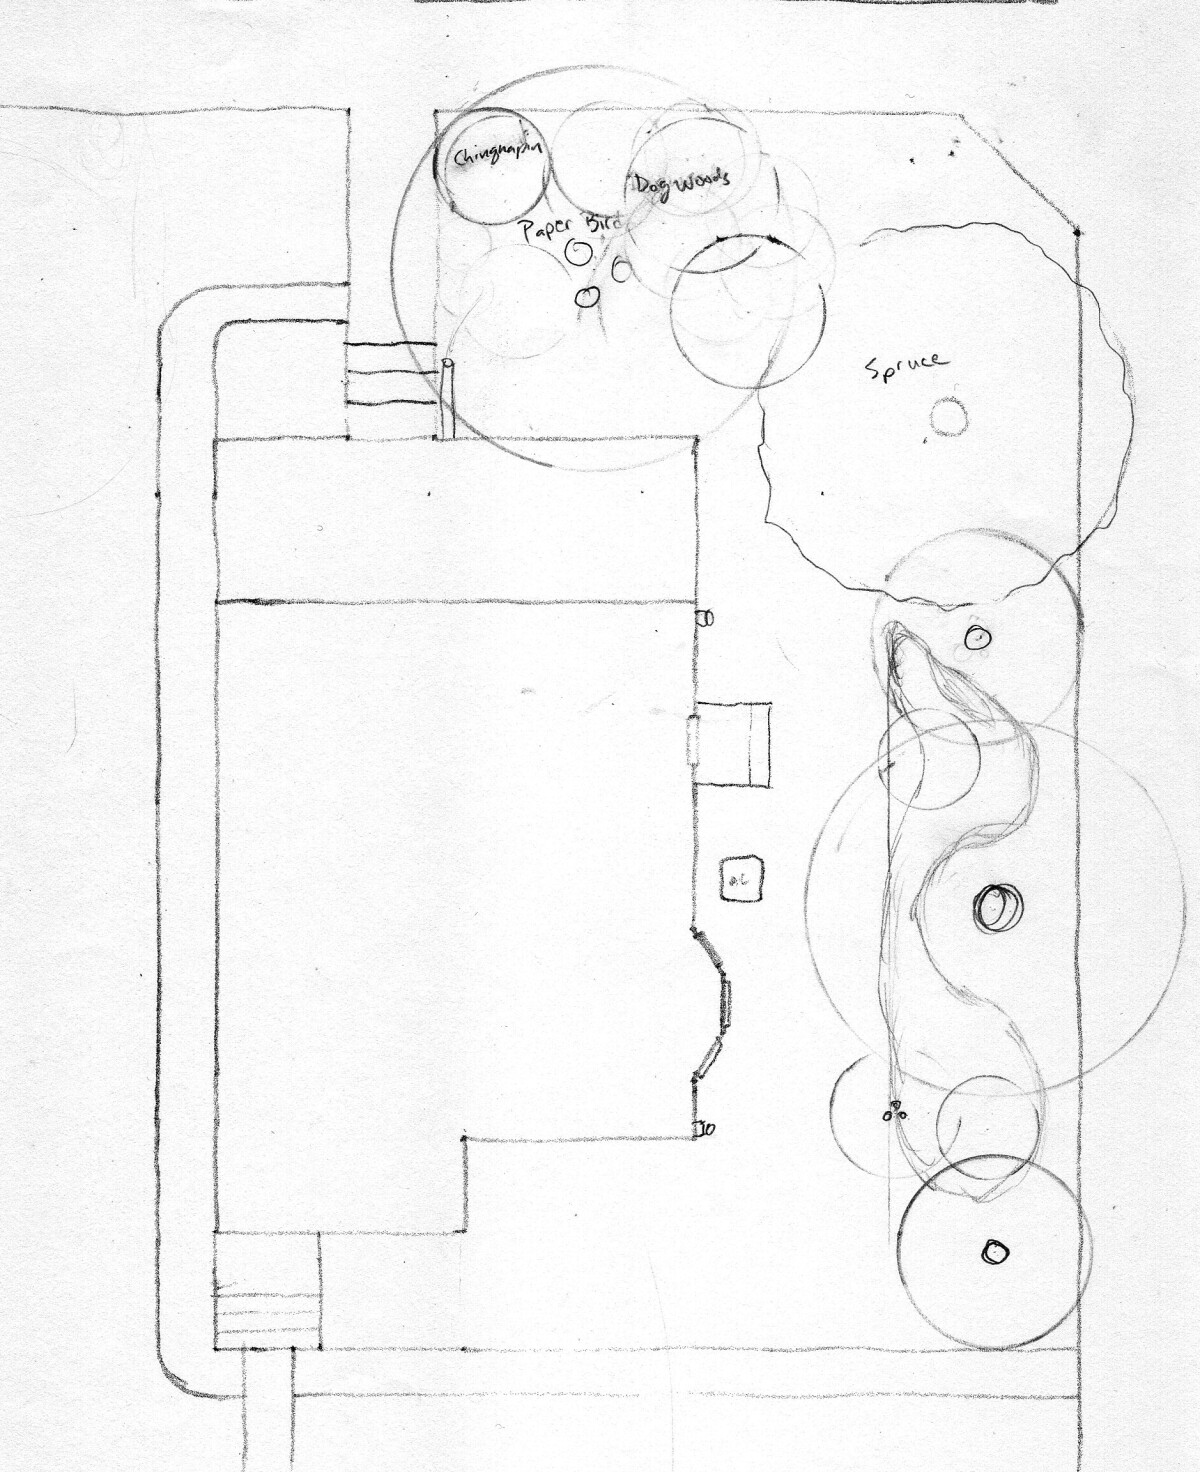
Moving the serviceberry into the middle. This contorted the basin shape too much and also took away too much sunny space.
-
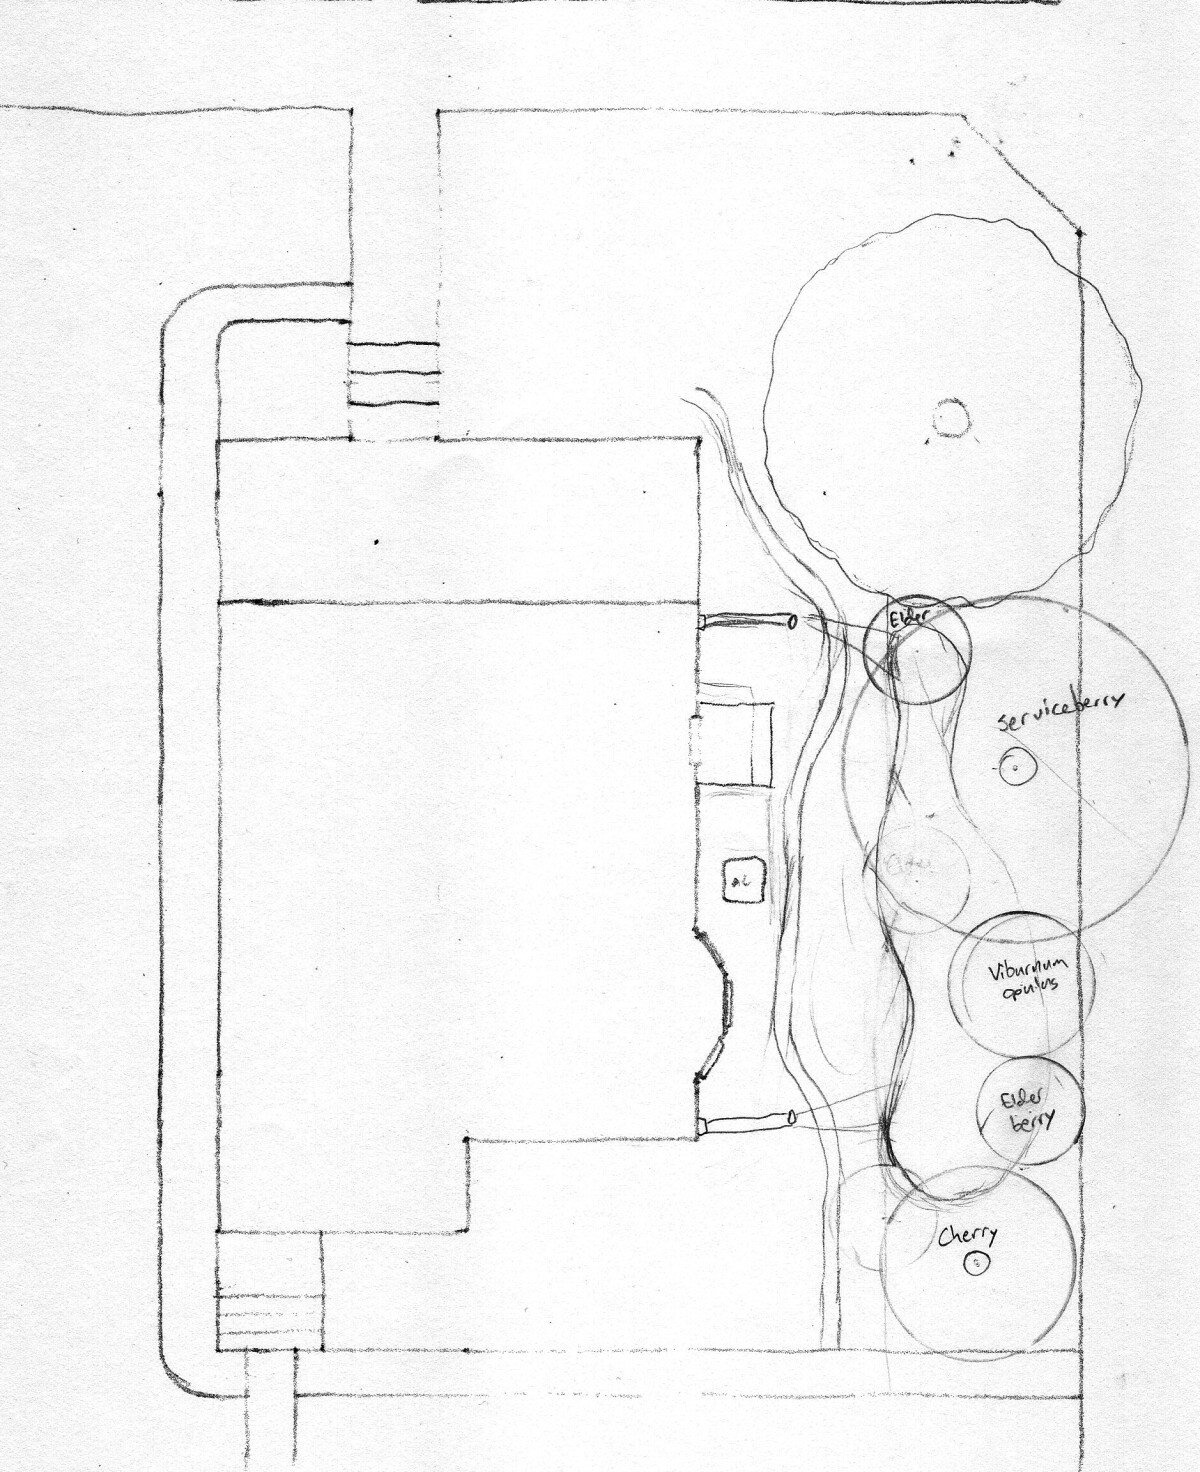
More or less the winning concept. A few of the plant selections changed, but the structure and layout remained the same.
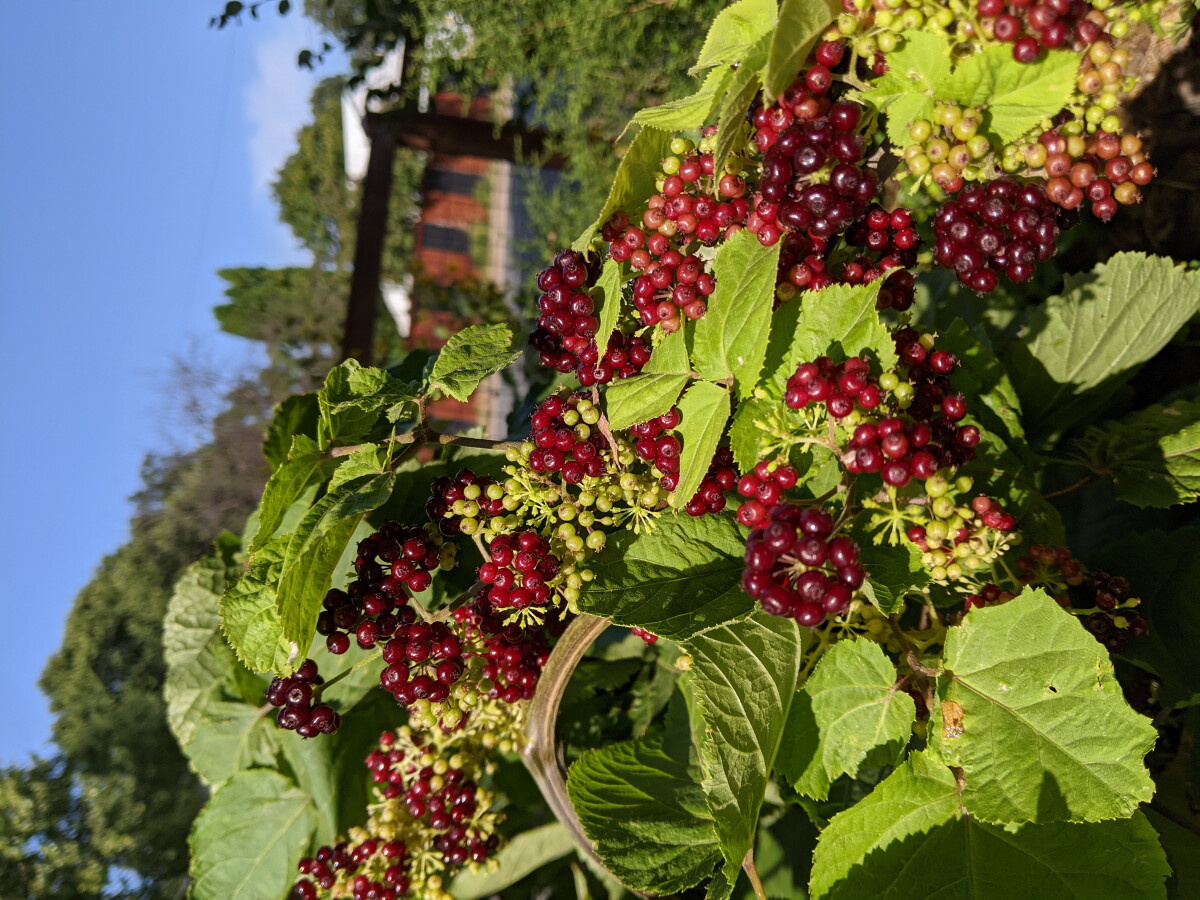
I settled on a large serviceberry shrub/tree and a couple medium shrubs, highbush cranberry and chokeberry. All three of these have attractive flowers, nice fall color, and berries that are popular with birds and (to varying degrees) edible for humans as well. Elderberry almost made the cut, but we had acquired a dog who likes to eat a lot of things she finds outside, and there are some reports of elderberry toxicity to pets—not a particularly grave danger, but I decided I’d be happier if I just didn’t have to worry about how many unripe berries the dog had eaten off a bush in one sitting.
The rule of thumb for siting rain gardens is they should be at least 10 feet away from the foundation. That plus the placement of the woody plants defined the approximate shape of the basin. I made sure to extend it far enough to be within reach of both of the downspouts that would be feeding it.
The final step was filling it in with wildflowers and native grasses. Starting with the list of candidates I had built up from my resources, I started slotting them in based on sun an moisture preferences and plant height. Advice for designing with native plants is to plant them in “drifts” of multiples for the best visual effect, so I did mostly groups of 3-4 per species.
My rain garden plan called for a lot of different species. In no way was this necessary; you can make a perfectly beautiful and functional rain garden with a much smaller palette. But I had gotten really excited about native plants during all my research and wanted to fit in as many as I could. One of the advantages of all that variety was that I didn’t have to plan too carefully around bloom times. With all the different flowers, there are always a few things blooming at any given time, giving pollinators a nice steady supply of food.
After a first draft to rough things in, I did a second draft of the plan with colored pencils to mark flower colors. This helped me fine-tune the placements so I could have a nice mix of colors throughout the space and not have all the yellows clumped together or anything like that. Plus, this made my plan look really fancy like I knew what I was doing.
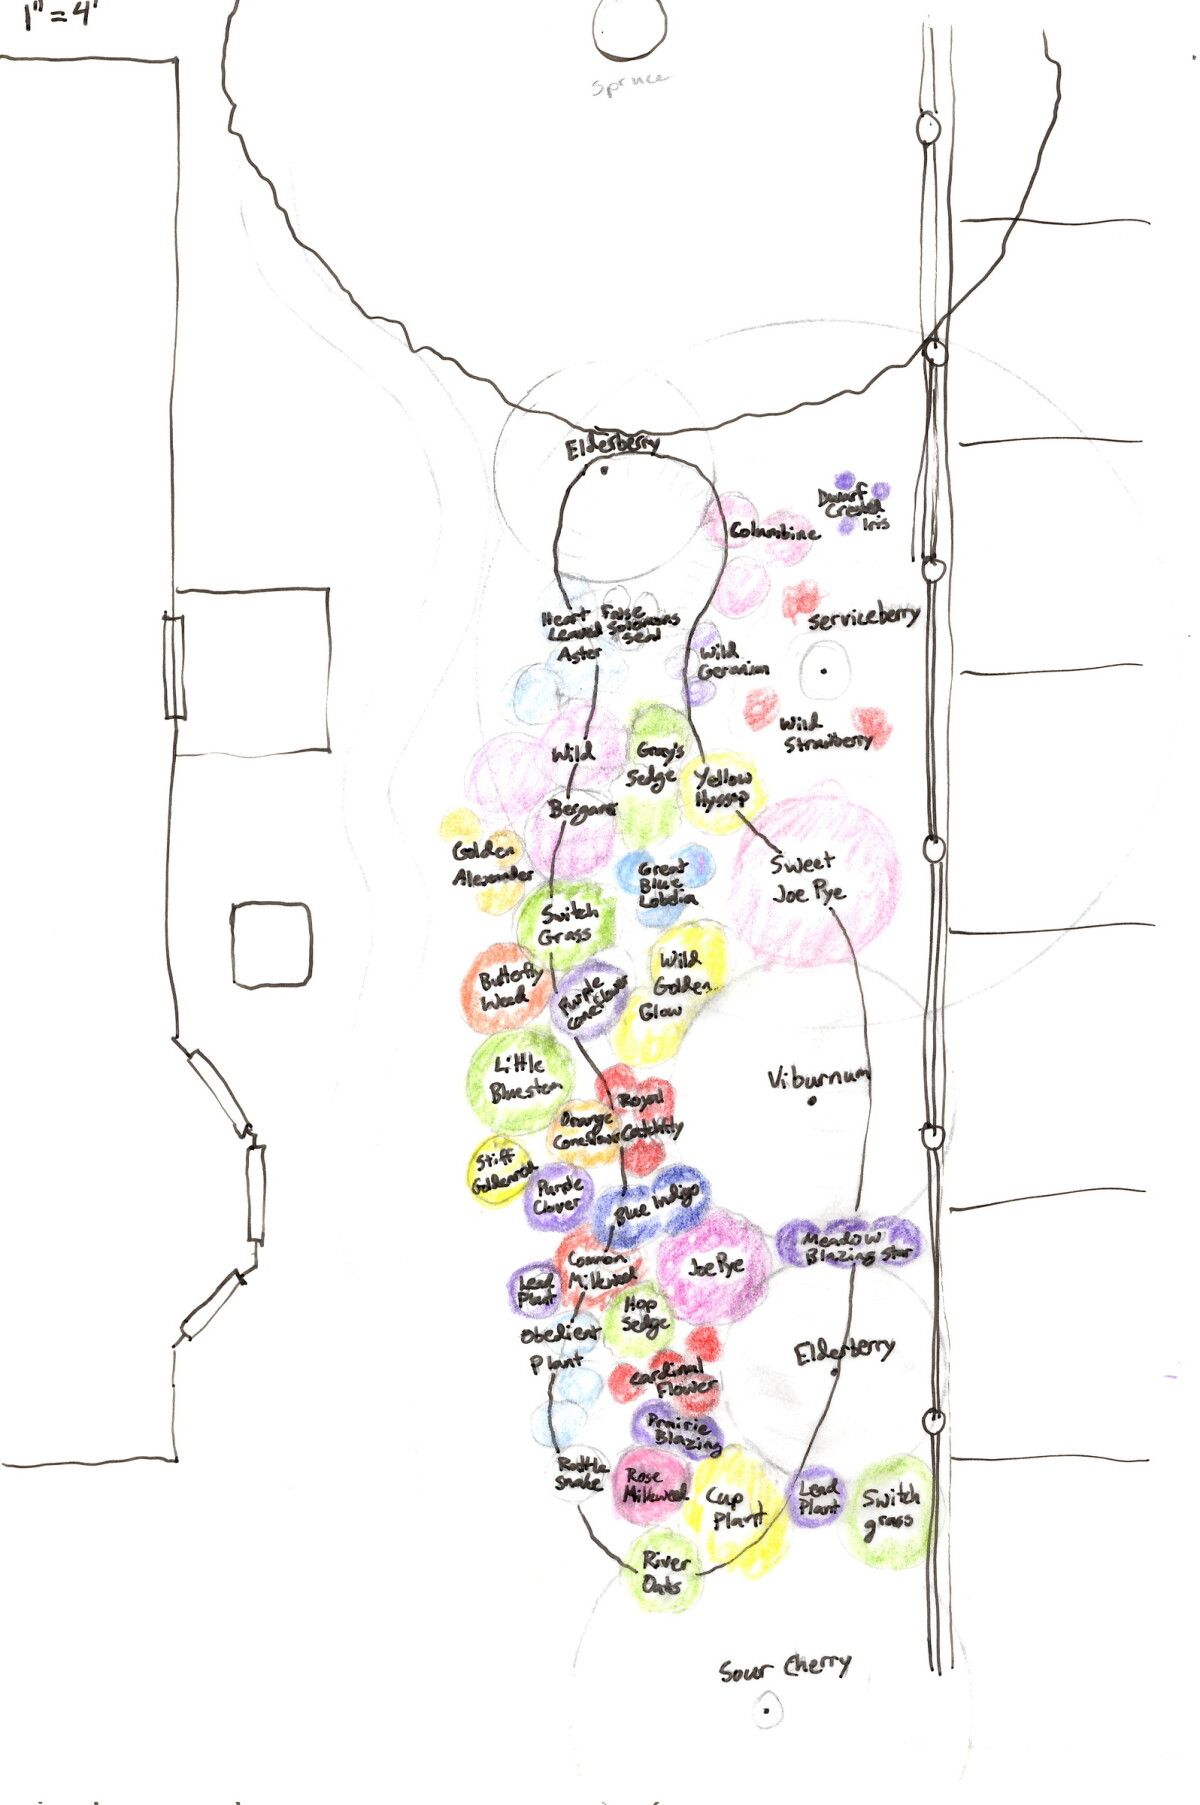
Hot tip: don’t forget the grasses. They’re not as showy as the flowers, but they’re pretty too and will add to the overall effect. Plus, they’re a crucial part of the prairie ecosystem, so if you want your prairie flowers to be happy, let them hang out with their grass buds. I planned some grasses but not as many as I should have, in part because I didn’t take my own advice, and in part because it was harder to source a variety of grasses than it was to source wildflowers. In particular, grasses and sedges that like wet feet are not as readily available, so the basin was a little lacking in grass. In the years following I’ve started some additional grasses and sedges from seed to help fill in.
Installation
The rain garden was going in right by the egress window, so it definitely needed to wait until that was finished. Luckily the window got done early in spring, so we were ready to get started on the garden as soon as the ground thawed, which ended up not happening until late April thanks to an endless winter. I transferred the paper plan to the actual site by outlining the basin with marking paint and sticking stakes in the ground to mark the trees and shrubs. This gave me a chance to fine-tune the design and make sure it harmonized with the surroundings.
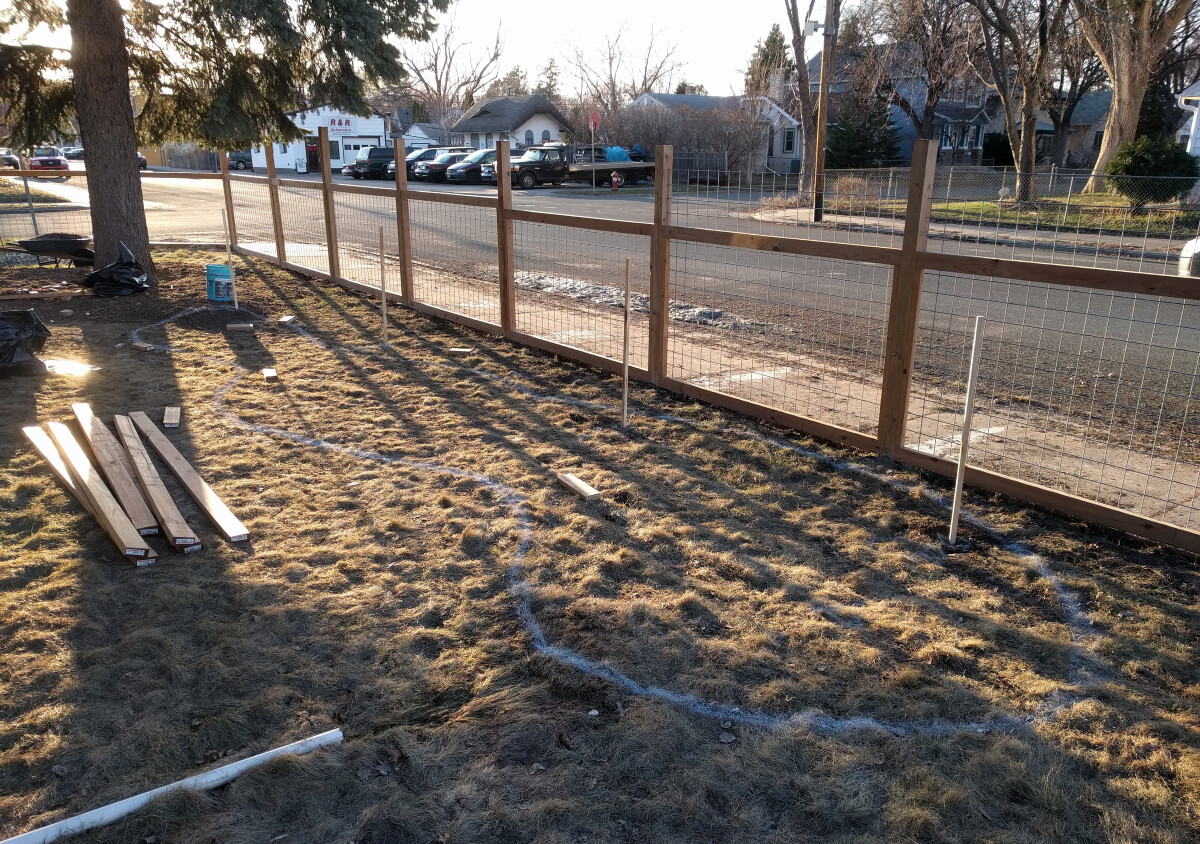
Never mind the fence construction debris. You can see the sump pump outlet sadly spitting out into the grass in the bottom corner, where one of the channels would eventually go.
All of the initial planting was from starts rather than seeds. Native seeds can be difficult to germinate and grow, so starts were easily worth the small extra expense, especially given the number of different varieties I was planting. Most of the plants came from the massive Friends School Plant Sale. This sale was a huge boon for my project. Their native plant selection is excellent, the plants are good quality, and their prices are significantly better than what I would find anywhere at retail. Plus, they had gone fully neonictinoid-free by then, a very important consideration given that this garden was meant to attract and benefit pollinators.
Knowing that I was going to go big at the sale, I developed a carrying system with a convertible hand truck so I could fit everything I needed.
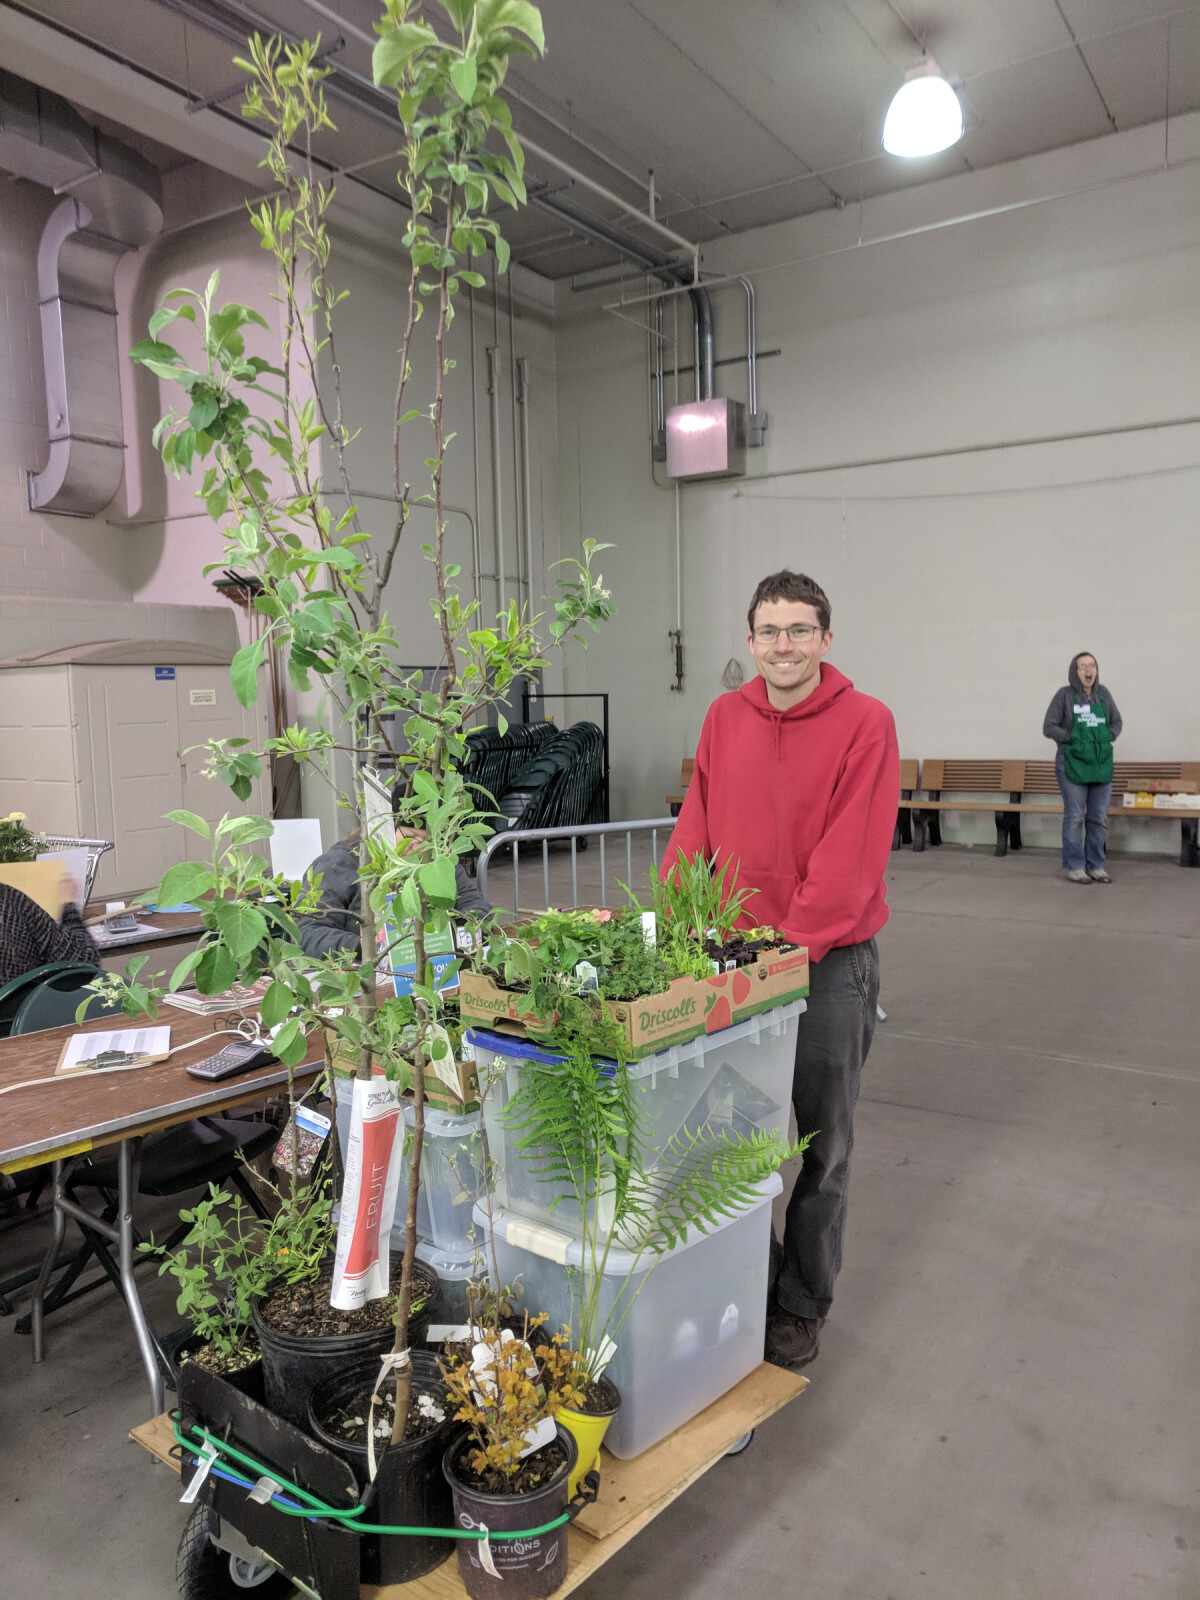
Checkout at the plant sale. Not everything here is for the rain garden; I was also buying veggies and things for elsewhere in the yard.
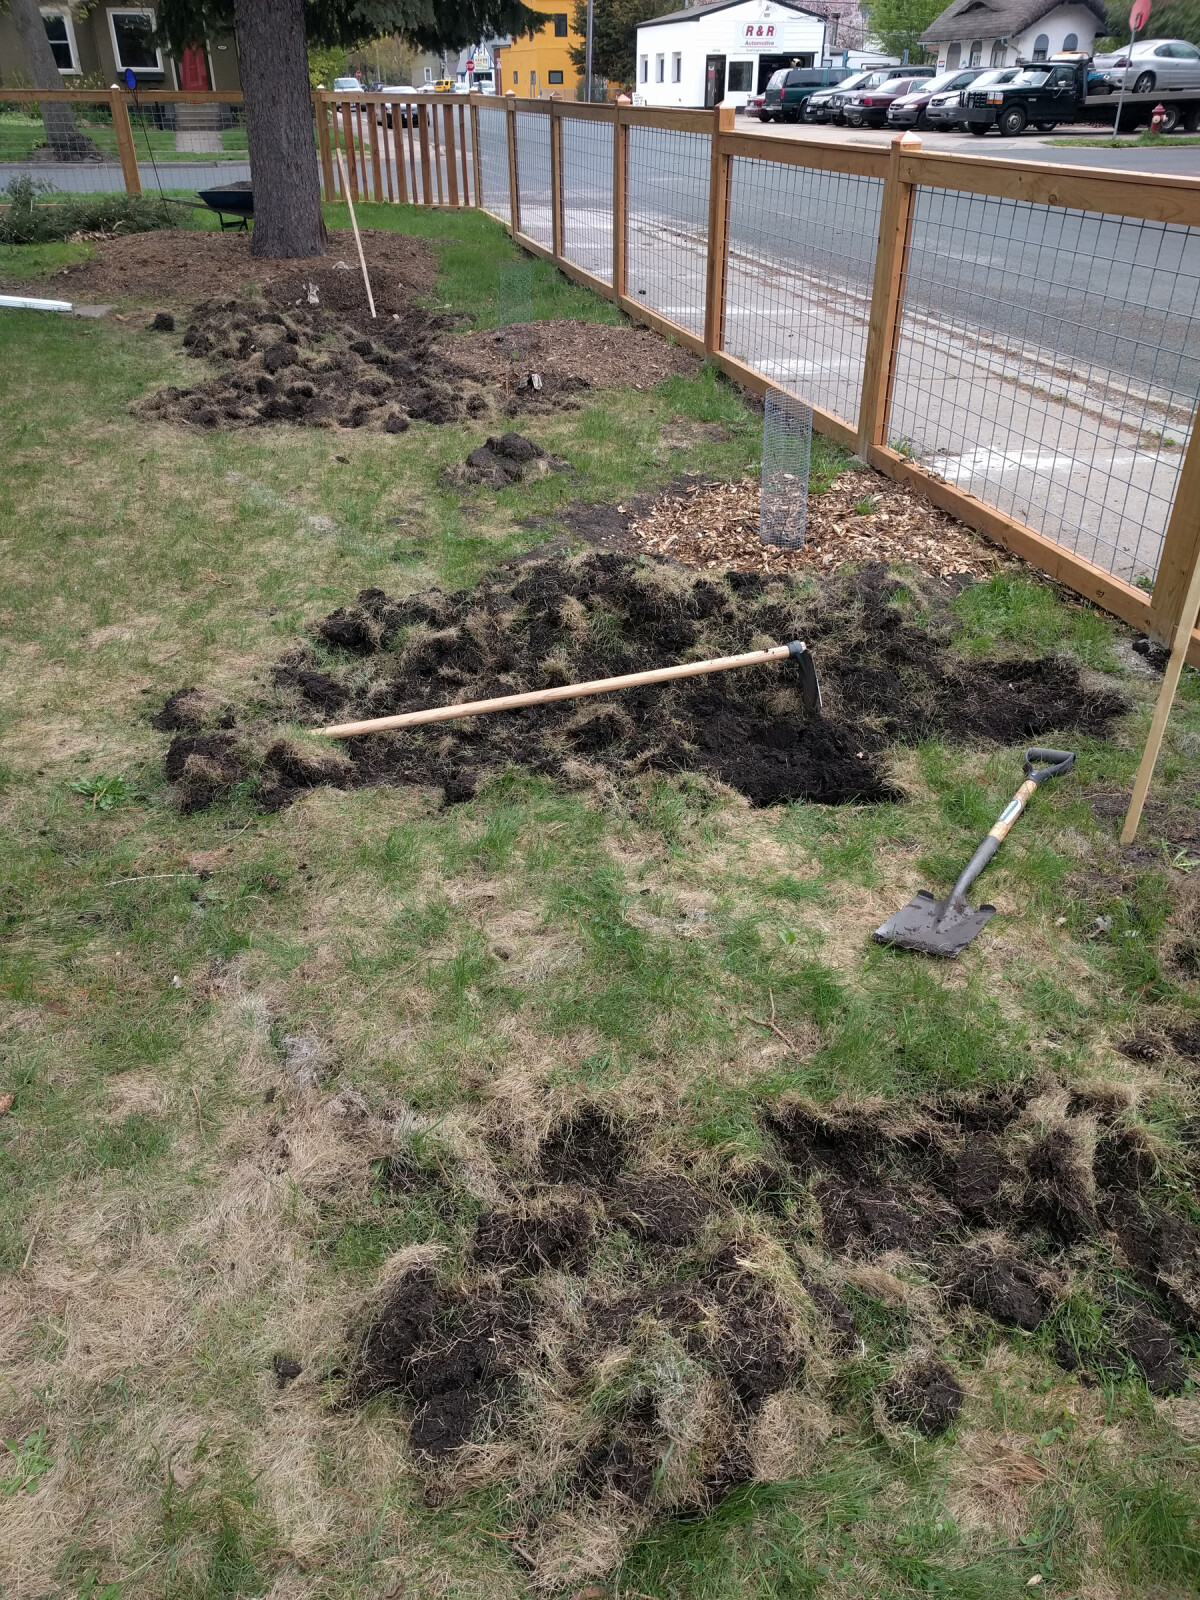
My parents and Katherine helped out for installation day. Residential-scale rain gardens are a project easily accomplished with simple hand tools. We removed the sod with shovels (I also used my grub hoe to make things move faster), then hand dug the basin to the desired depth.
-
The beginning of sod removal. A couple shrubs are already planted because they showed up in the mail early.
-
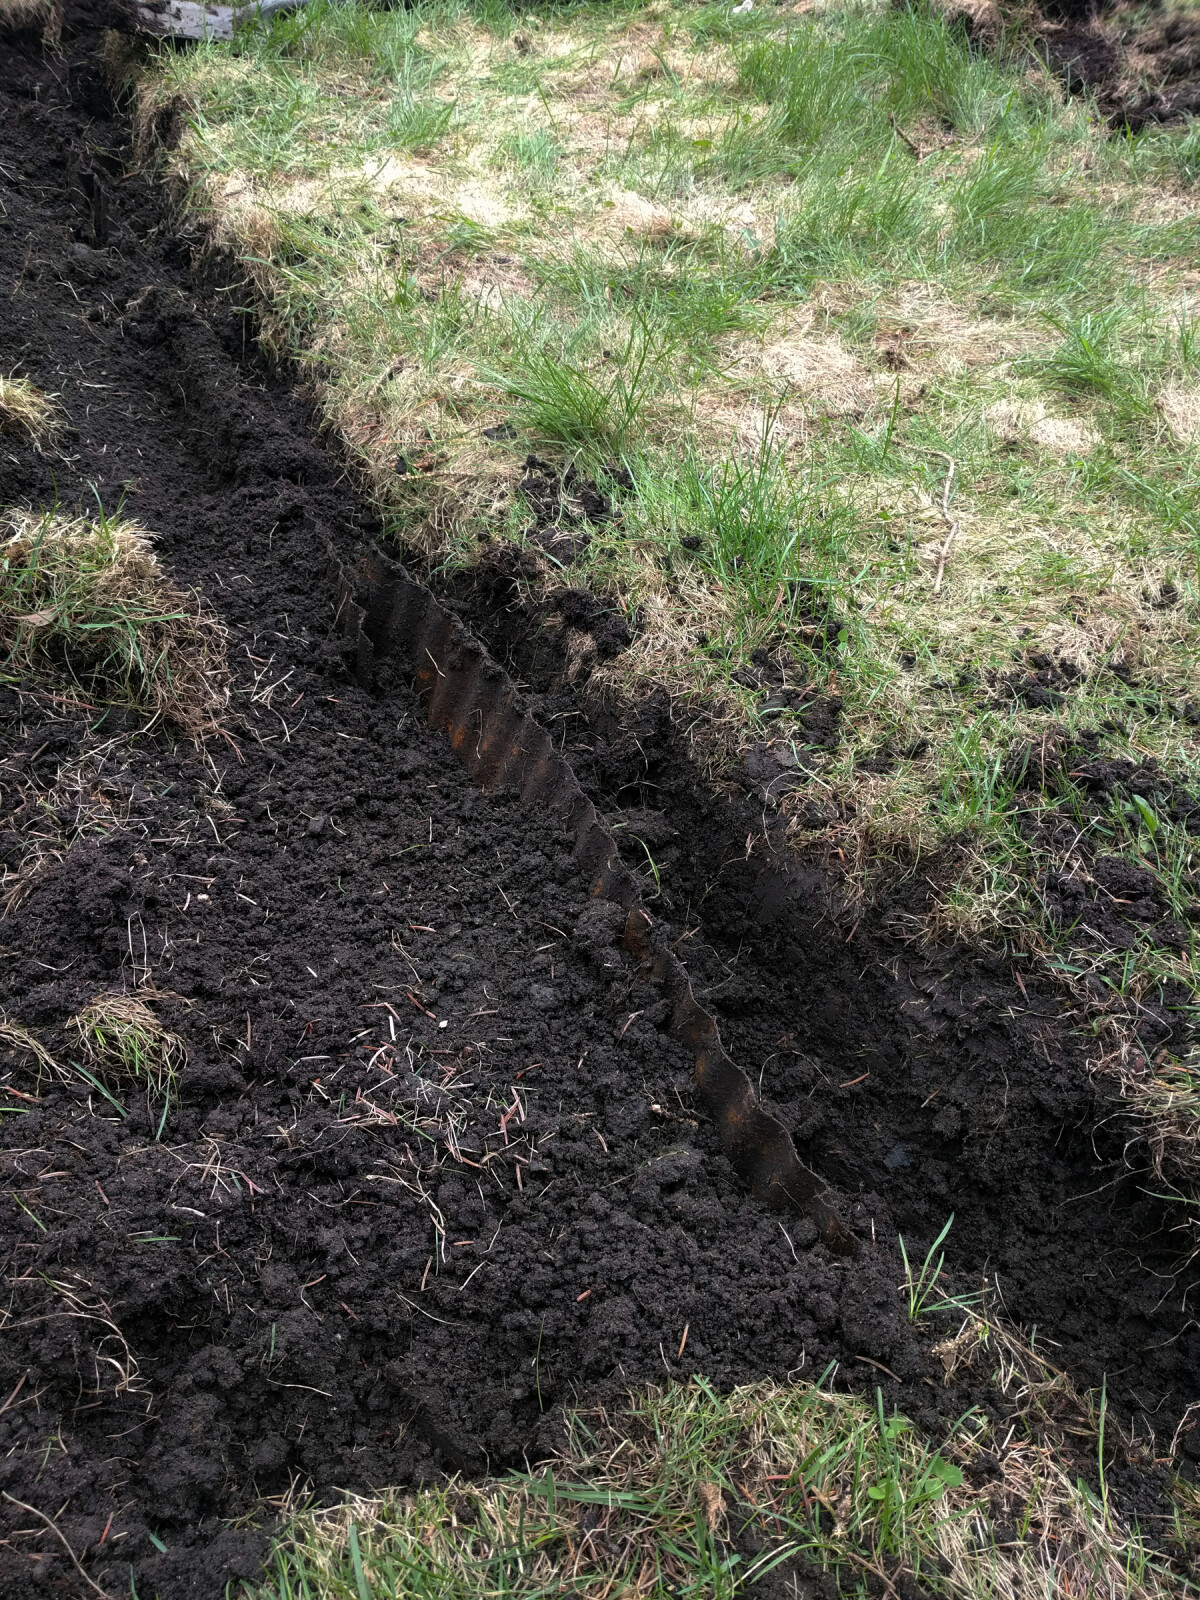
We found this old rusty edging buried several inches below the top of the soil. How long ago did someone have a garden here, and how did it get so buried?
I was aiming for about 3-4” below grade at the bottom of the basin. Stretching a string from one edge to the other let me measure down with a ruler to check our depth. Combined with a bubble level, this also allowed me to make sure the edges of the basin matched in height. I kept the outside edge a tiny bit lower so that if the basin overflows, the water will flow out with the grade rather than backing up towards the house.
Planting moved fast with all the helping hands. Using the paper plan, I set seedlings out where they were to be planted, and everyone else followed behind digging them in.
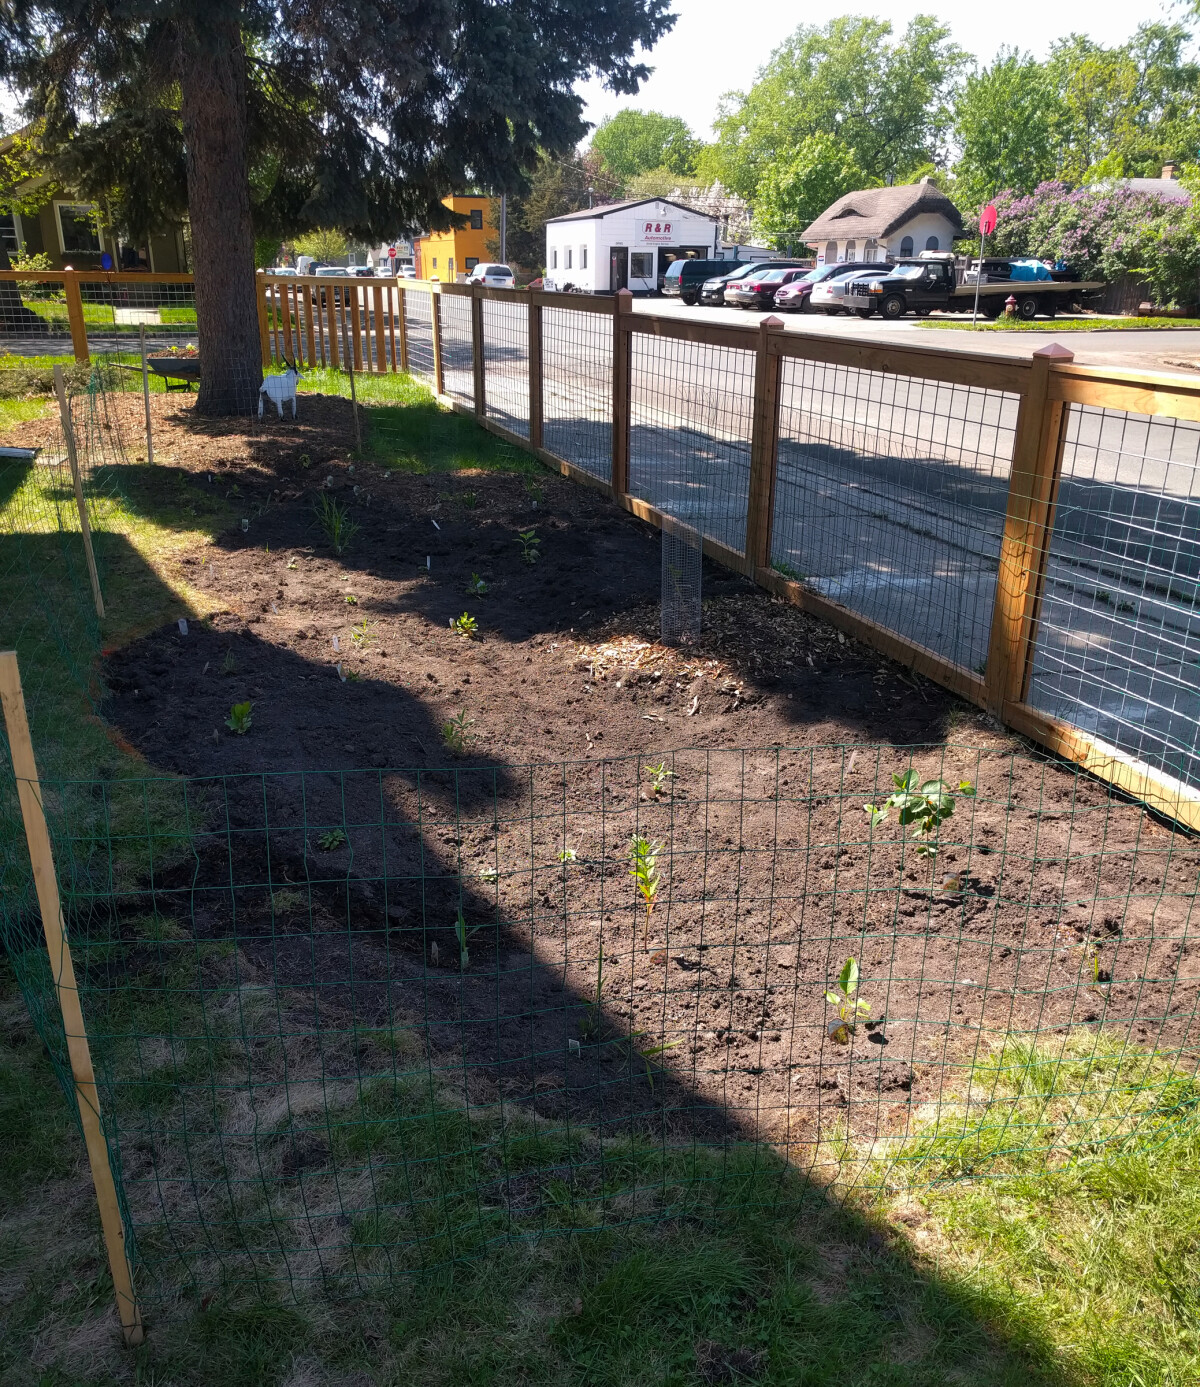
Basin dug and plants planted. The fence is temporary, to prevent the dog from trampling it.
I should have finished up by mulching around everything, but it had been a hectic spring and I hadn’t acquired mulch yet, so I just watered everything in and left it as bare dirt for the moment. It’s recommended to use double-shredded mulch, which mats together and resists floating up when the basin fills with water. I bought some mulch made from recycled lumber because I liked the sound of it, but honestly the shredding wasn’t very good and I would have been better off going with the standard weird dyed stuff.
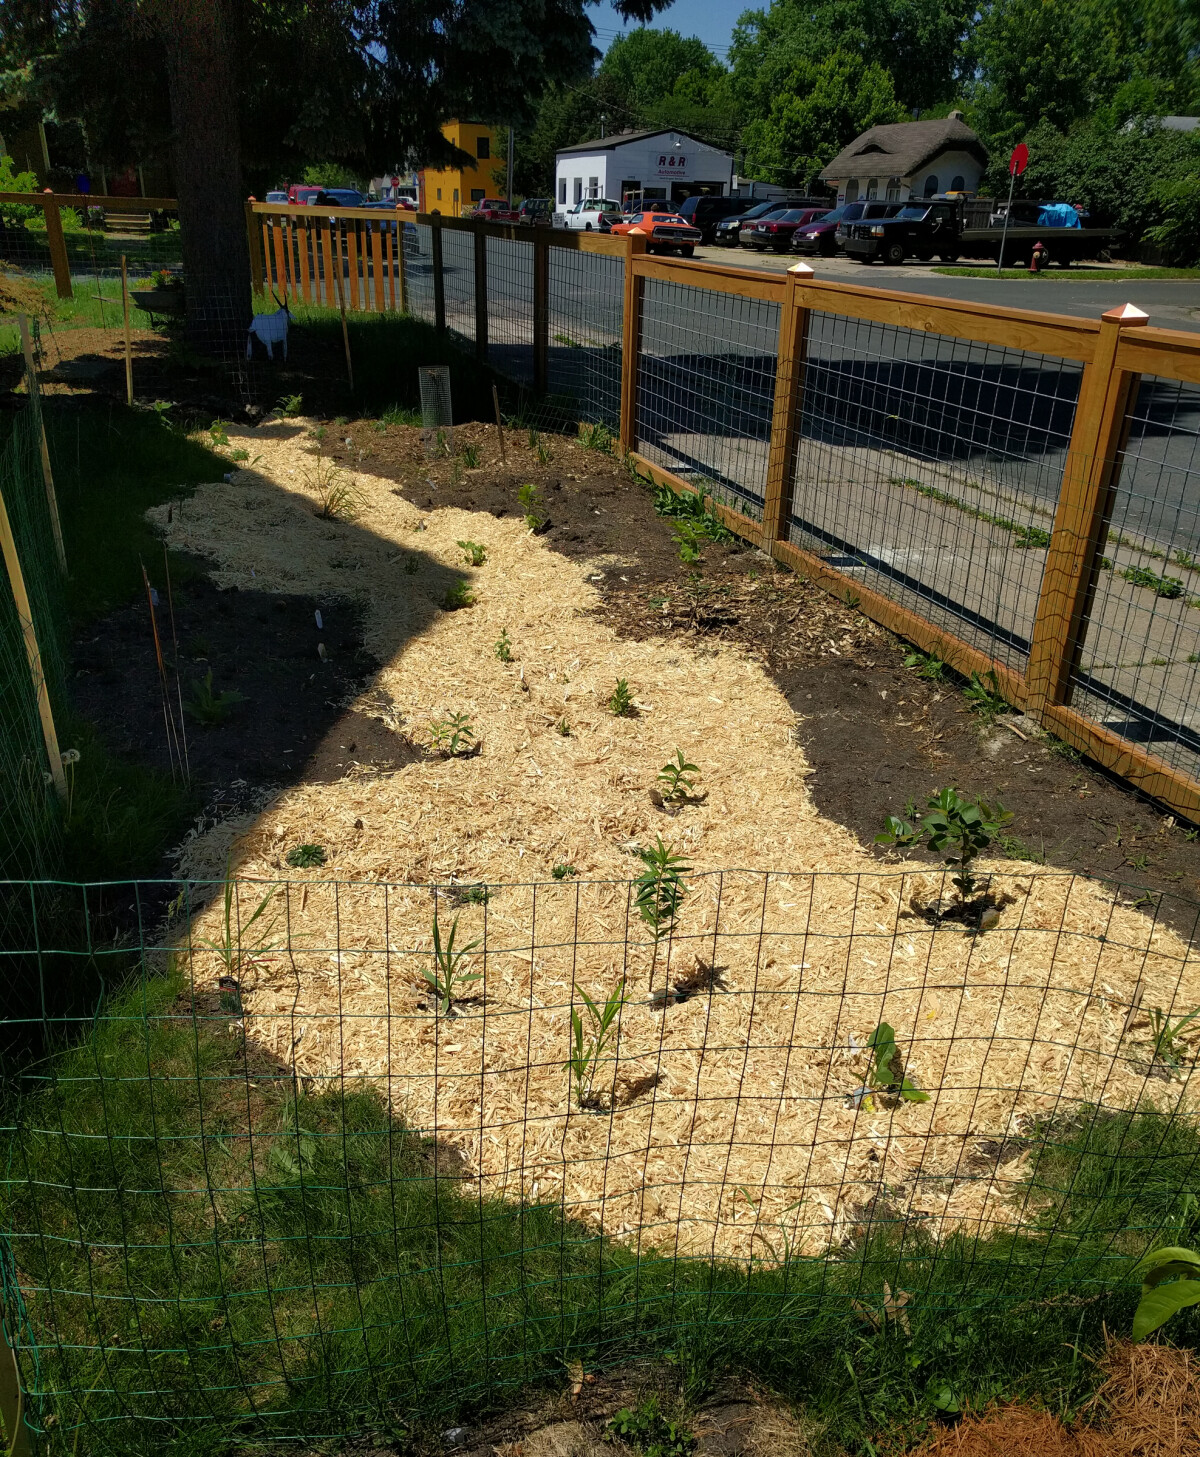
Basin mulched with shredded wood. I'd add regular arborist wood chips along the upper areas later.
It took me a week or so to acquire and put down the mulch, which unfortunately provided an opportunity for a bunch of weed seeds to germinate and cause me trouble throughout the year. A better plan: have the materials on hand and ready to distribute immediately after digging the garden.
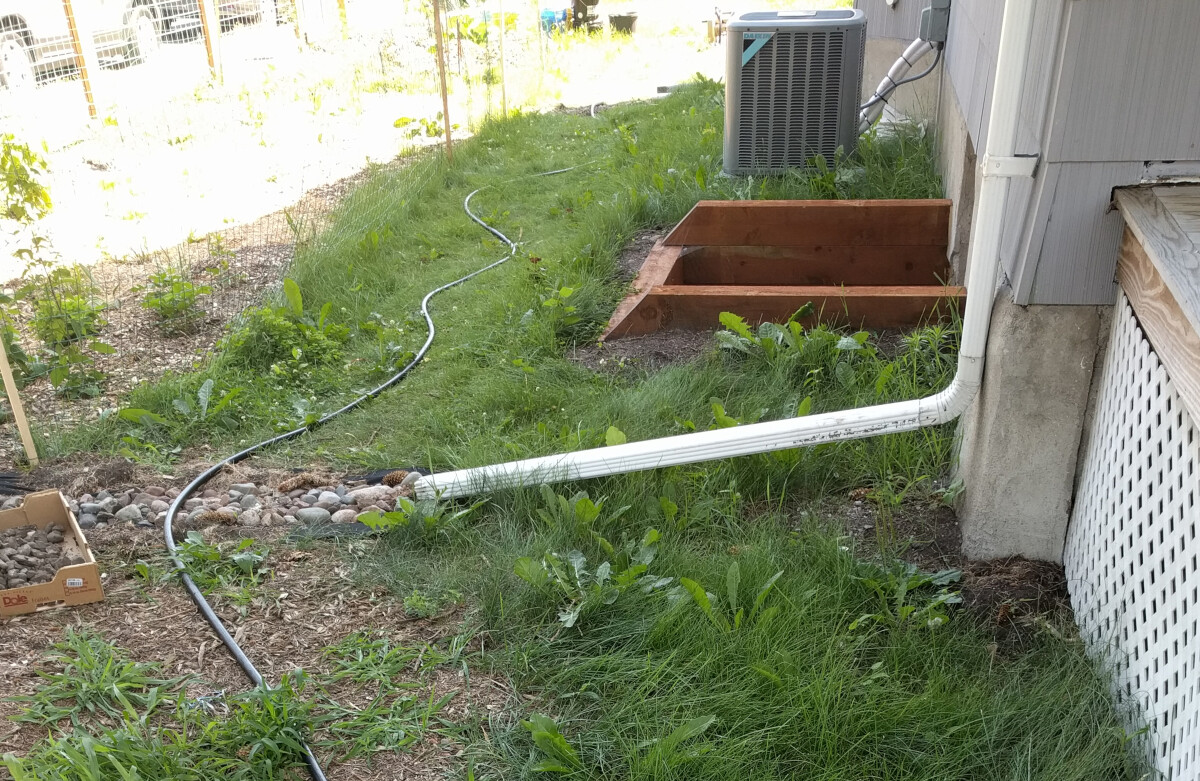
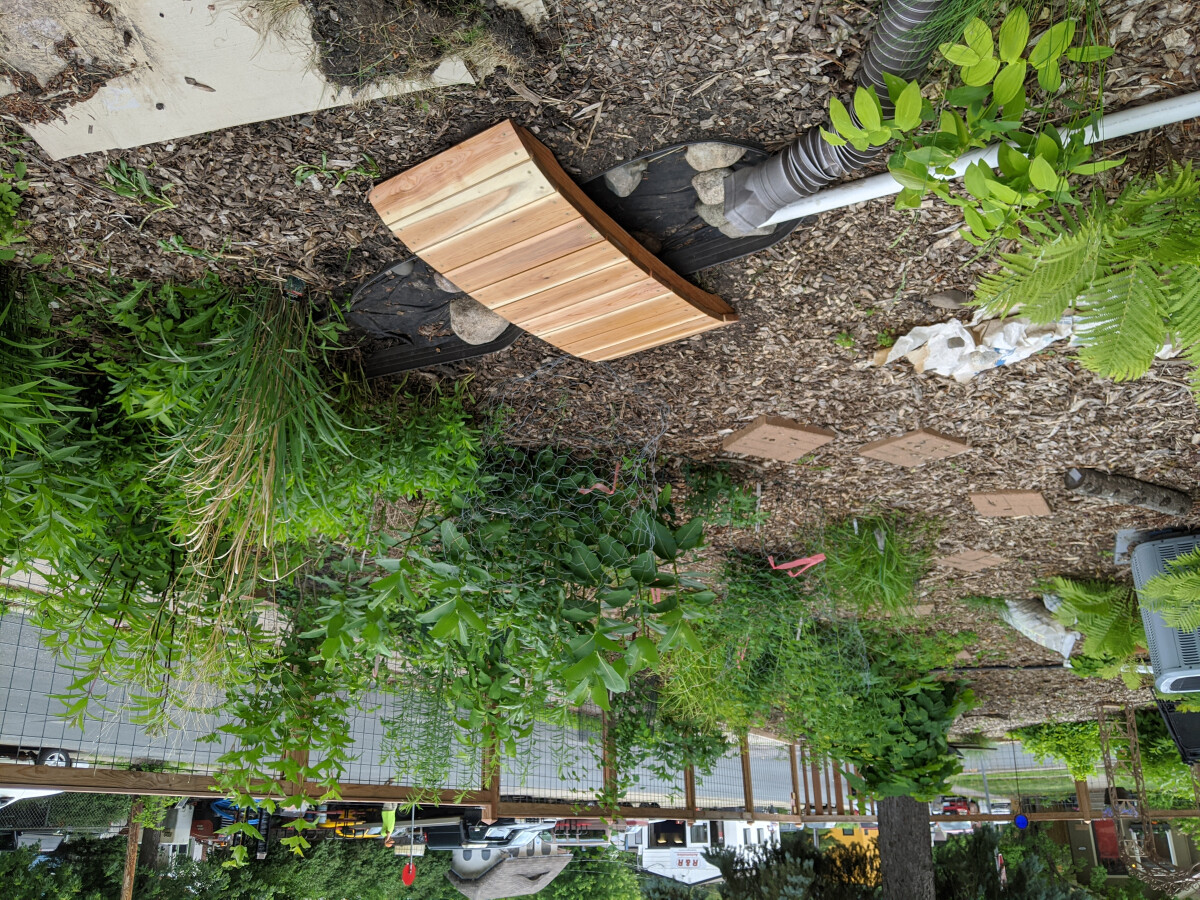
Downspout channels
I wanted to make sure that water from the downspouts was conveyed effectively to the basin of the rain garden, but I didn’t really want to add giant downspout extensions. I decided to dig a couple channels and line them with rocks in a sort of creek bed aesthetic. After sifting through all the dirt from the egress window and the dirt we had just removed from the rain garden itself, I had quite a good collection of fist-sized river rocks on hand. These worked perfectly and it was lovely to be able to turn a waste product into an asset. I saved myself the time and money of disposal and I didn’t need to buy imported rocks. Closed loop, baby!
Digging the channels mostly just involved making sure they maintained a steady downhill grade so there was nowhere that water would pool. I had some landscape fabric I had scavenged from somebody’s alley, and I decided to line the bottom of the channels with that, held down by landscaping staples. I figured this would discourage weed incursion and help keep the soil in place. Landscape fabric also significantly reduces water infiltration, which is a negative trait when used in plantings but was beneficial in channels where I’d prefer the water to run off anyways. I could have lined them with black plastic to completely prevent water infiltration, but I didn’t have any black plastic on hand, and am not very worried about a small amount of water soaking in, as long as most of it runs off.
I mounded a little soil along the edges to define the channel, filled them in with rocks, and we were in business.
I liked the appearance of these channels a lot and they worked well enough in the first year. However, a few design flaws became apparent that I wanted to improve upon.
First, I had topped off the large rocks with a bunch of smaller gravel-size rocks (also dug up from our yard). These kind of ruined the attractive look of the rock, and also seemed to encourage sediment buildup.
Second, I had tried to make the channels meander a bit instead of taking a straight path, for aesthetic reasons. Since they are only about six feet long, these curves ended up looking a little forced and one of the larger bends was causing water backups and erosion. Better to give it a straight path and let the edges gently undulate.
Third, I needed better separation on the edges. Having no physical barrier meant a lot of dirt and woodchips was being kicked into the channels, which would presumably eventually clog them up.
So in 2020 I pulled all the rocks out and re-dug the channels. This time I used aluminum landscape edging to define the edges. I don’t know why Home Depot doesn’t carry this stuff in stores. It’s great: easy to install, easy to bend to shape, stays put, looks nice, and should last for a long time. It’s a bit pricier than plastic edging, but for this small a job that wasn’t much of a concern.
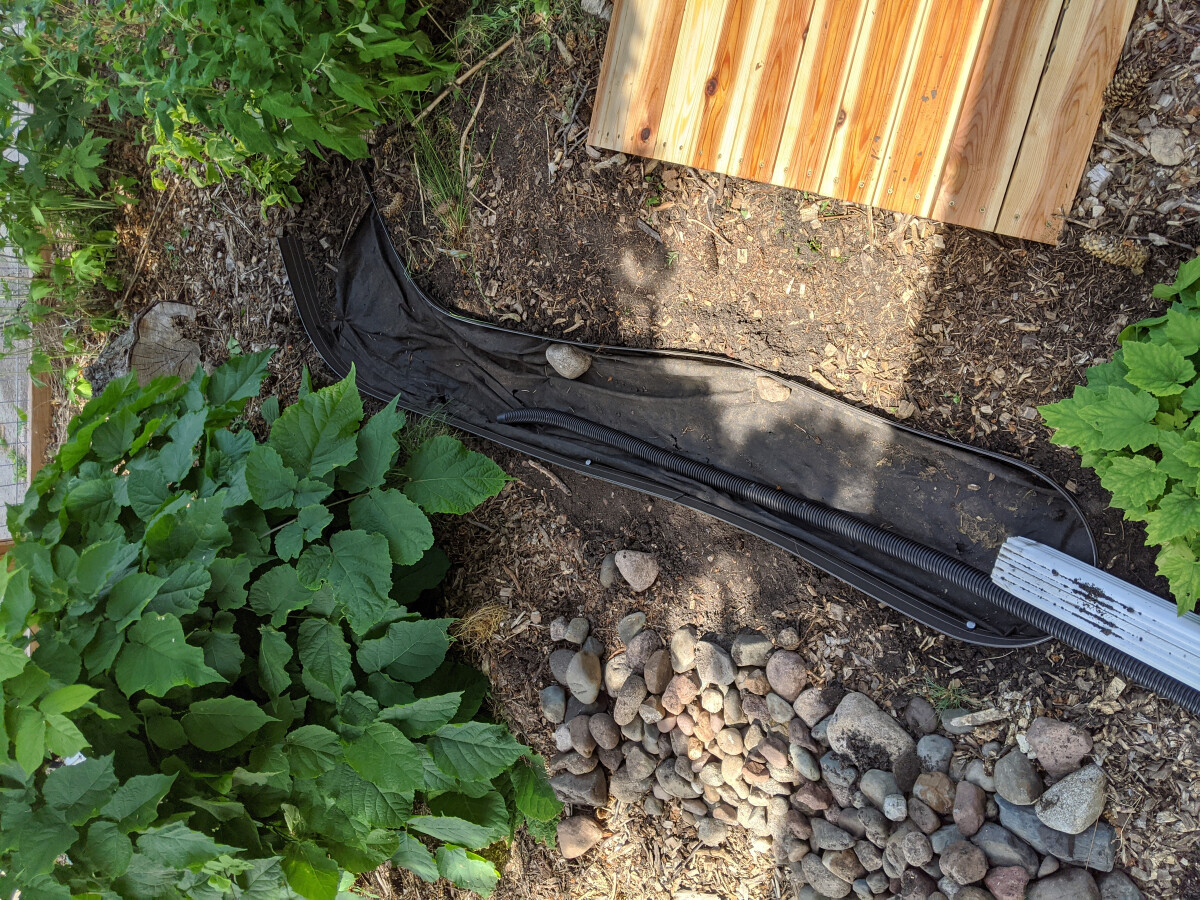
I put Katherine in charge of replacing the river rocks in an aesthetically pleasing configuration, and she took the job seriously. The final step was to build some lil’ bridges where the path crosses the channels, to protect the edging and cut down on contamination.
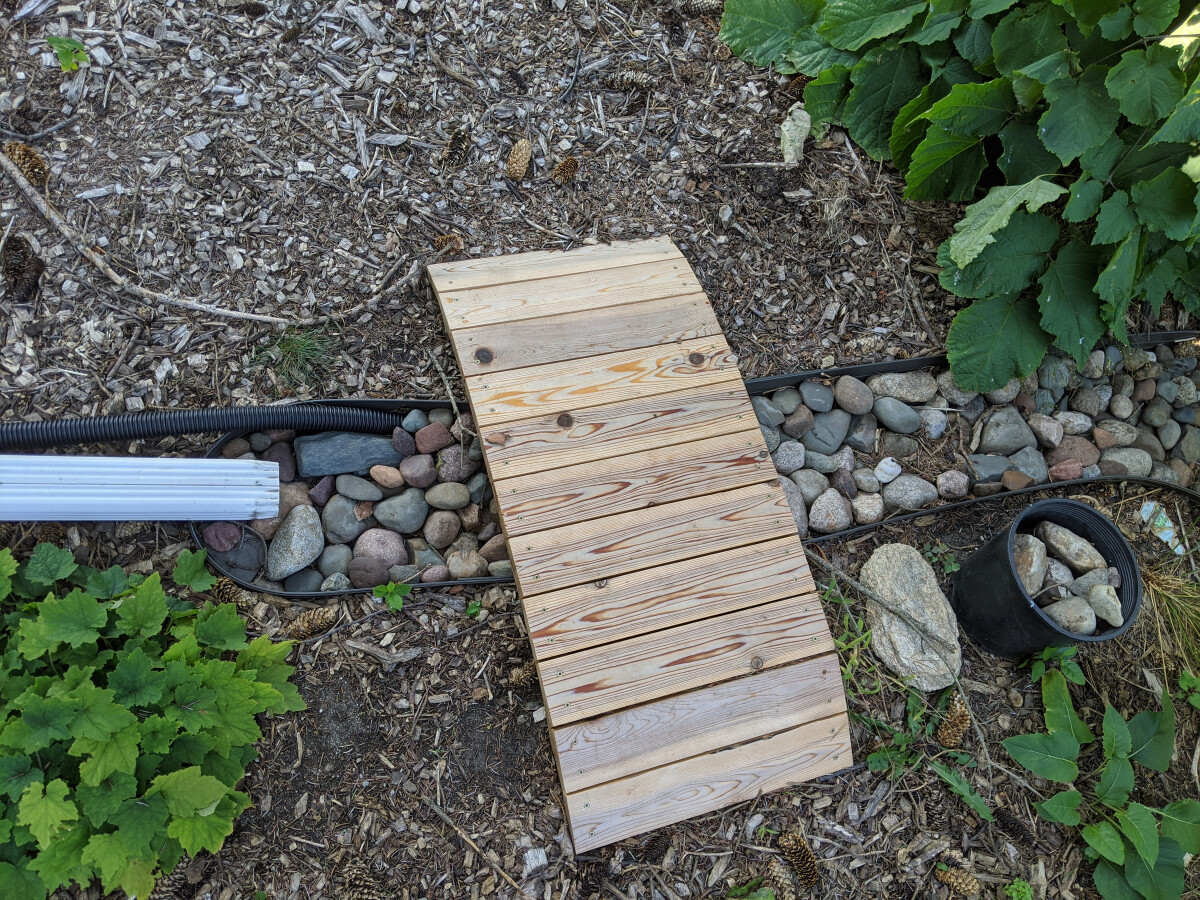
With these changes made, the channels have worked perfectly and look great. I love how they fit into the landscape, and the fact that all the rocks came from this land gives them a special extra connection to the site.
Revisions
The final plan I drew up on paper has stood up quite well to implementation. I made a few adjustments based on plant availability and moved a few things around slightly at planting time, but for the most part I was able to follow the design and it has turned out very nicely.
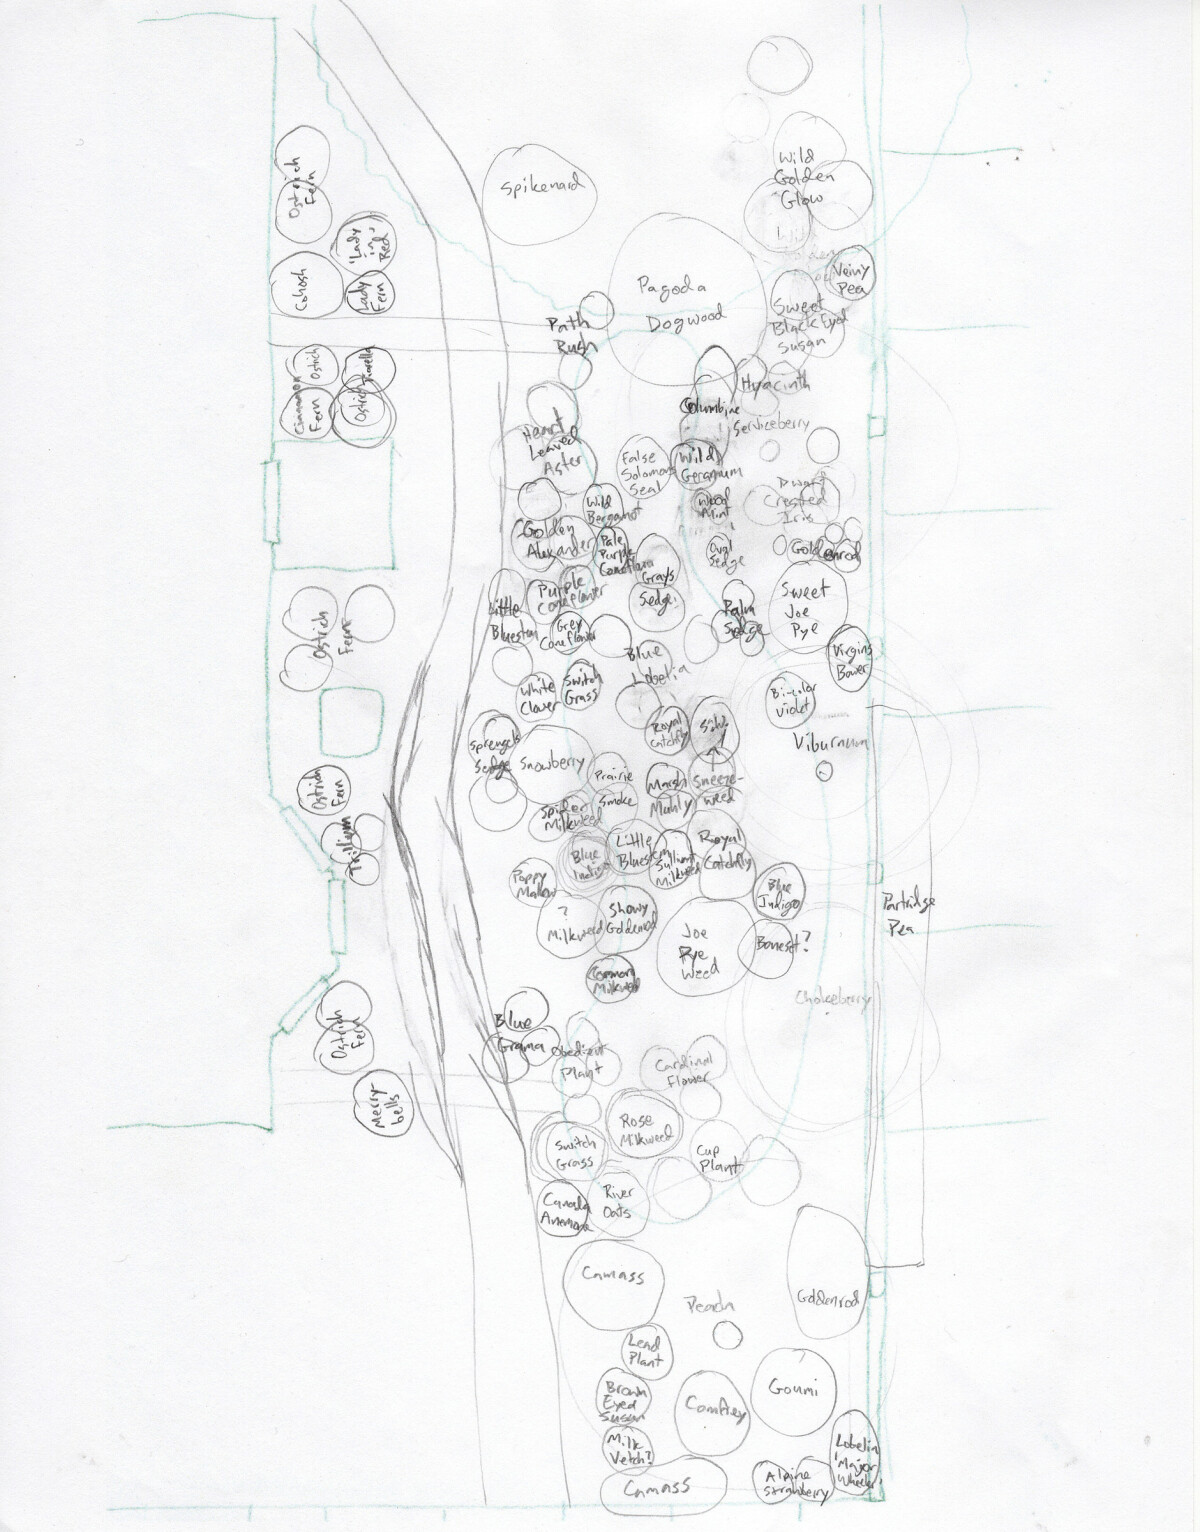
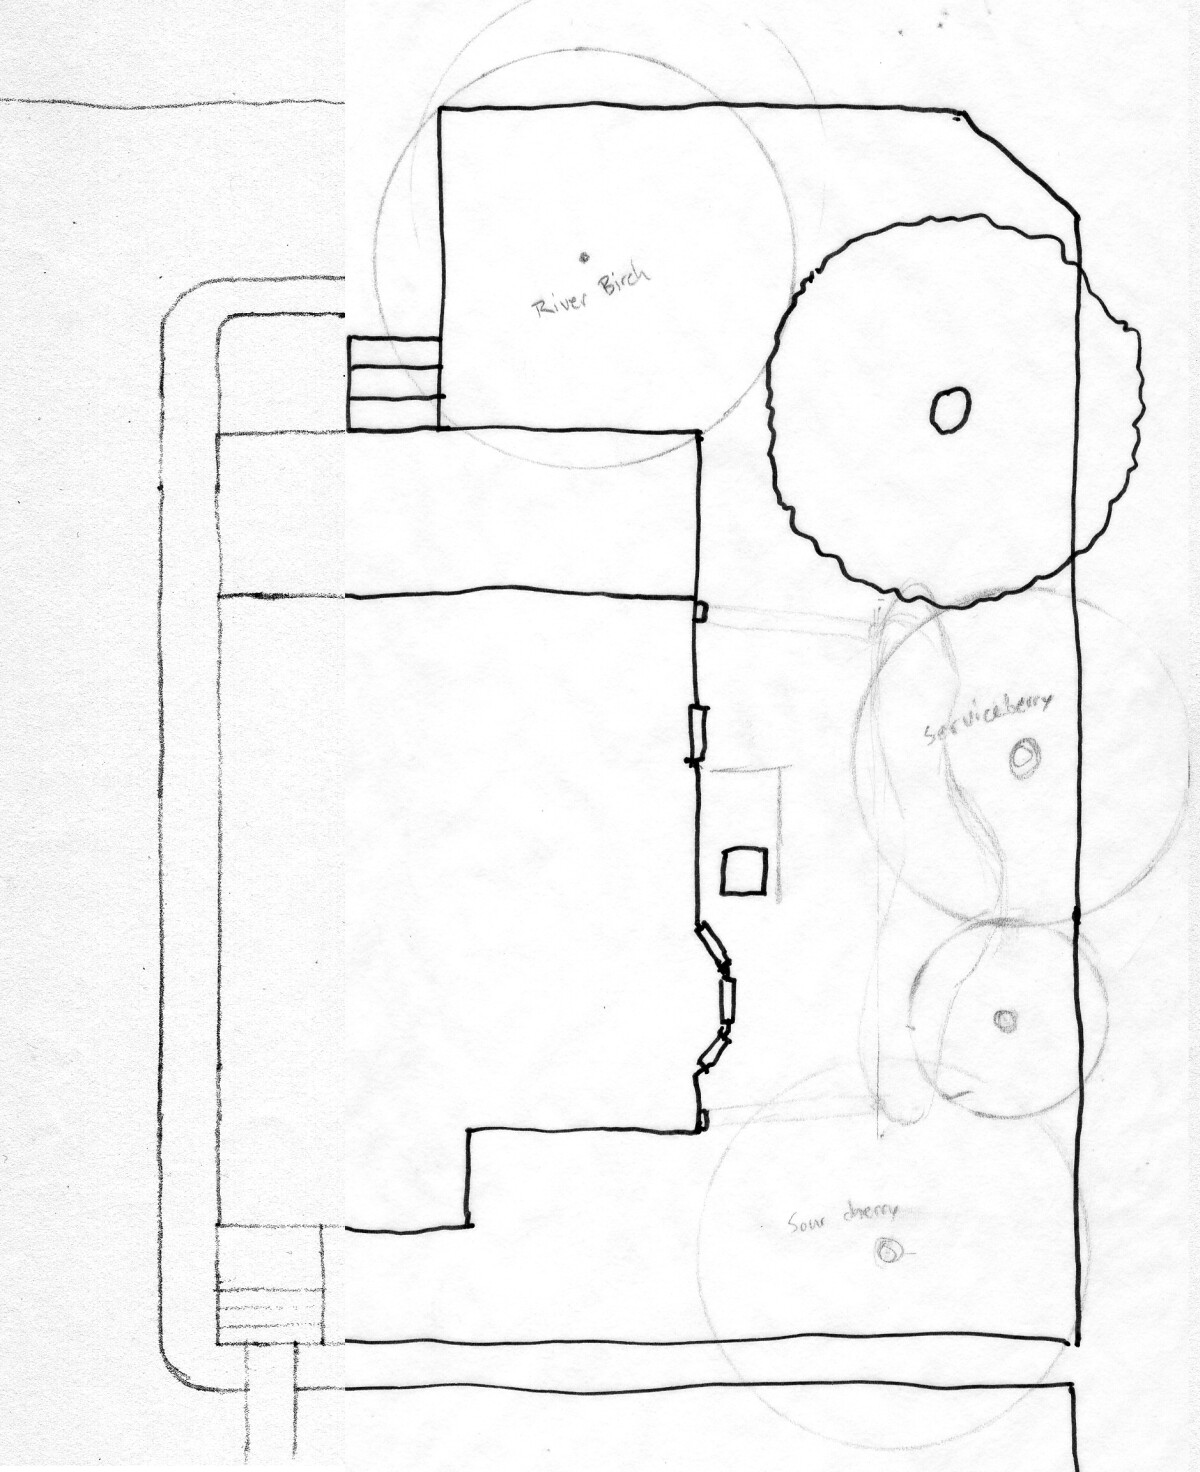
Map of the garden updated in 2020 with revisions and other changes.
Almost all of the plants have succeeded. The Rattlesnake Master and a couple of the unusual milkweeds didn’t do well and seem to be gone now. The Blazing Star suffered because it didn’t come with a tag to stick in the soil and I foolishly didn’t add anything at planting, so I lost track of where it was planted. Blazing Star leaves look pretty similar to grass, so I think I may have pulled it out during a weeding session without anything to warn me off.
I’ve only needed to change a couple plants that haven’t worked in their original spots. The Wild Golden Glow was altogether too happy with its spot in full sun with lots of moisture and grew to about 9 feet before flopping over and causing trouble for the plants around it.
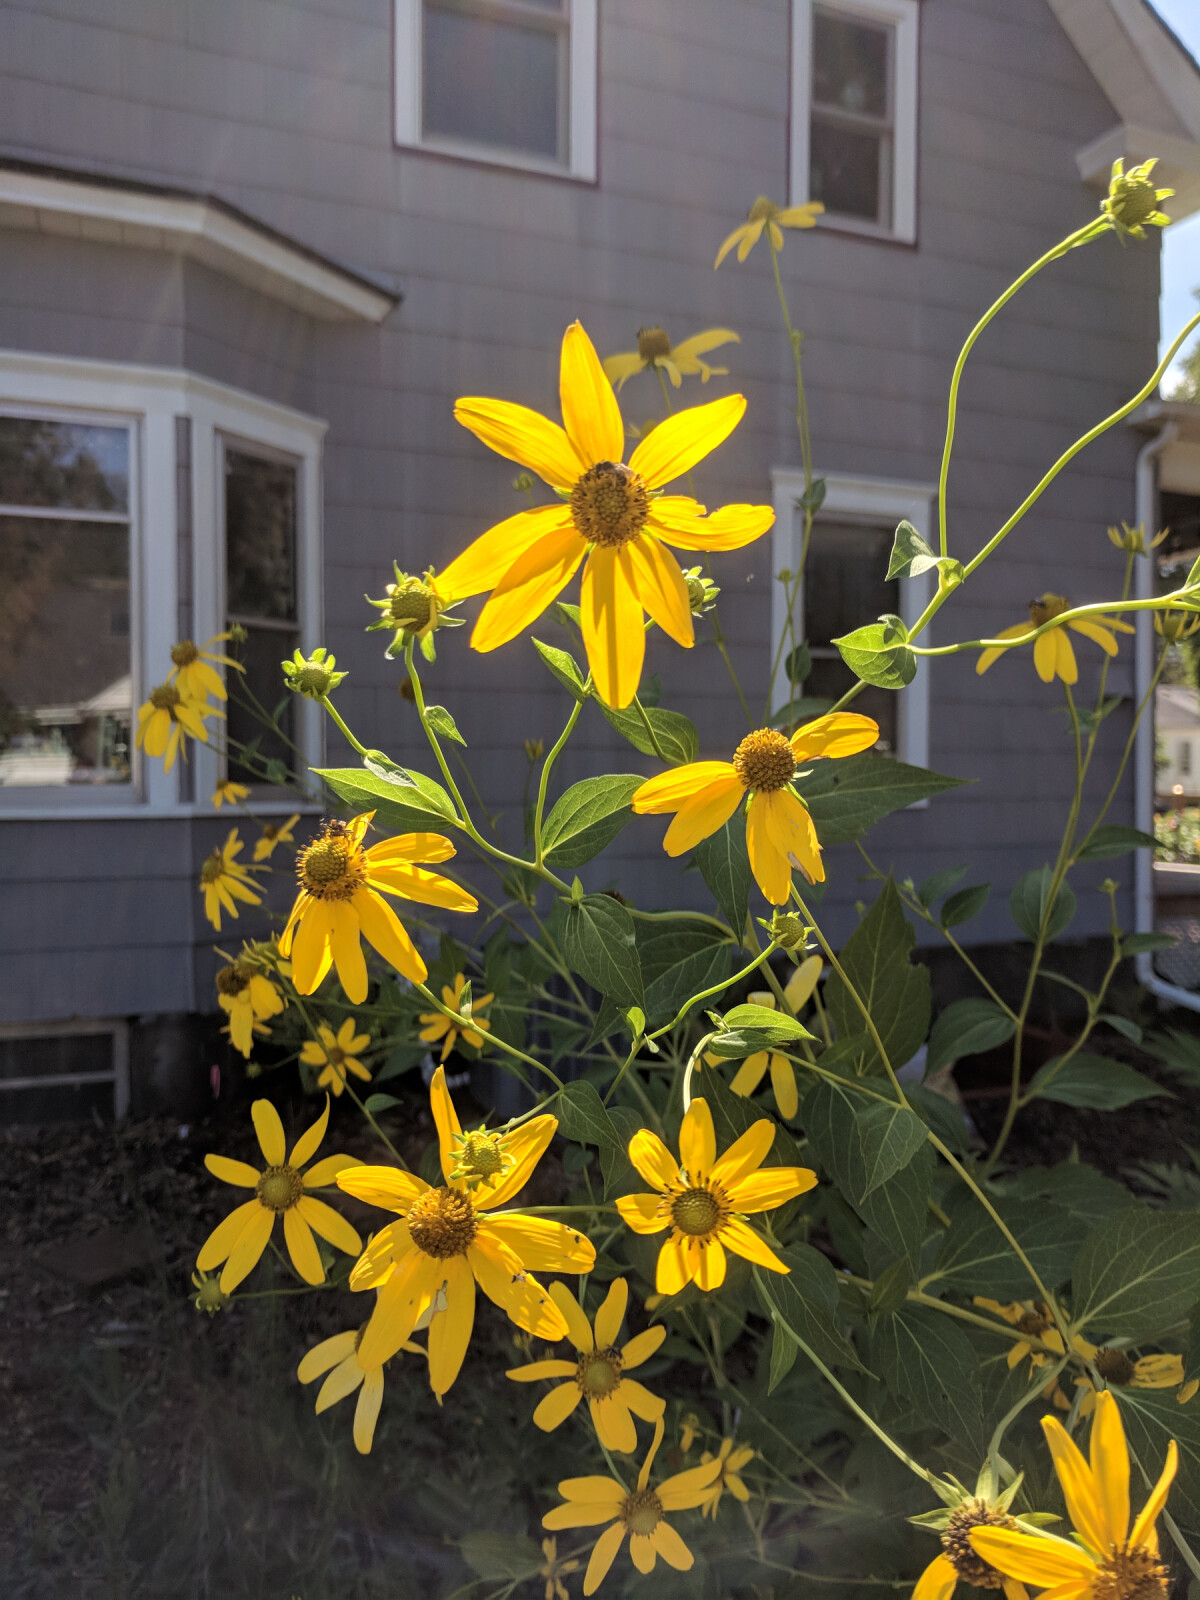
Wild Golden Glow, making a scene before I moved it.
I relocated it to a shadier corner by the spruce tree and it seems to be growing much more reasonably now. I replaced it with Sneezeweed, which may also prove to be a mistake if it turns out like it did for Hauslermo. This year I plan to relocate the Royal Catchfly, which seems a little too small and dainty to hold its own with the burly prairie plants around it. I plan to replace it with New England Aster and another try at Blazing Star, marked properly this time.
In retrospect, I could have planted with tighter spacing. I drew up the plans using recommended spacings from Prairie Moon, but I could have tucked everything a little bit closer if I wanted a garden that felt “full” a few years earlier. That said, this would have required more plants and thus increased costs, so I’m not sure I would have done so anyways. In subsequent years I’ve been tucking more plants into available spaces as I discover additional species that pique my interest or have success starting less-common plants from seed.
After observing the garden’s performance in major rain events over the first two years, I realized some parts of the basin needed to be deeper. The wide portion of the basin had originally been dug deeper than the narrow portion, which caused water to flow to the deepest part instead of being distributed evenly. I carefully dug around the existing plants to bring the other parts of the basin to an equal depth—definitely more of a nuisance than doing it prior to planting, but it worked. The basin can now hold significantly more total water, and more plants get access to the moisture.
The other mistake I made was one that I ought to have been wise enough to avoid, given how much time permaculture spends on the concept of succession. When planning the spacing and light tolerance for plants around the trees and shrubs, I plotted the mature size of the plants. But the baby woody plants will take 5+ years to reach that size, and I should have thought through the sunnier and more open conditions that will exist until they do. Luckily, most of the plants I picked out for shade in those areas (Dwarf Trout Lily, Sweet Joe Pye) seem to be handling the extra sun gracefully. I’ve filled in some of the extra space with some easy sun-loving plants like Goldenrod that will be gradually phased out as they become shaded. A garden changes over time, and a good plan should take that into consideration.
Performance
Not much happens in the first year of a native wildflower garden. Not only do most plants not flower in their first year, but many of them seem to just sit there without even putting on much foliage. Be patient, they’re working on a good root system and will get moving once they’re ready.
I watered carefully for the first month or so, but we had pretty good rain that summer so after that I mostly just left them alone and only watered after prolonged dry spells. I spent a considerable amount of time weeding that summer (I don’t have a good estimate of how much exactly). Part of this was my own doing: I had left the area unmulched for too long after planting and then didn’t get it mulched super thick after that. This gave weeds (particularly some nuisance grasses) a bit of a foothold and caused me to spend the summer beating them back. I think I likely would have needed to invest some time in weeding regardless, but I probably could have reduced it by quite a lot by nailing the installation a bit more.
Year two was much more encouraging. The plants put out much more vigorous growth, and most of them flowered. It was clearly not completely established yet, but I could start to envision what it will look like at maturity. It was beautiful throughout the growing season and attracted lots of insects.
-
The rain garden in 2019 (year two).
-
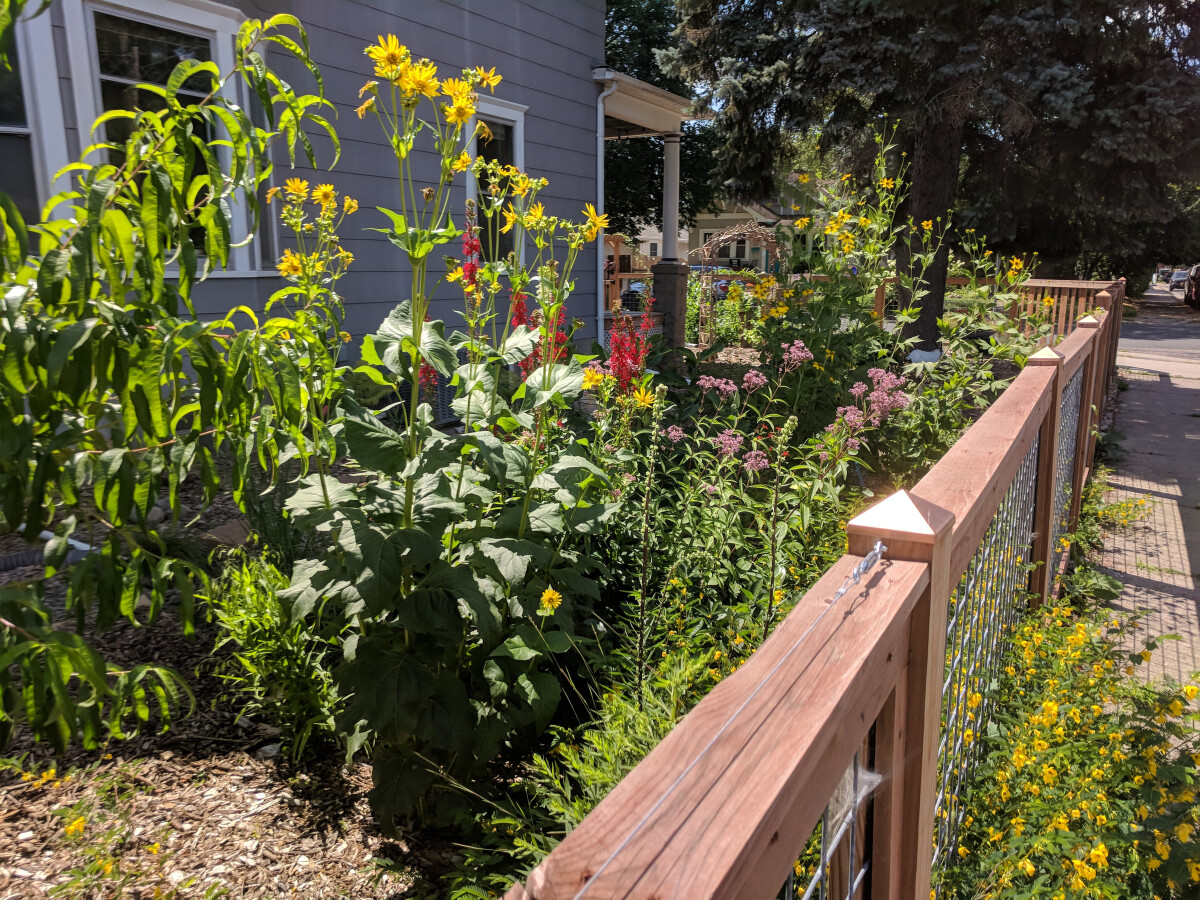
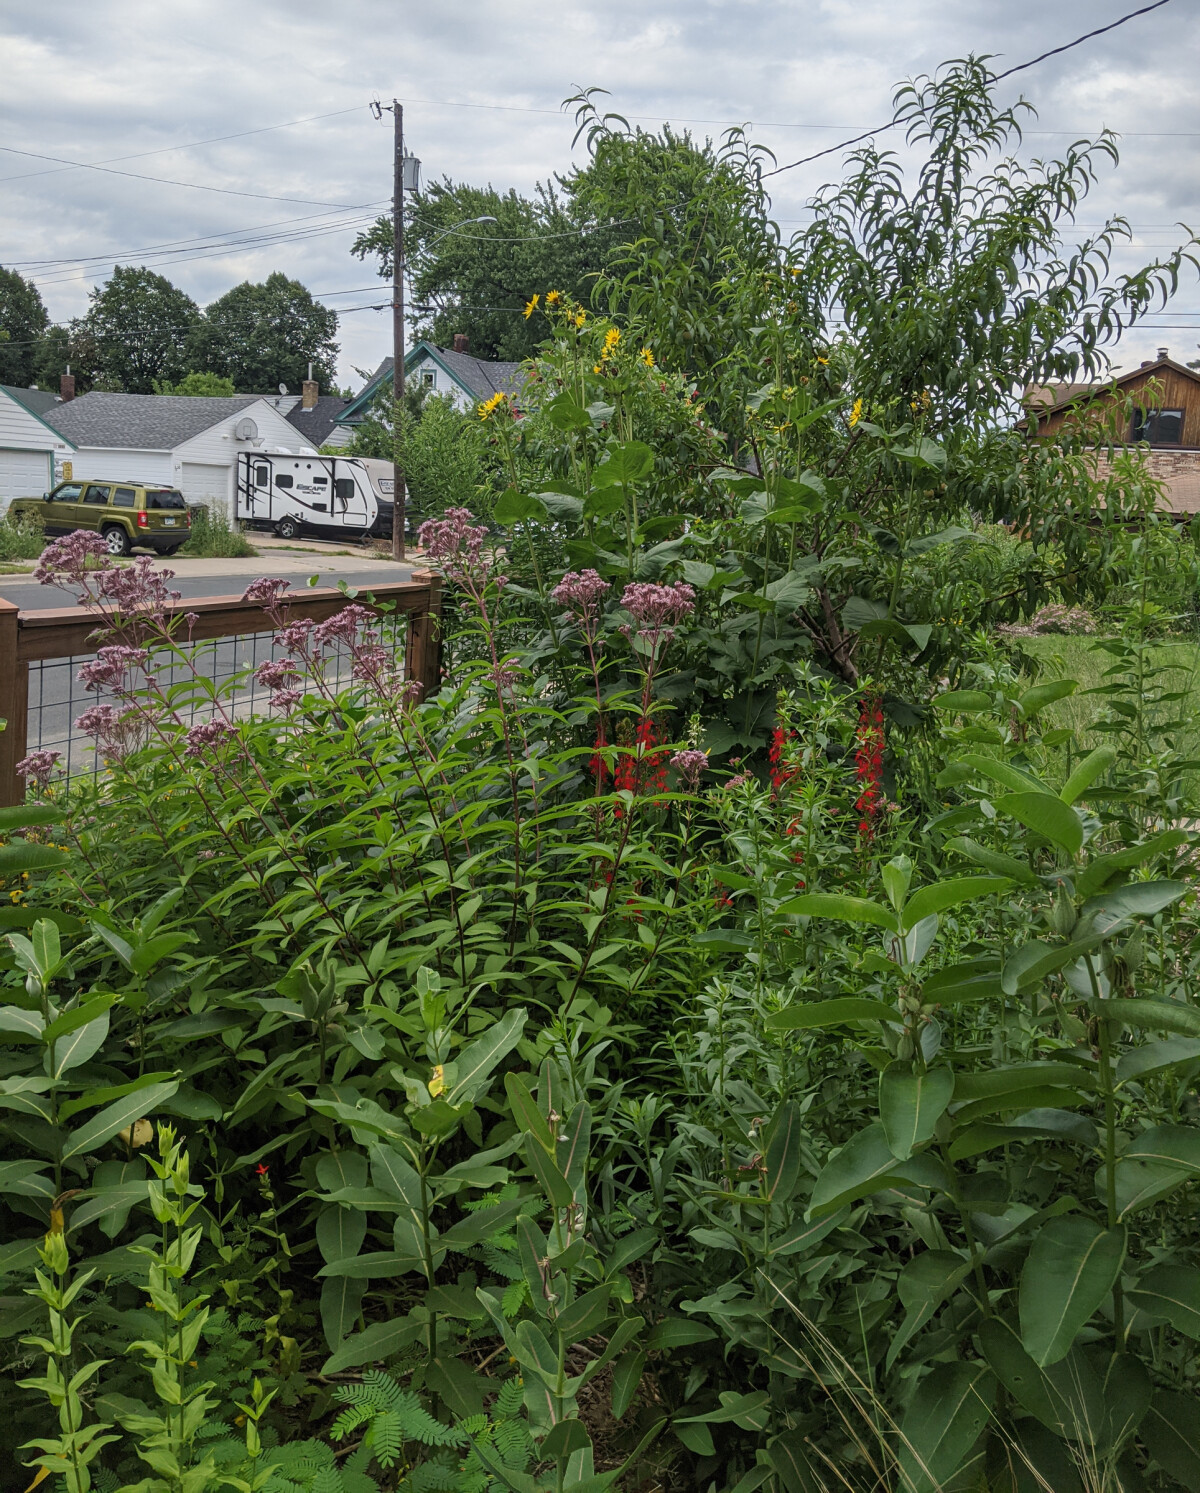
Good late summer blooms from from Cup Plant, Cardinal Flower, and Joe Pye Weed.
-
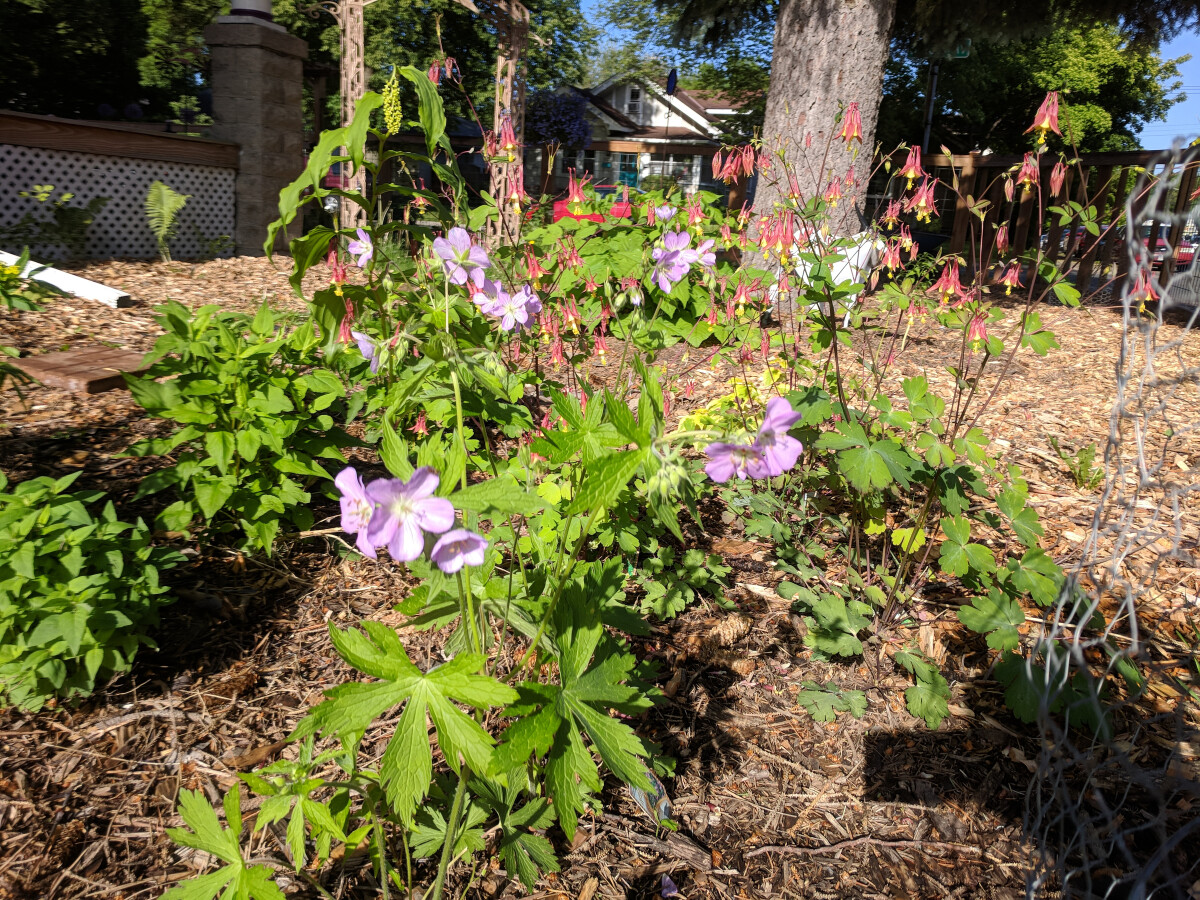
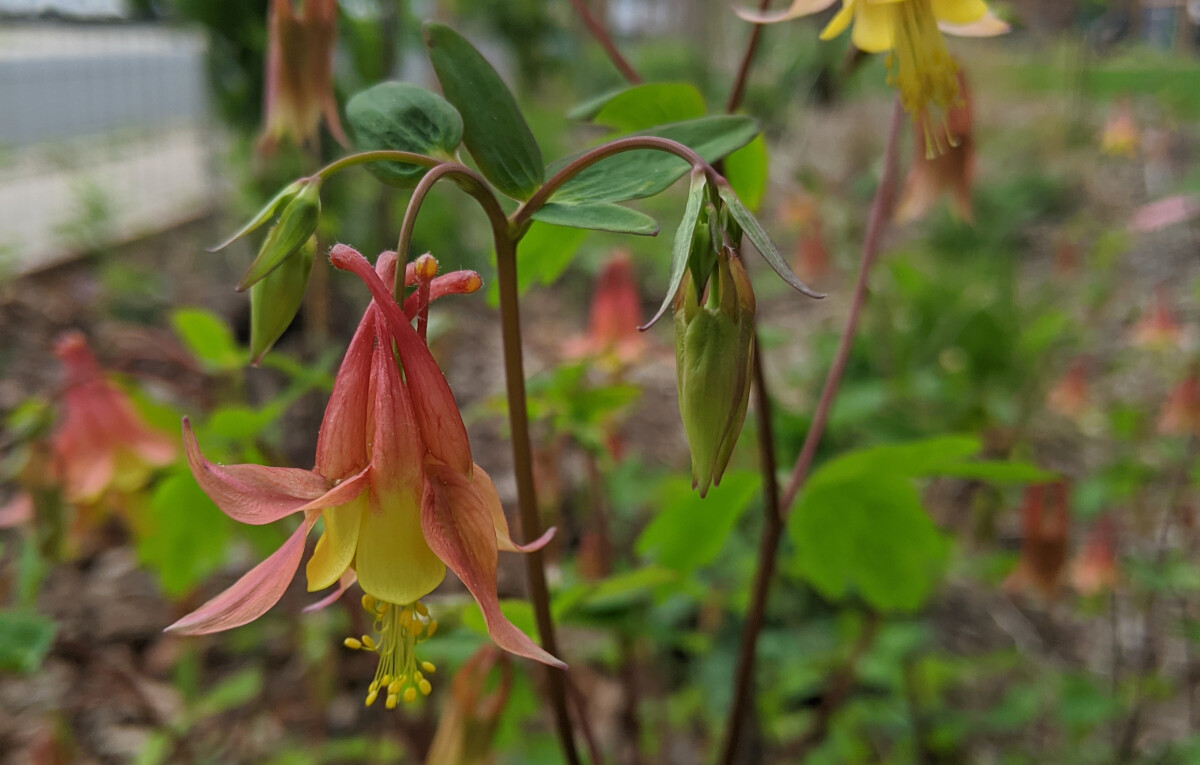
We also had nice spring blooms in 2019 from Wild Geranium and Columbine.
We had a fairly wet summer, so I don’t think I did any supplemental watering other than for some new transplants I added. Even if the summer had been drier, I would have done a pretty minimal amount. The plants had good root systems by now, a layer of mulch to keep moisture in the soil, and plenty of rain water coming from the downspouts. I also did very little weeding in the second year, probably in the area of 10 total hours. This was a nice change from the more involved work of year one, I think thanks to a combination of my thorough job from the previous year and the native plants starting to outcompete weeds more successfully.
Year three felt like the garden had fully arrived. The woody plants still have a lot of growing left to do, but most of the forbs are at a mature size. Some of the more aggressive spreaders (like Common Milkweed and Obedient Plant) have already expanded considerably, while many of the others will spread more slowly over time. So far, almost everything is cohabiting happily. Time will tell if some of the aggressive plants will start to swamp the others and need to be curtailed, or if everything will find an equilibrium (obviously I’m hoping for the latter).
-
The garden in early summer of 2020 (year three).
-
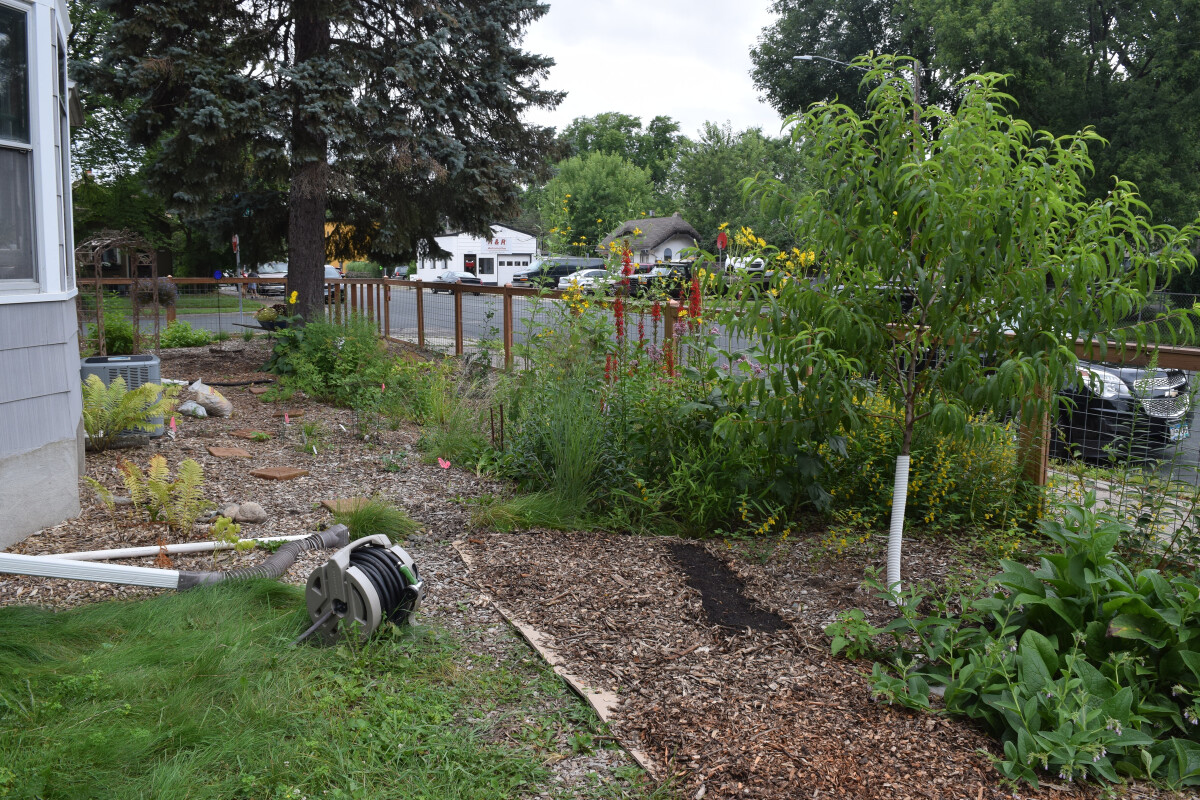
By mid-summer 2020, it's lush and full.
-
View from the street. Eventually the shrubs will add some more height in the middle.
I didn’t add any supplemental water to the established plants in the third year, and barring some freak climactic event, I don’t plan to in any subsequent years. I also spent almost no time weeding: one short session in spring and one in fall, and other than that just a few minutes pulling weeds here and there when I was already poking around the garden doing other things. I don’t think I spent more than 5 hours total weeding the rain garden in 2020, and as far as I know it ended the year with almost no weeds growing. This is very exciting! A low maintenance burden was one of my goals for this area and it is exceeding expectations. I probably spent another 1-2 hours on needed maintenance—mostly cutting back dead plant stems—and another hour doing the needed relocation of Wild Golden Glow. Beyond that, the rest of the time that went into the rain garden was purely optional stuff like adding some new plants or just poking around watching the pollinators at work.
We haven’t had too many pest problems. The Cup Plants have had a few infestations of red aphids (apparently a fairly common thing), but they don’t seem to be an actual problem so I’ve left them alone and assumed nature will sort it out eventually. The rabbits leave most of the native plants alone. They heavily browsed one particular bunch of Switchgrass while leaving all the other grasses alone, and it seems like they might occasionally nibble on certain baby plants. Someone (I blame the squirrels) digs up Prairie Clover every time I try to plant it (does it have good-smelling roots or something?). As I add transplants at a slower pace I sometimes protect them with chicken wire cages to improve my odds, but everything that went in the first year was not protected and largely did fine. The biggest problem the rabbits have caused in the rain garden is with the woody plants, which they will eat in winter when other food is scarce. They chewed up both the Pagoda Dogwood and the Chokeberry pretty badly in the first winter, and I’m sure they would have attacked the Serviceberry as well if I had given them the chance. At this point, I put up fencing around all of the woodies for winter, and will continue to do so until they’re big enough to not get targeted.
The rain garden is also excelling at its titular job of capturing runoff. It’s getting runoff from 3/4 of the roof, plus the sump pump outlet, and while the basin is a little smaller than the size recommended to capture 100% of runoff, it’s been handling it like a champ. The basin has filled up a few times during major rain events. To my knowledge, it has only overflowed once, and it did so away from the house, as planned. Usually it drains within a few hours, with the maximum time so far being somewhere over half a day.
-
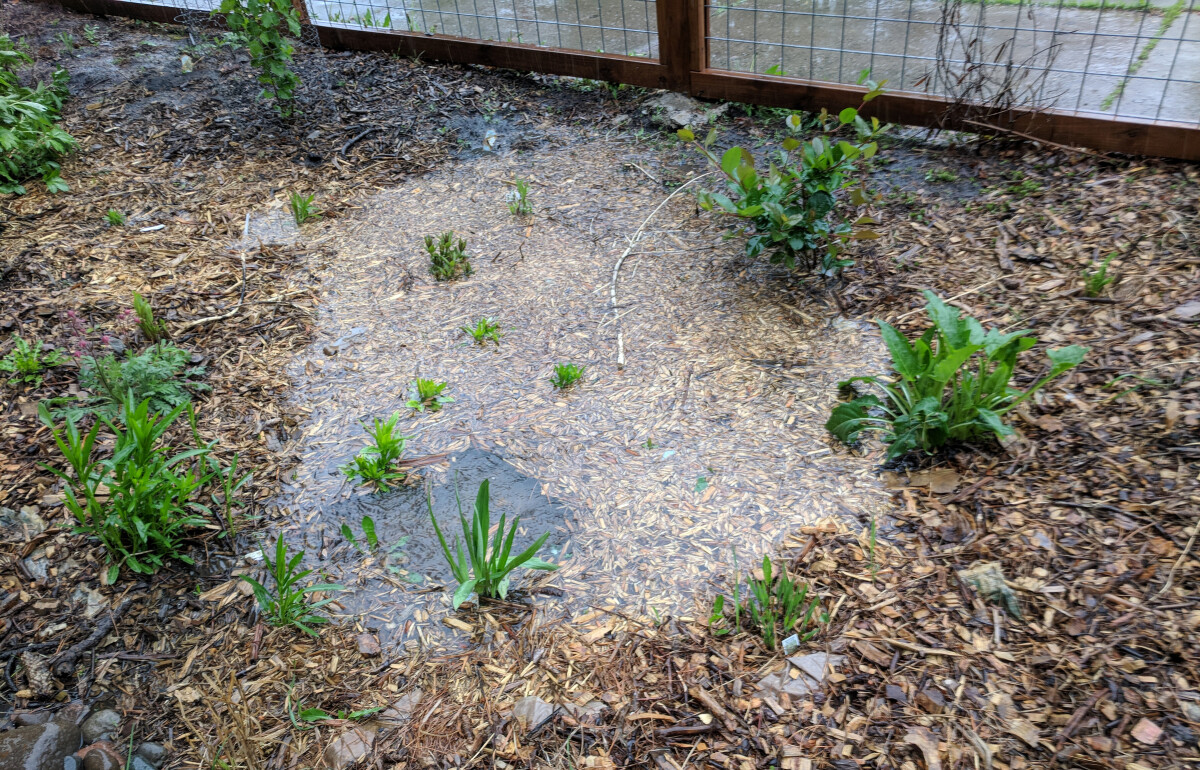
The basin filling up during a rain storm. You can see that the water is a little too concentrated in the deepest part, as this was before I re-dug the other parts.
-
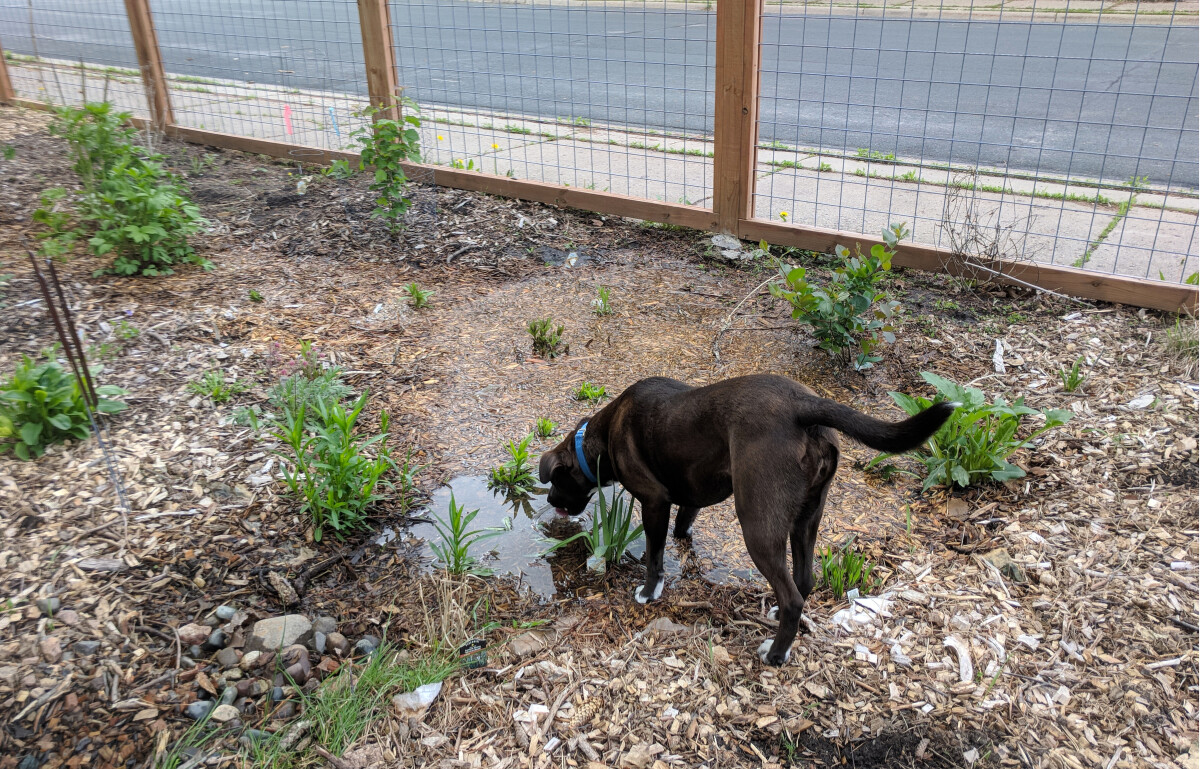
Rigby took full advantage of the magical day when the yard had a giant water bowl in it.
This is a lot of water (thousands of gallons, by now) diverted from the storm sewers. I adore the multi-functional nature of rain gardens. Not only are we doing a civic good by mitigating runoff, but that runoff is converted to beautiful plant life that brings joy to humans and provides for the needs of a vast number of pollinators and other wildlife.
The good stuff
I appreciate all the rain garden does for water and wildlife, but it’s also worth underscoring just how pretty it is. A steady diet for pollinators also means there’s something pretty in bloom at just about any time of the year. Use the little arrows to navigate the photo gallery.
-
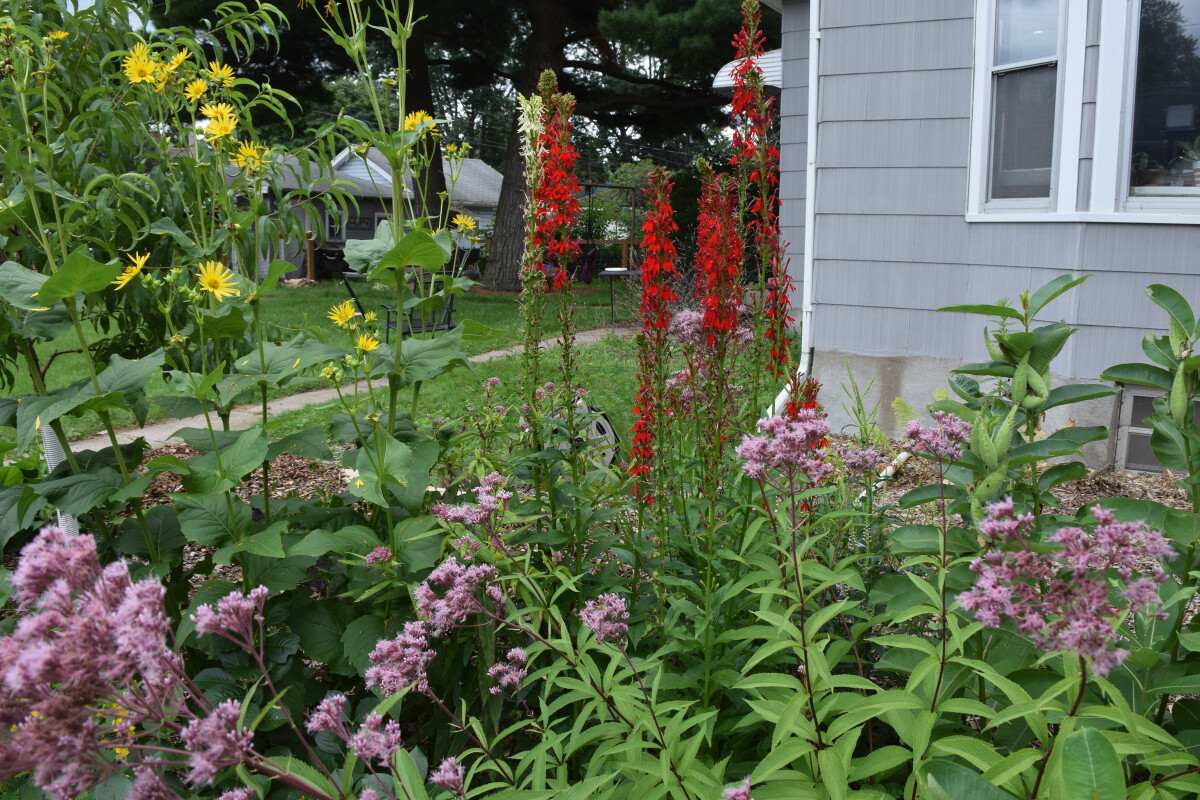
The view in early August. I didn't specifically plan this combination of blooms, but I love the color show put on by the Joe Pye Weed, Cup Plant, and Cardinal Flower.
-
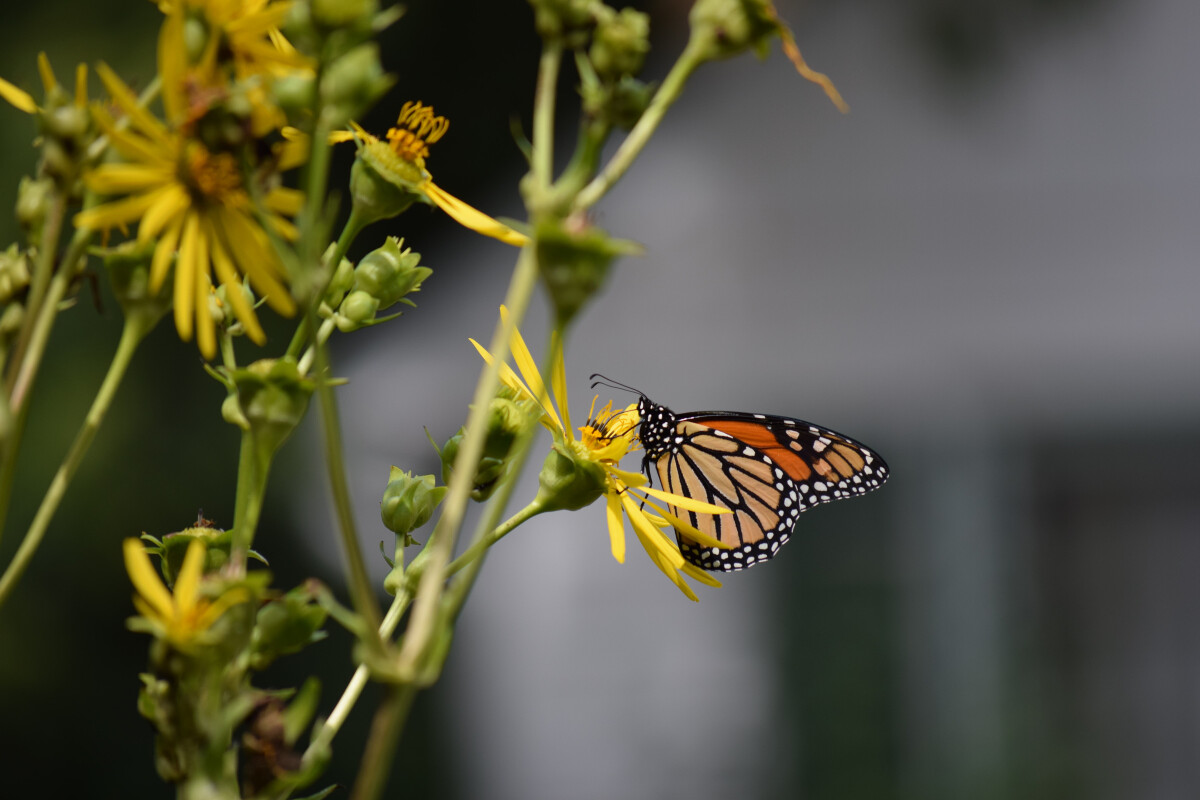
The Cup Plants seem to be a favorite of Monarchs.
-
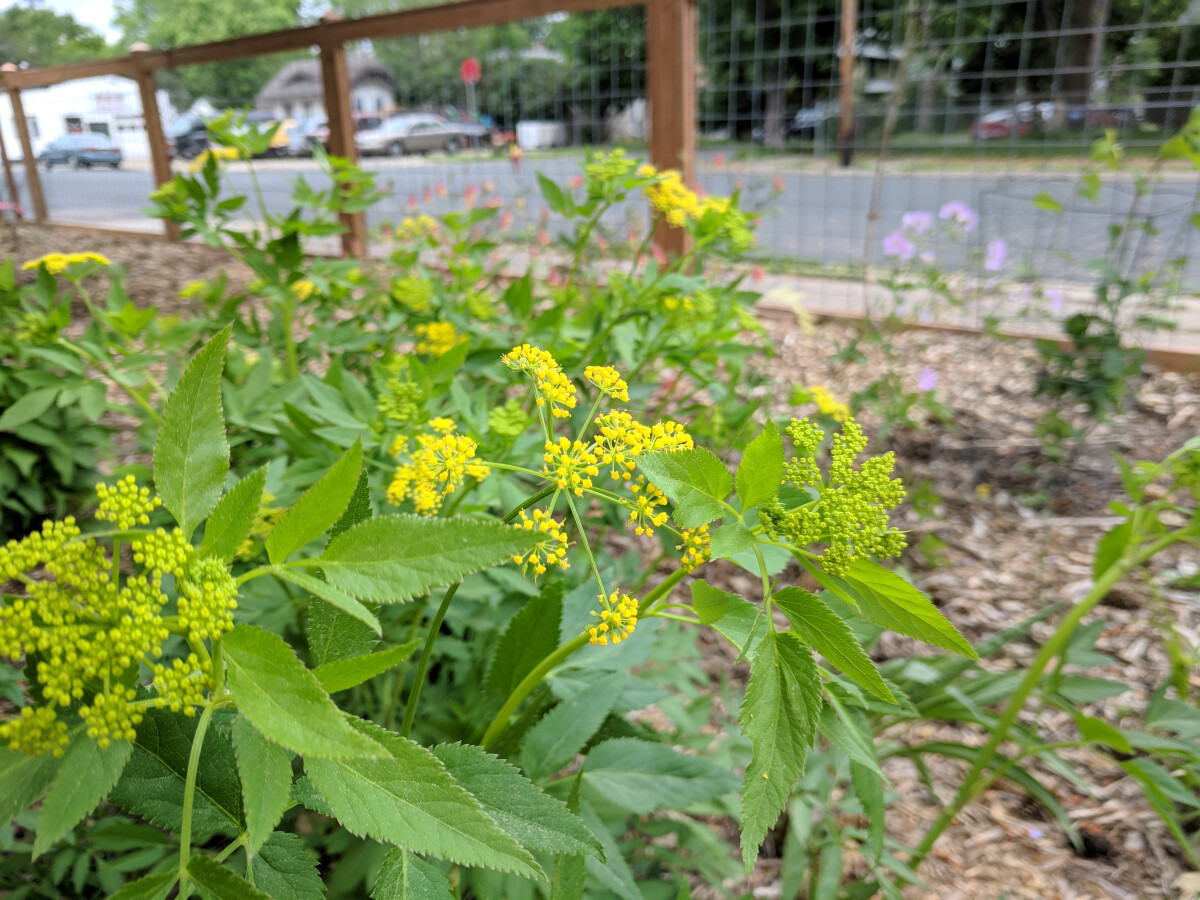
Golden Alexanders provide delicate yellow blooms in early June.
-
The Dwarf Trout Lily, as the name suggests, is just a little one. But look at that flower!
-
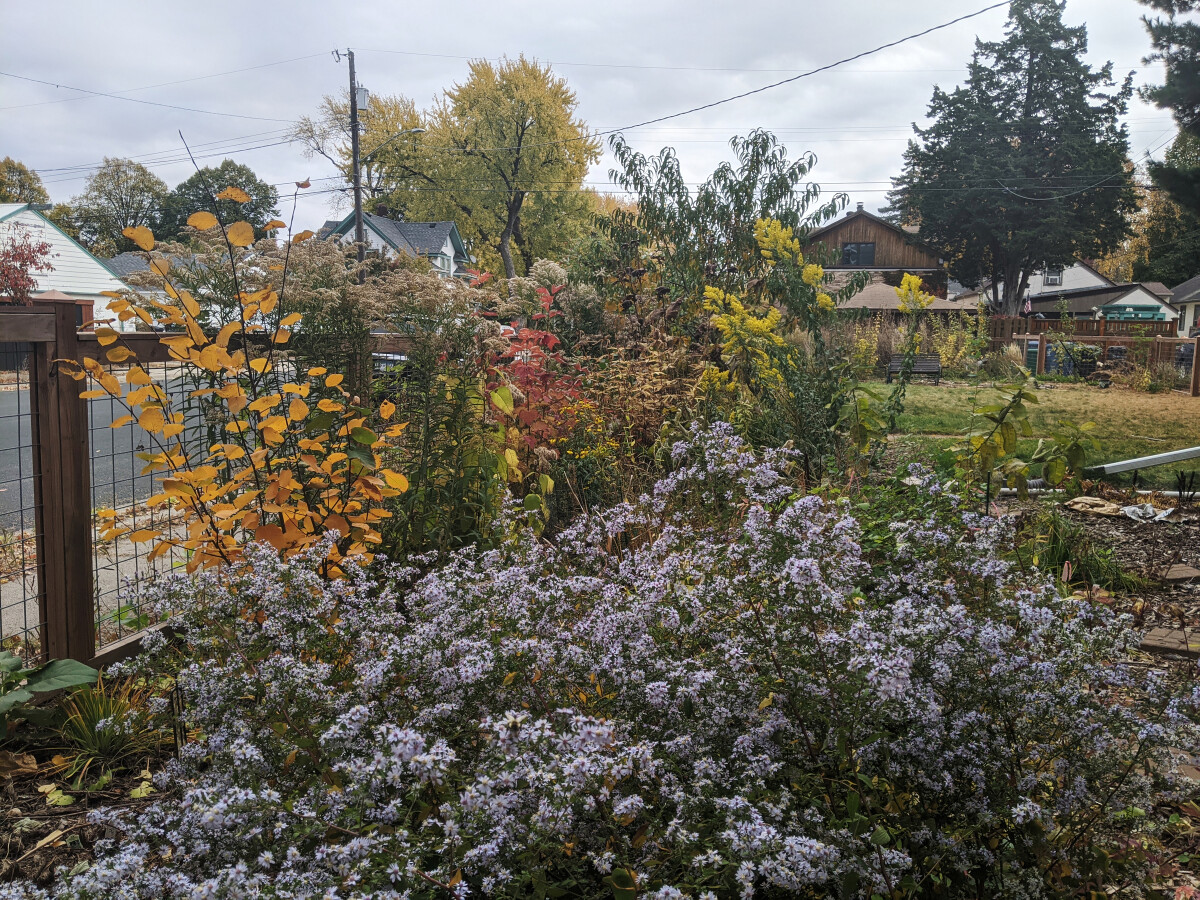
October mood. Heart-Leaved Aster in the foreground, foliage from the Serviceberry and Cranberry Viburnum, and Showy Goldenrod in the background.
Favorite plants
I like all the plants in the rain garden. There are certain ones, though, that I especially enjoy for one reason or another.
Cardinal Flower (Lobelia cardinalis)
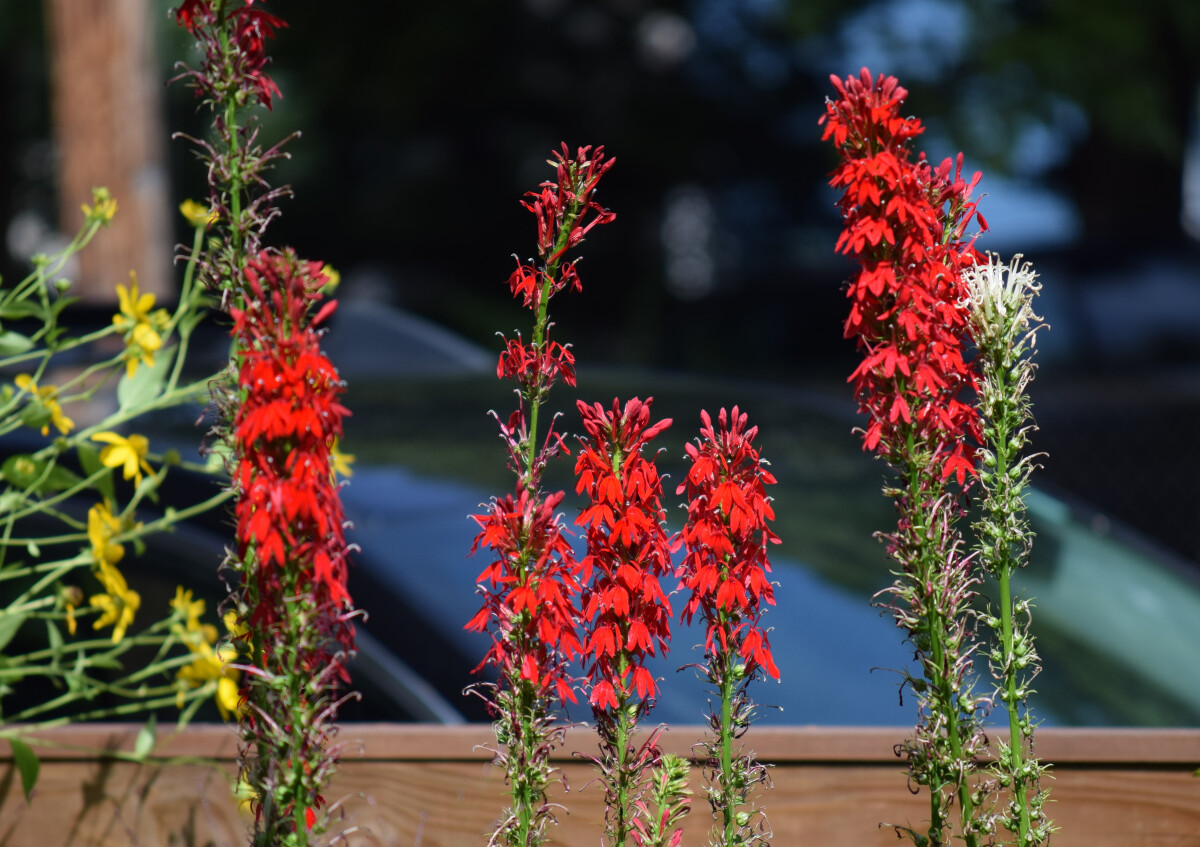
This is the royalty of the rain garden. Look at that brilliant red! One of my goals for the yard was to attract hummingbirds, and this plant is one of the top recommendations, for obvious reasons. It has worked, too: I’ve spotted several hummingbirds visiting the flowers. No successful photographs yet, because those suckers move fast.
I’ve heard that some people have trouble growing this one, but it has done very well for me. It’s planted in the part of the basin that receives the most moisture and seems to be very happy with that situation.
Obedient Plant (Physostegia virginiana)
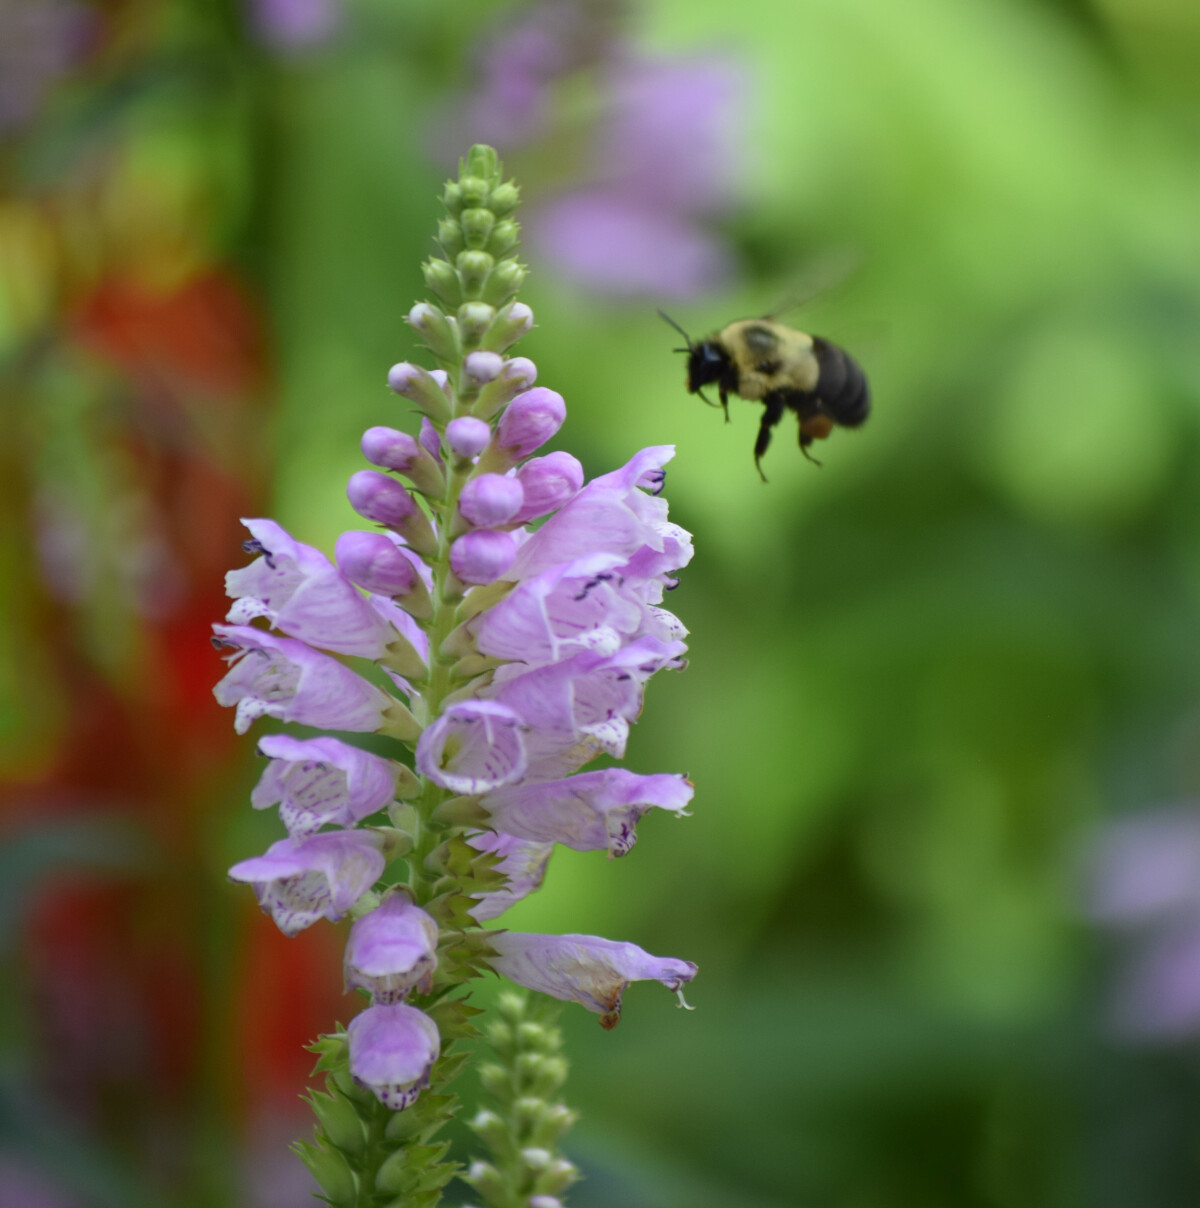
Obedient Plant is just the right amount of strange. The flowers are closely packed on spikes and the blooms progress upward over time, giving it a sort of pyramidal appearance. Bumblebees seem especially fond of this plant and are often visiting it.
Obedient Plant gets its name because you can adjust the angle of the flowers and they will stay where you put them. Ironically, it is not an obedient plant and is well-known to be an aggressive spreader. I’ve seen it doing this for me and it has already expanded well beyond where I planted it. So far the spreading has not been a problem, but I will keep monitoring it to make sure it’s not getting into any trouble.
Partridge Pea (Chamaecrista fasciculata)
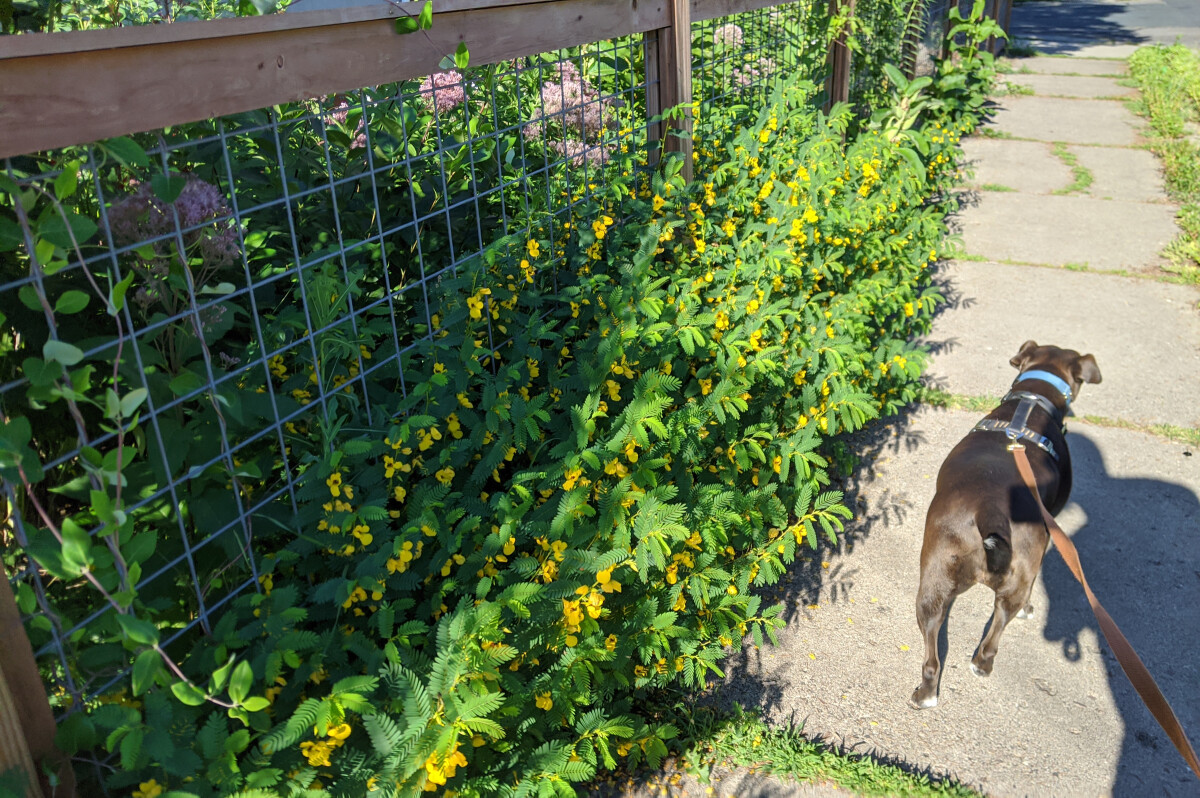
This plant doesn’t seem to get much publicity, which is strange considering how delightful it is. I found it because it was listed in the USDA Plants Database as a native plant with the highest level of nitrogen fixation ability. It’s an annual but self-seeds so effectively that it might as well be a perennial. It’s got a bushy, mounded habit about 1’-2’ high. After letting it spread for a few years, we have big drifts of it along the fenceline, where it has been very effective at outcompeting weeds. It does spread some each year, but it’s not hard to rip up some seedlings if you want to keep it in check.
It’s easy to grow and blooms right away—a treat in a newly-established native plant garden where all the perennials will take their time to get going. The profuse yellow flowers are very pretty and bloom for an extended period of time. And pollinators love this plant. I see all sorts of bees, wasps, and flies jostling each other as they enjoy the buffet. When I walk past the partidge pea in late summer, there’s so much activity that it sounds like the entire bush is buzzing.
I don’t think any other flower I grow comes even close to the amount of pollinator interest these generate.
Gray’s Sedge (Carex grayi)
Didn’t think a grasslike plant could be exciting? Think again as you gaze upon the madness of Gray’s Sedge.
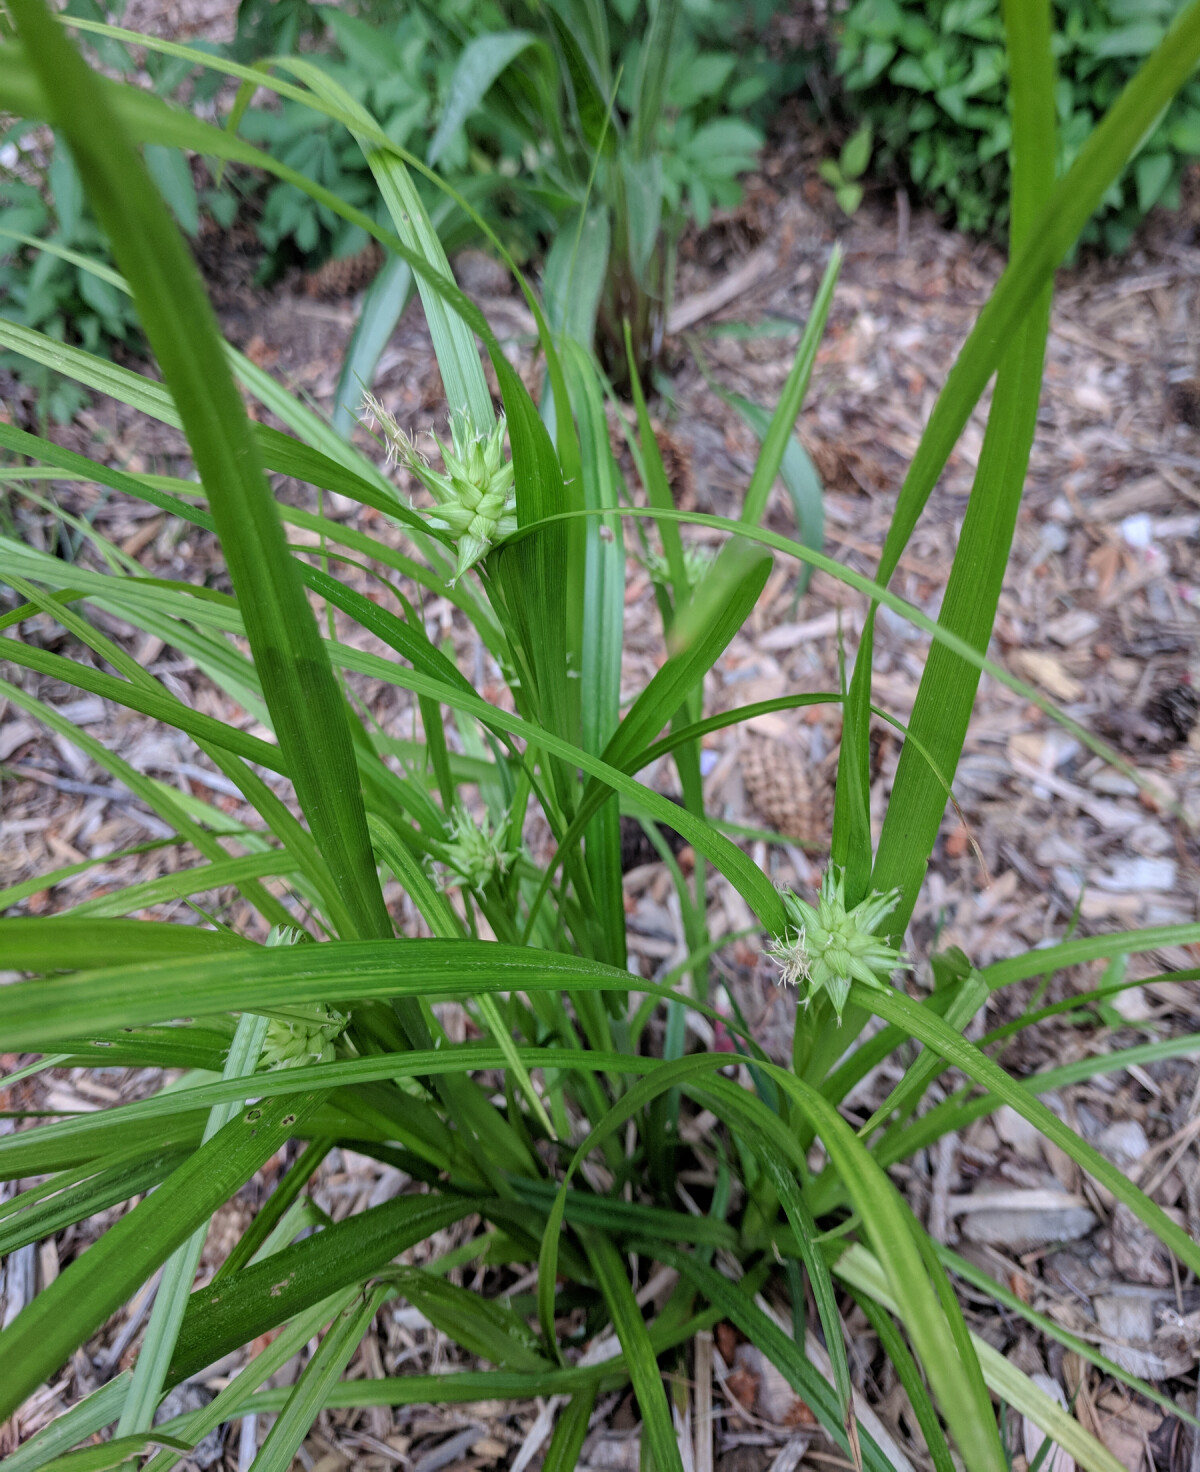
Yes, those are this sedge’s seed pods. Why it decided to make it look like a morning star, I do not know. But it’s a delightfully weird sight, and the sedge itself has grown very happily in part shade at the bottom of the basin.
There are other sedges with fun seed heads (palm sedge, fox sedge), but Gray’s Sedge is a total standout and well worth picking up if you can find it.
Wild Geranium (Geranium maculatum)
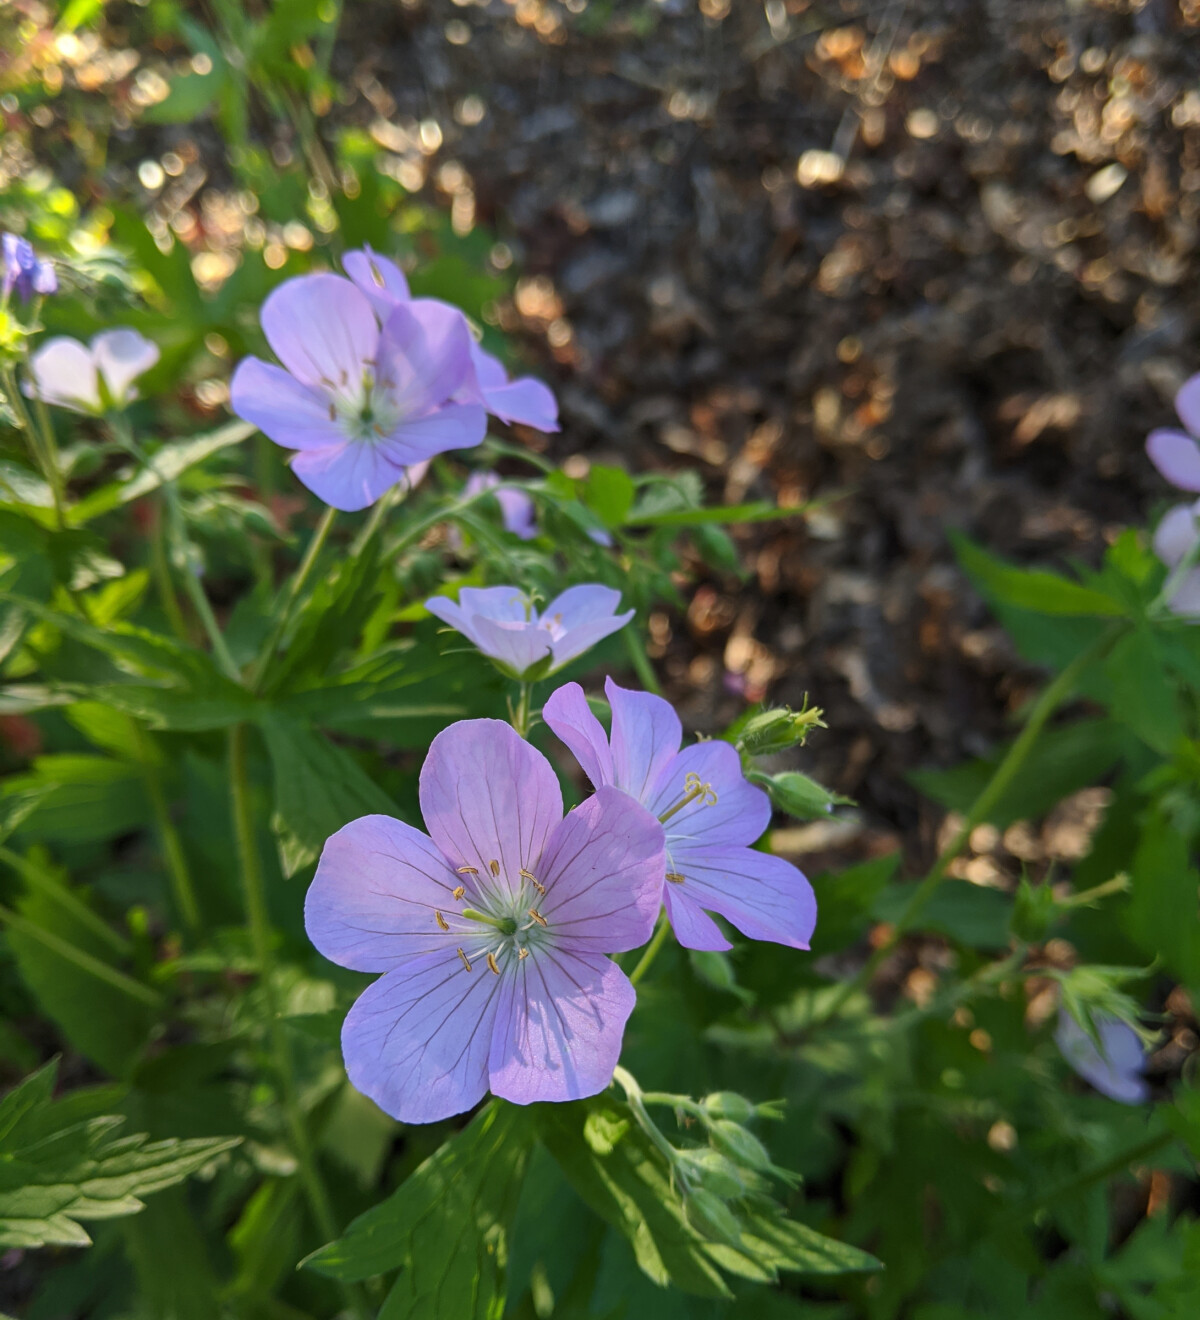
I have several early-blooming spring flowers planted in the rain garden, as food sources are especially helpful for hungry pollinators at that time of year. Wild Geranium always strikes me as the most cheerful of the early bloomers. The light blue-purple flowers are a welcome pop of color in the spring, and look as nice in shade as in sun. It has grown very well for me without any special treatment and bloomed profusely in the second year. Wild Geranium is also found in many of the wooded state parks around Minnesota, so now that I recognize it I’ve enjoyed spotting it on spring hikes.
Spikenard (Aralia racemosa)
Spikenard is a weird one. I picked it out because I had been reading about Wild Sarsaparilla (Aralia nudicalis), which has roots sometimes used as a root beer substitute, and that led me to its relative Spikenard (Aralisa racemosa). In mid-summer Spikenard looks like a rounded bush, about 2-3 feet tall and wide, but it’s an herbaceous plant and dies back to the ground in winter. I have it growing in fairly dry full shade at the end of the garden and it seems happy as can be. It has started putting out bountiful clusters of small berries. There isn’t a lot of information on if the berries are edible to humans, but it seems like they are probably fine. I’ve tried them and the flavor is pretty nice! They might get a little insipid if eaten in large quantities, but they make a good nibble. In theory the roots of Spikenard can also be used in a beverage, though I don’t know if I will ever go to the trouble of trying that.
Serviceberry
I suspect we will like our serviceberry a lot, since pretty much everyone loves serviceberries. It started as a very small seedling, though, so it’s still a fairly small plant and is not yet flowering or producing fruit. Mostly I just wanted to take a moment to tell you about how utterly confusing the taxonomy is as soon as you try to determine what actual plant constitutes a “serviceberry”.
Everyone agrees that it’s a plant in the Amelanchier genus, but beyond that, all bets are off. There’s A. laevis, sometimes known as Allegheny serviceberry. There’s A. alnifolia, sometimes known as Saskatoon berry. A. arborea is downy serviceberry. A. canadensis is Canada serviceberry, or sometimes shadblow, but shadblow can also refer to other species in the family. One of the most popular serviceberries sold in nurseries, ‘Autumn Brilliance’, is Amelanchier × grandiflora, a hybrid cross between A. arborea and A. laevis. “Juneberry” is sometimes used to specifically refer to A. alnifolia, but at other times is used generically to refer to just about any of these.
And then there’s A. lamarckii, about which apparently no one can agree. It might be a hybrid cross between A. canadensis and A. laevis. Or it could be a cross between A. arborea and A. laevis, which would make it the same as A. x grandiflora. Or it might not be a cross at all but rather it’s own species.
To top it all off, many nurseries will simply sell you a “serviceberry” without providing species information. And of those that do provide species information, it may just be incorrect. So who knows what you’re getting!
Anyhow, I purchased a selection of a wild type from OIKOS, purveyors of unusual crops. They bill it as Amelanchier laevis-canadensis. I assume they’re doing this just to mess with me.
Time & Materials
| First year (2018) | ||
|---|---|---|
| Digging and planting | ~18 hours | |
| Mulching | ~3 hours | |
| Weeding & watering | ~18 hours | |
| Downspout channels - version 1 | ~5 hours | |
| ~44 hours | ||
| Second year (2019) | ||
| Weeding | ~10 hours | |
| Additional digging | ~3 hours | |
| Additional planting & watering | ~4 hours | |
| Downspout channels - version 2 | ~5 hours | |
| ~22 hours | ||
| Third year (2020) | ||
| Additional planting | ~5 hours | |
| Weeding | ~5 hours | |
| ~7 hours | ||
| Total | ~73 hours | |
| Initial planting (2019) | ||
|---|---|---|
| Wildflowers & grasses from the Friends School Plant Sale - 38 plants | $147 | |
| Wildflowers from Landscape Alternatives nursery - 8 plants | $16 | |
| Chokeberry (Aronia melanocarpa) | $12 | |
| American Cranberrybush (Viburnum trilobum) | $11 | |
| Serviceberry (Amelanchier laevis-canadensis) | $9 | |
| Pagoda dogwood (Cornus alternifolia) | $10 | |
| Mulch | $16 | |
| $221 | ||
| Additional plantings (2019 & 2020) | ||
| Potted seedlings - 6 plants | $33 | |
| Virgin’s Bower (Clematis virginiana) - on sale | $2 | |
| Snowberry (Symphoricarpos albus) - on sale | $8 | |
| Seeds | $42 | |
| $85 | ||
| Downspout channels | ||
| Aluminum edging (bronze), 24’ | $45 | |
| Landscape fabric | free | |
| Landscape staples | on hand | |
| River rocks | free | |
| $45 | ||
| Total | $351 | |