My journey thus far in landscape design had arrived at a high-level plan for the yard that split it into segments with themes driving the design.
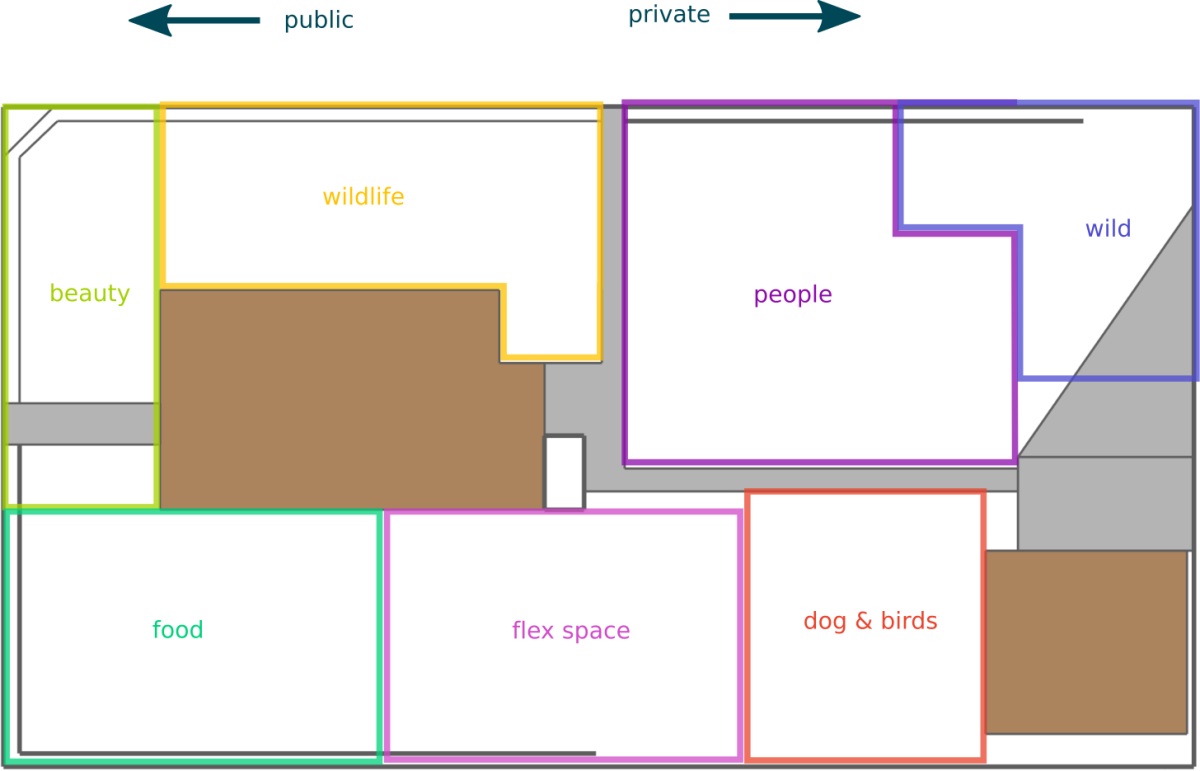
This was an excellent starting point for the design, but I still had to fill in a lot of details and figure out what we were actually going to put in, and where. I already extolled the virtues of Edible Forest Gardens, Volume Two in the previous post, so I’ll spare you more of that, but suffice it to say that I learned a lot about the following planning steps from it as well, from broad concepts down to specific advice on drafting.
A map of the territory
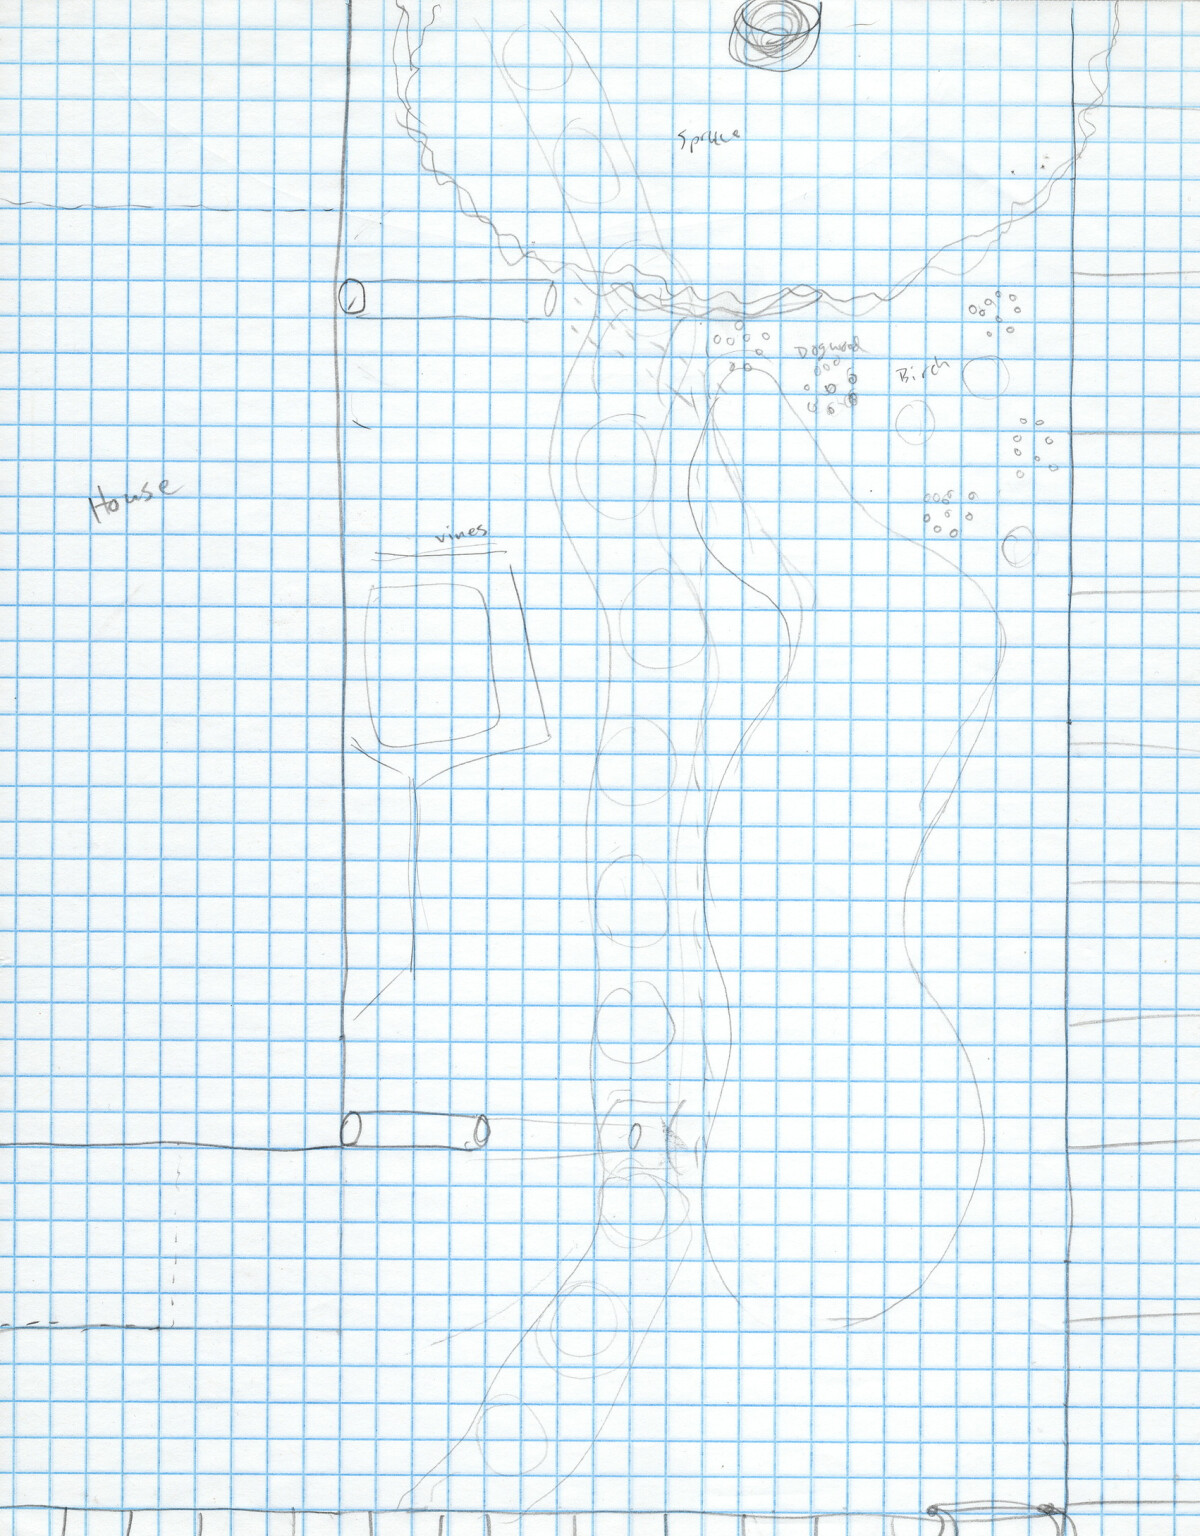
I’ve shown you an overview map of our lot that I used for high-level planning, but let’s back up and talk about how I got that map in the first place. We didn’t have any documents to use as a starting point, so it was up to me to come up with a decently accurate map of the yard and existing features. Here’s my working document:
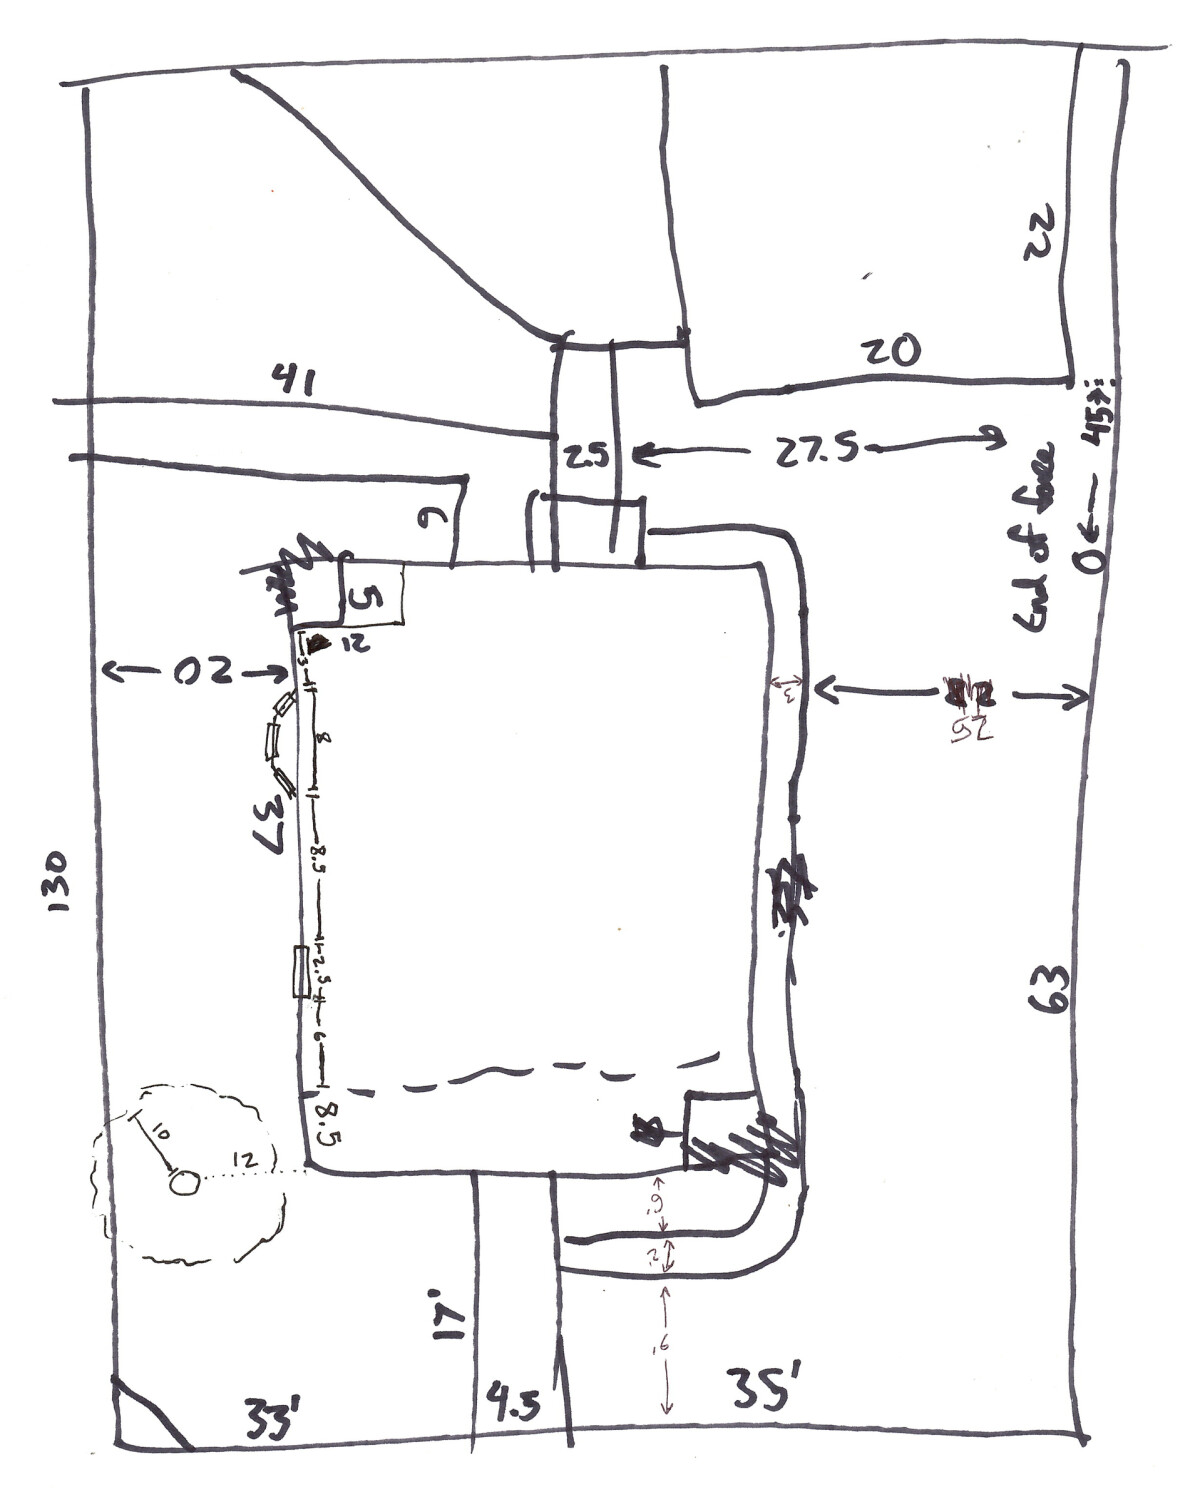
I sketched out the house and yard and then spent a while walking around outside measuring every component you see marked on there. For the longer segments, I marked out about 40 feet with masking tape on a spool of rope I had found abandoned in the garage and used that with a little stake to hold one end. This let me measure large distances like the sides of the lot fairly quickly.
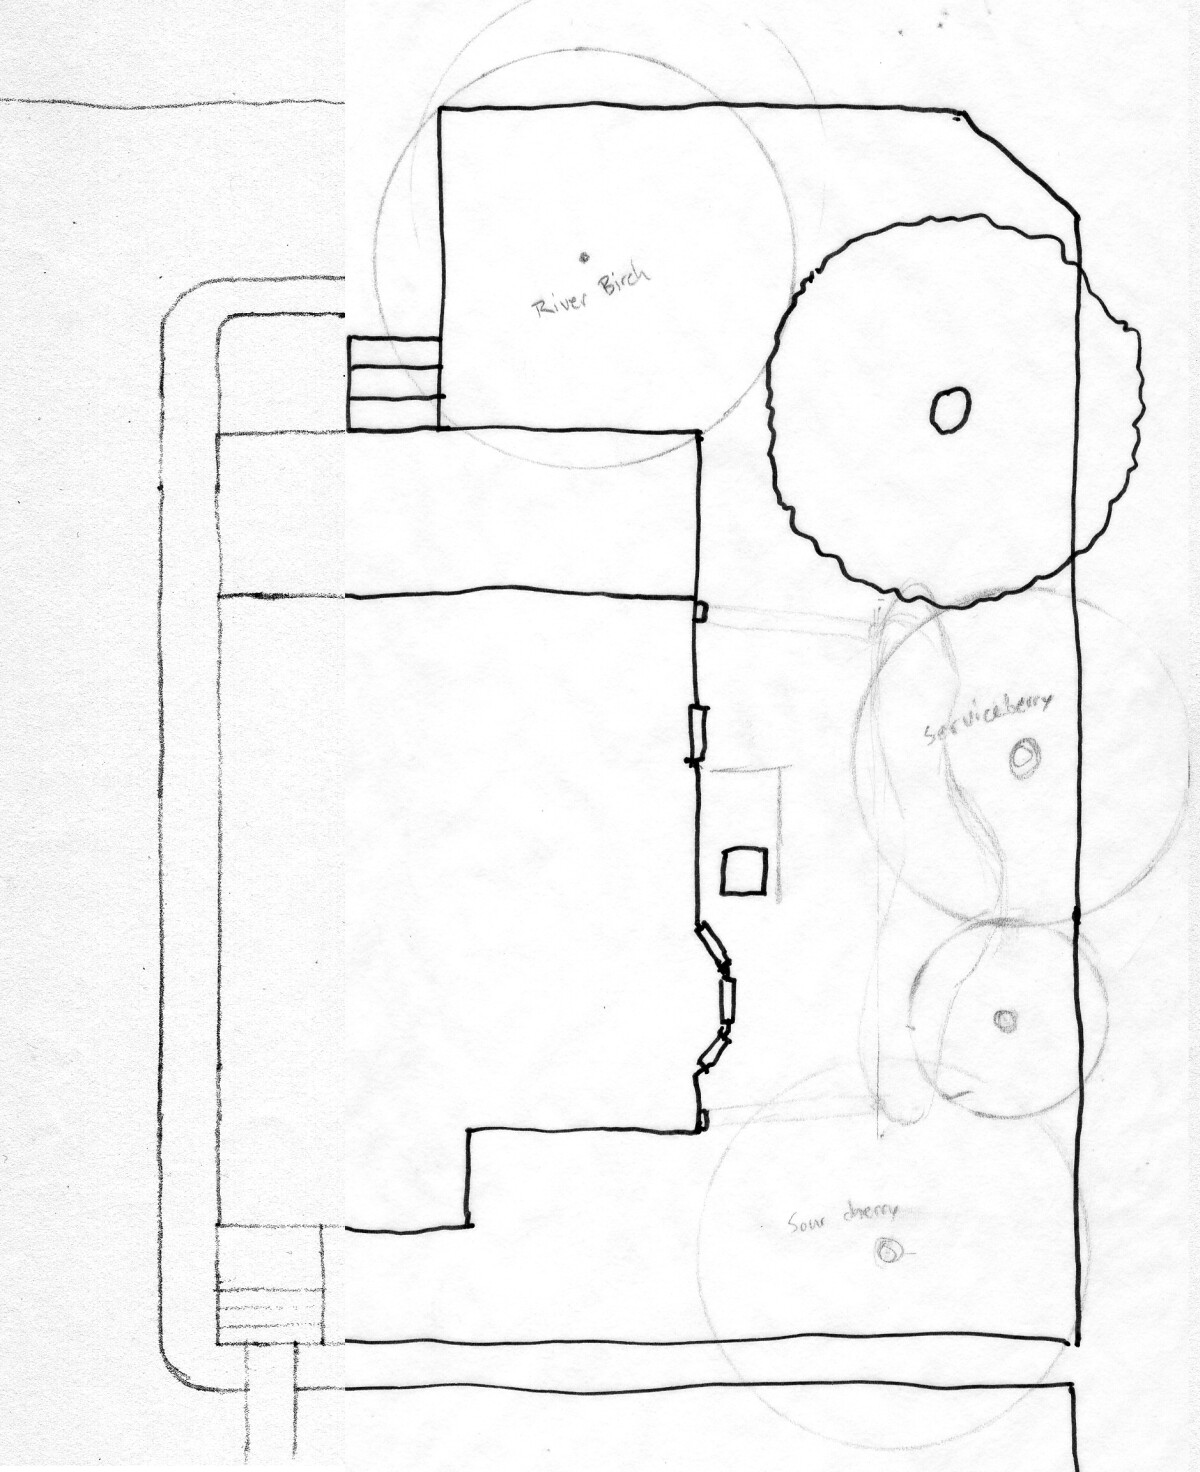
With my annotated sketch in hand, I was ready to get out graph paper and start putting together an accurately-scaled drawing of the lot. You can see I didn’t measure every dimension of every feature, but rather just enough of the dimensions that the other ones can be deduced with the existing information. Were our lot bigger or more complicated, I might have needed to use fancier techniques like triangulation to accurately locate some features, but on my map that never felt necessary. Most features were easily placed with right angles, and I only needed it to be accurate within a couple feet anyways.
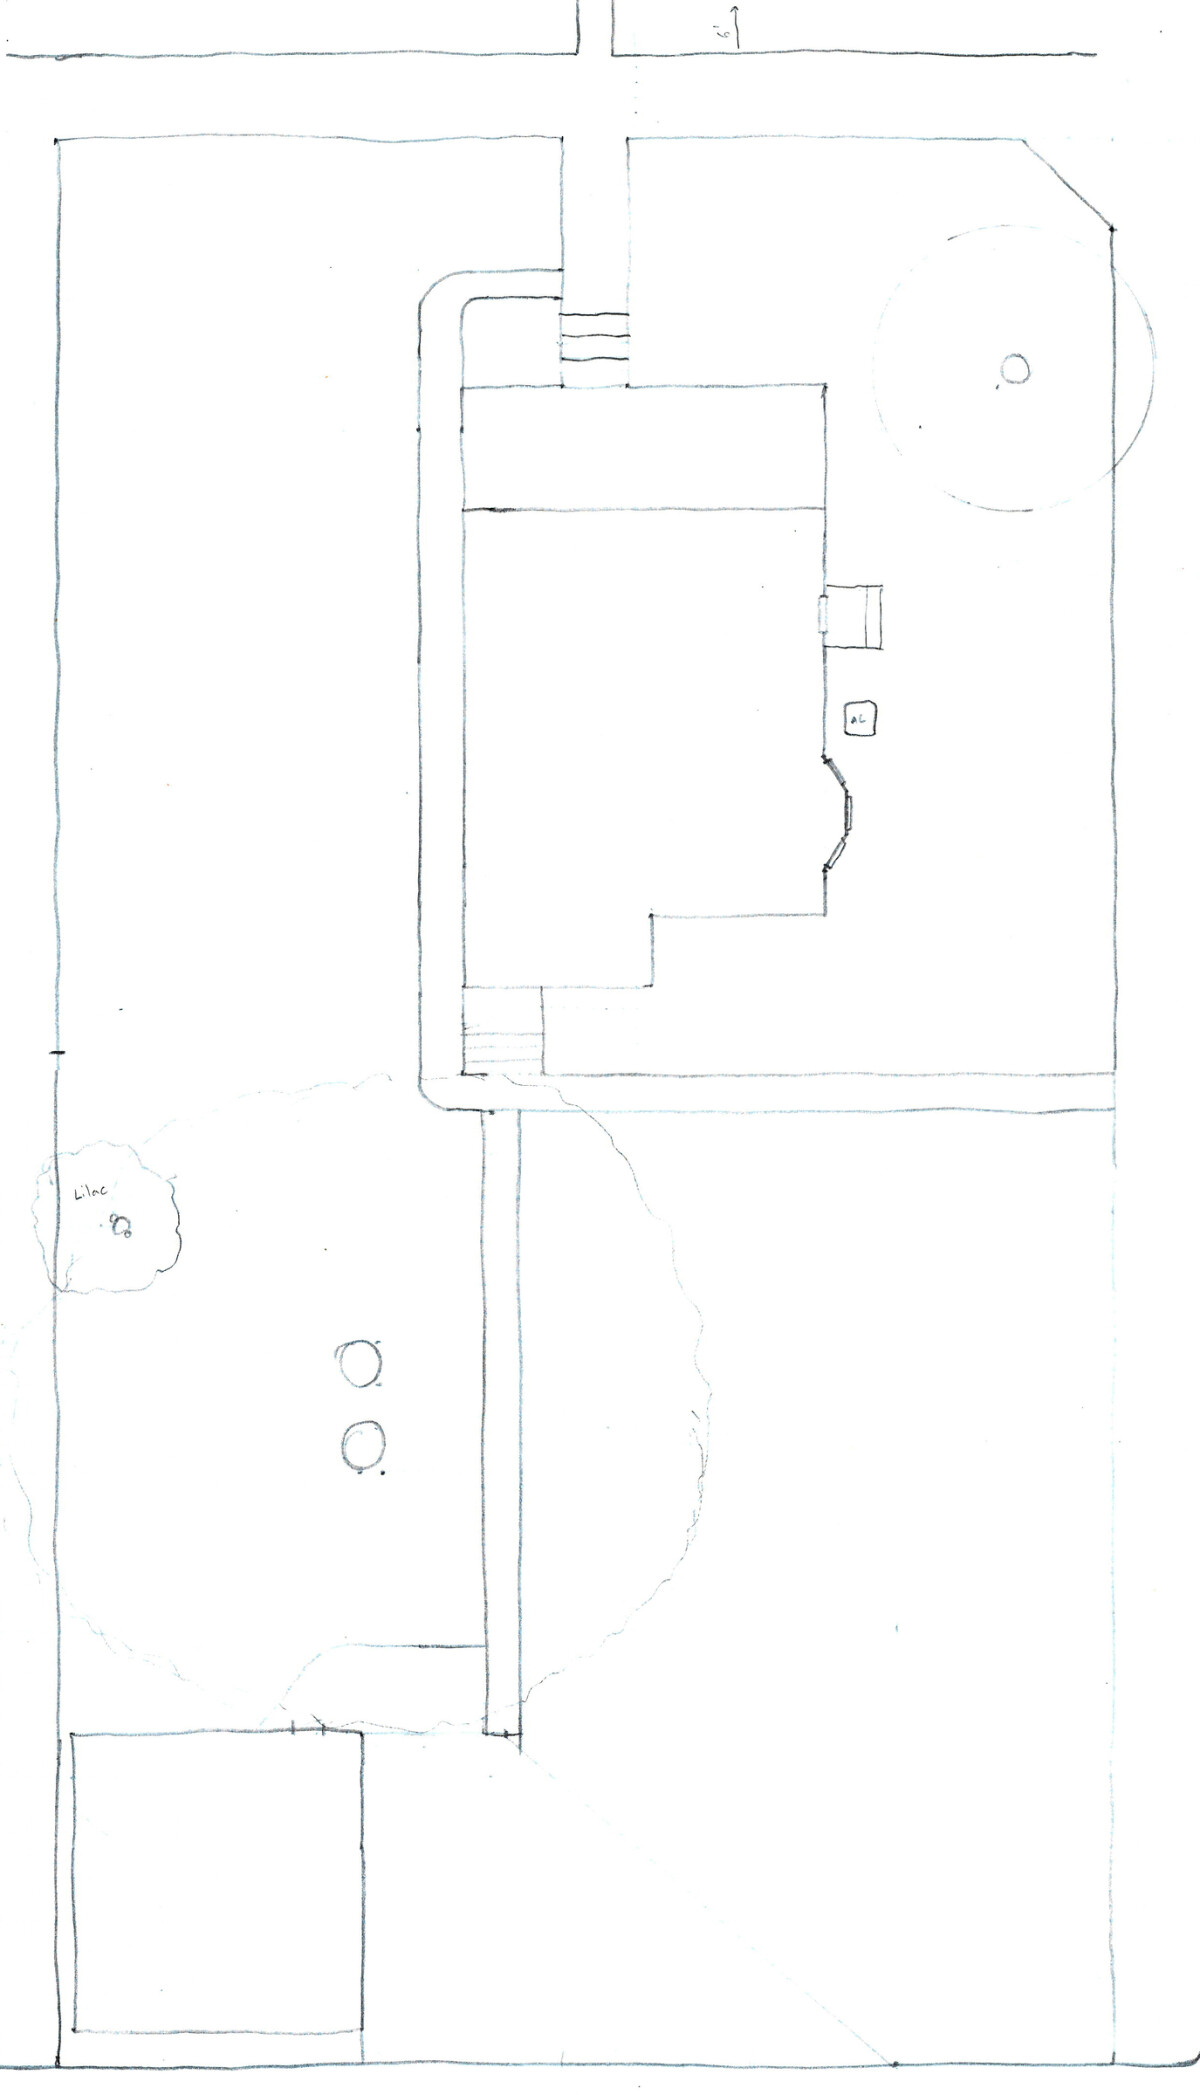
This final map was drawn on 10x10 graph paper. I have another version drawn in Sketchup, which is the one you see in the previous post, but I didn’t end up using that version much during the planning process. The graph paper version was easier to refer back to, as I could easily count out measurements of an area I was interested in.
Tools of the trade
In preparation for doing a lot of mapping, I assembled some tools to help. These weren’t all necessary, but they did make the job a bit faster and more pleasant.
- Graph paper
- I got two types, 10 squares per inch and 4 squares per inch. The 10x10 is easiest to do math with, and matches up with the common engineer's scale of 1:10. It's a good size for larger maps but was a little too small for doing finer designs on specific areas, like mapping out exact plant locations. The 4x4 graph paper was a much better scale for those drawings.
- Tracing paper
- Once I had a map drawn, I could quickly trace the boundaries onto tracing paper to make copies. This was handy when I wanted to try out different potential layouts or iterate several times on a design. There are other ways I could have dealt with this, so the tracing paper was not a necessity, but it did come in handy a few times.
- Circle drawing template
- I stumbled on this by chance but it turned out to be one of the most useful tools I picked up. This particular template has a wide range of circle sizes that were perfect for drawing trees, bushes, and forbs. It's much easier and faster to draw small circles this way than with a compass, and much neater than trying to draw circles freehand. There are other templates with a variety of architectural shapes, but circles was all I ever needed.
- Compass
- Purchased to make circles, but the circle drawing template picked up most of the work so I didn't use this much. Still a useful tool to have around, and has a few uses in addition to circles, such as quickly transferring distances.
- Engineer's triangular scale
- Like an ordinary Imperial ruler, but with inches broken into fractions of 10 rather than 12. Used with 1:10 graph paper, you can make measurements that translate to feet with no conversion required. While it seemed like a great idea, I didn't end up using this very much. If I weren't primarily working on graph paper, or if our site were bigger and had fewer right angles, I might have needed it more often.
- Clutch pencil
- Not a necessary purchase, but a nice complement to mechanical pencils. Has a wider expressive range, such as drawing thicker lines, or shading areas. Sturdy and will last me forever.
The lay of the land
Elevation changes are typically an important part of site design. The contours of a site can affect water drainage, microclimates, ease of access, and so on. I won’t be discussing this much, for the simple reason that our lot doesn’t have any elevation changes. It’s graded completely flat and is level with the sidewalk, so we don’t even have the small front yard hill that many South Minneapolis lots do. For the most part, this was fine, as it made my job easier. I thought a few times about adding mounds or hills to provide some variety, but there was nowhere in the yard that seemed like it would particularly benefit from that, and since the drainage on our site is generally fine, I was hesitant to make any changes that would throw things out of balance.
Another important thing to consider early in the design process is hardscaping. In our case, this was also fairly easy. There is a small patio behind the house, and if we ever decide to add a larger patio, it will go in that same area. I don’t have any plans to change the location of the other sidewalks, and other than slightly decreasing the size of the driveway when we put in the fence, none of that is changing either. The area a potential patio might extend to is staying grass for now, so there wasn’t a concern about installing permanent plantings when they might turn out to be in the way.
Plants…
Plant selection was probably the most time-consuming (and most fun) part of the process. I didn’t have much plant knowledge coming into this, so I really dove headfirst into the subject. Starting with themed areas helped a lot, as the different sections of the yard naturally lent themselves to different kinds of plants. The food area got vegetables and other edibles, the wildlife area got native plants, and the back of the lot got a permaculture food forest palette. Focusing on these areas one at a time gave me a way to direct my research.
Some of the resources I found most useful in this were:
- Gaia's Garden
- Offers some good starter lists of permaculture favorites, and in-depth profiles of a few specific plants the detail how they might be best put to use.
- Edible Forest Gardens, Volume Two
- The back of the book is a huge set of appendices with fabulous plant lists for a permaculture focus. Would that every resource was this thorough.
- Perennial Vegetables
- A guide to edible perennial plants, a subject I was specifically interested in. Not a perfect book but a good companion piece to the others.
- Birdscaping in the Midwest
- A thorough and informative guide to attracting all sorts of birds. Excellent plant lists, second only to Edible Forest Gardens.
- Attracting Butterflies & Hummingbirds to Your Backyard
- Just like it says, a guide to creating plants and habitat for hummingbirds and butterflies. These were two types of wildlife I was specifically interested in, so it was a great fit.
- Seed catalogs
- Some of the catalogs seed companies put out offer a lot of good information on the plants they sell. Fedco has very good paper catalogs for both trees and vegetables. [Prairie Moon](https://www.prairiemoon.com/)'s online and paper catalogs are excellent reference sources for native plants in our region.
- Plant lists
- There are lots of sample plant lists for native plants floating around. I collected a variety including some from Blue Thumb, Xerces, and UMN's Bee Lab. If I were starting today my first stop would be the resources in the [Lawns to Legumes program guide](https://bwsr.state.mn.us/sites/default/files/2020-06/Planting%20for%20Pollinators_updated_2020.pdf). The plant lists and sample plans are high quality and easy to use.
- USDA Plants Database
- This tool isn't the easiest to use, but it contains a ton of information. I used it to check if a plant was considered native to the state, to find scientific names for plants, and to help untangle the taxonomy of plants with confusing classifications (lookin' at you, "serviceberry"). Some plants also have more detailed fact sheets or plant guides, which can offer detailed information on growing characteristics (though these are often aimed towards agriculture or forestry). They also have a ton of searchable plant characteristics that I feel like I have only scratched the surface of. For example, I figured out how to search for MN natives with "medium" or "high" nitrogen fixing capabilities and got several useful plant suggestions from that.
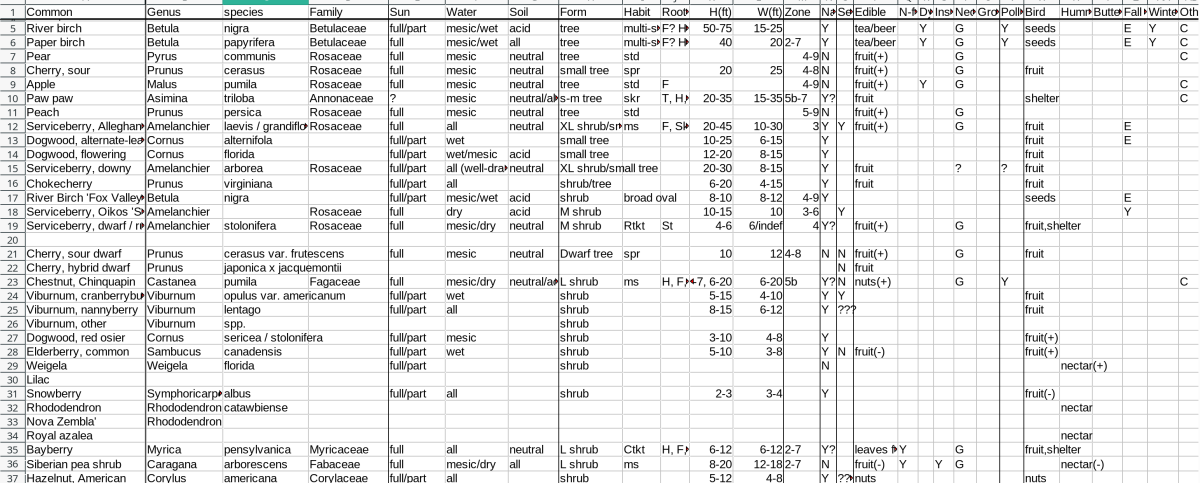
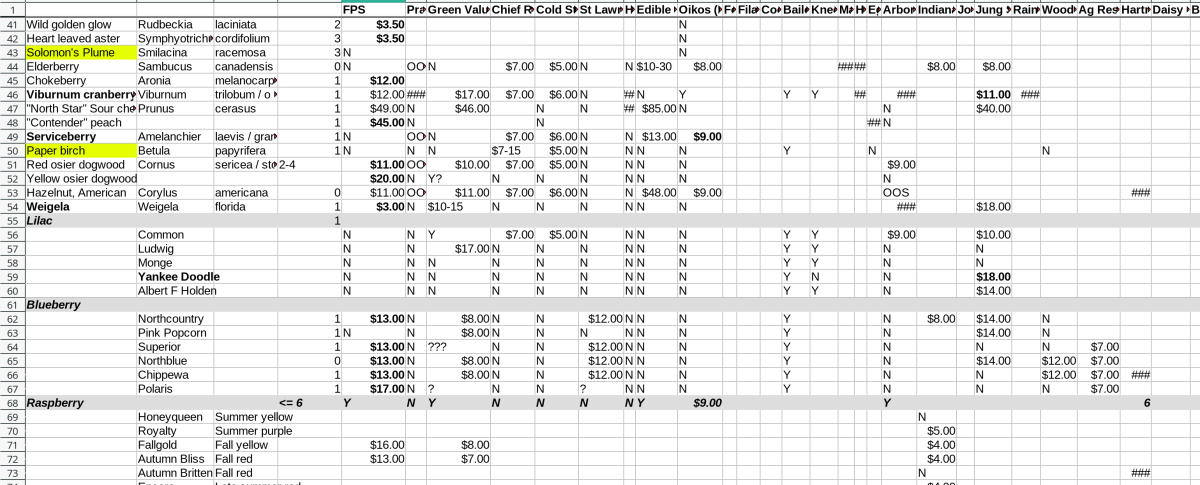
A glimpse into my master plant list.
My plant research mania hit a peak with the creation of the “master list” I used to track potential plants and their attributes. Many of the fields were cribbed from the extensive and detailed charts in Edible Forest Gardens, Volume Two. Any plant I came across in research that sounded interesting was added to the list, and if it entered serious consideration, I’d fill out as many of the fields as I could find information for. This gave me a quick reference for design characteristics like size, sun, and moisture preferences. It also helped me track which of the traits I cared most about were met by each plant.
When choosing plants, the primary criteria for me is: what functions does this plant serve? Ideally, everything we grow should serve multiple purposes (in the permaculture world, this is called “stacking functions”). For example, a large serviceberry shrub on the north side of our lot can provide: attractive spring flowers and beautiful fall foliage; a partial screen from the sidewalk; early season food for pollinators; tasty berries for birds and humans; perching spots and cover for birds; habitat for a variety of insects; a deep root system that sequesters carbon, improves the soil, and allows for water penetration; and leaves that filter dust and pollutants. While it might sound very complicated to look at plants in this multi-faceted way, I felt that it actually made the job easier by narrowing my scope to selections of plants that have a lot to offer. Notably, I have been able to almost entirely ignore the vast world of decorative nursery perennials, because those plants are often bred solely for appearance and in my garden a single function is not enough to warrant consideration.
The idea of functions dovetailed perfectly with the considerations I had previously mapped out with zones and sectors, as finer-grained details within the general themes. For example, when picking plants for the northeast corner, the general theme dictated that they contribute to a woodland feel and four-season beauty. From sectors, I knew that they should be attractive from the public sidewalk as well as our picture window, that they should be able to withstand the strong winds that enter at that corner, and that they should provide a windbreak to protect the rest of the yard. From zones, I knew that they should be relatively self-sufficient because I wouldn’t be dragging a hose up there all that often to water them, and I wouldn’t be passing through every day to deal with weeds or other maintenance. Red-twig dogwood meets all of those criteria perfectly, plus is a native plant with excellent wildlife value, so it got the nod in that area.
The master list eventually generated several offshoots, like this plant sourcing list.
I feel like now would be a good time to point out that you certainly do not need to go this deep to do a successful garden design. This sort of highly detailed data-heavy process suits my personality, and besides, I was very excited about the whole project. But many people are perfectly successful using a much less rigorous process, so don’t be intimidated by my spreadsheet version of the crazy wall.
…and where to put them
When deciding on the exact placement of plants, there a number of other questions to consider besides meeting the desired functions.
How big will the plant be at maturity? What is its habit (i.e. shape) and will that be a good fit for where it is? How much sun does it like and will it receive the right amount (both right now, and once the plantings are fully established)? Will it create the right amount of sun at maturity for surrounding plants? What sort of root system does it have and will that coexist with other plants nearby? Does it spread or stay in one place, and is that what you want it to do? Will it receive the right amount of moisture? Is the plant hardy in your zone, or if it’s borderline, will it receive extra protection? Will the plant be happy with the soil pH?
For spacing, I largely adhered to the “crowns touching” rule. In hindsight now that we’ve had a few years of growth, I think I made the right decision on tree spacing but I could have planted many of the shrubs and forbs more densely. As this commenter notes, “most people put their trees too close together, but then don’t plant enough support species”. I’ve been slowly filling in my original plantings with additional understory plants as I realize there’s space for more.
Developing the designs was a highly iterative process. I worked primarily with the trees and shrubs in most sections, as those are the most permanent and most structural plants. For each section, I put together a short list of possible plants using the resources listed above, then sketched out different placements and combinations to see what worked well.
The rain garden was one of the most complicated areas, reflected in the number of different concepts I considered for it:
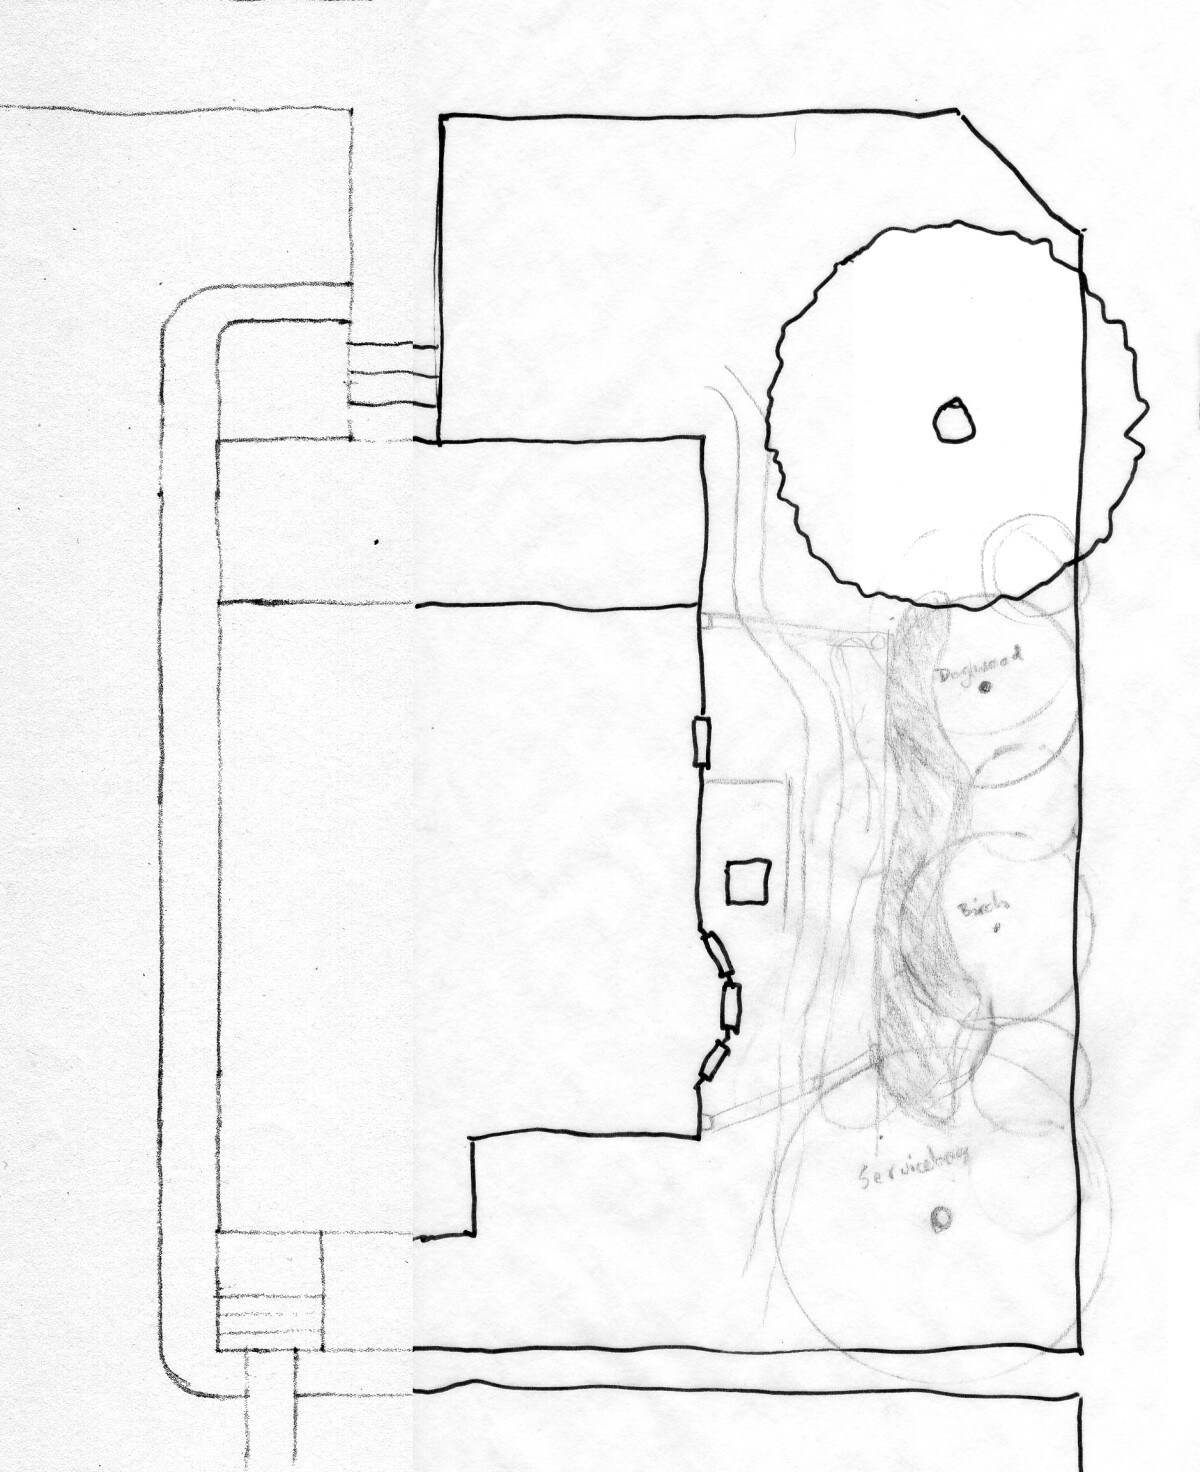
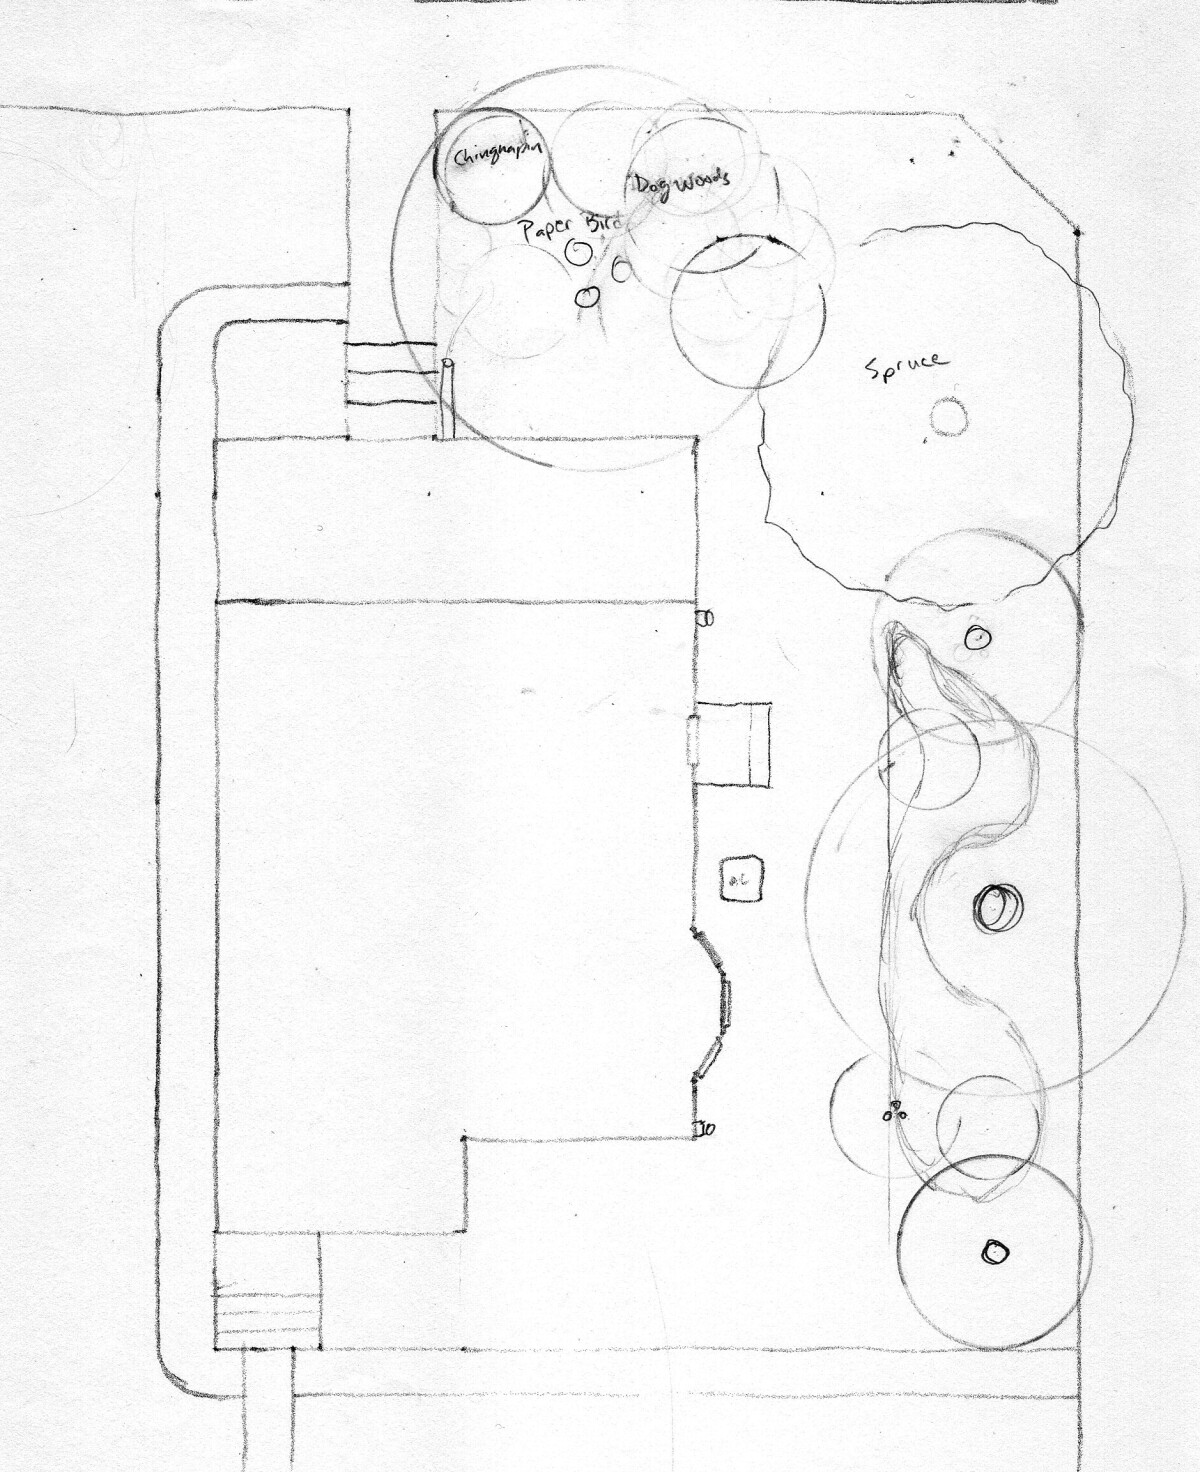
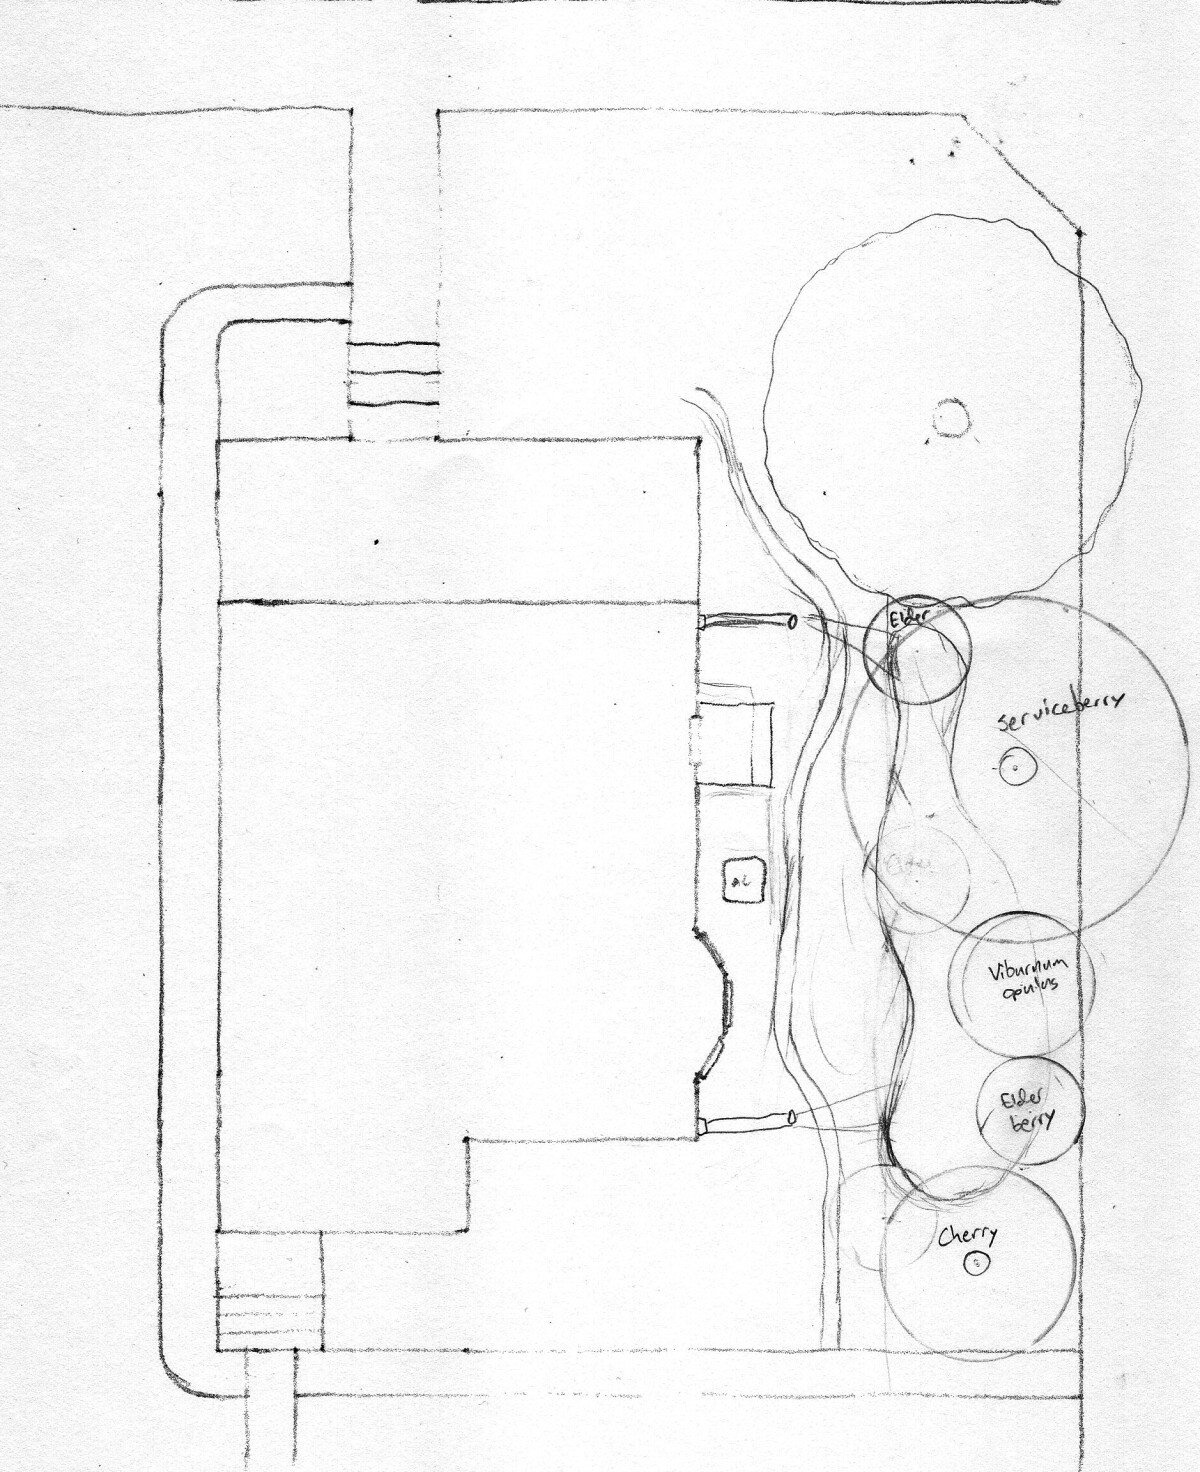
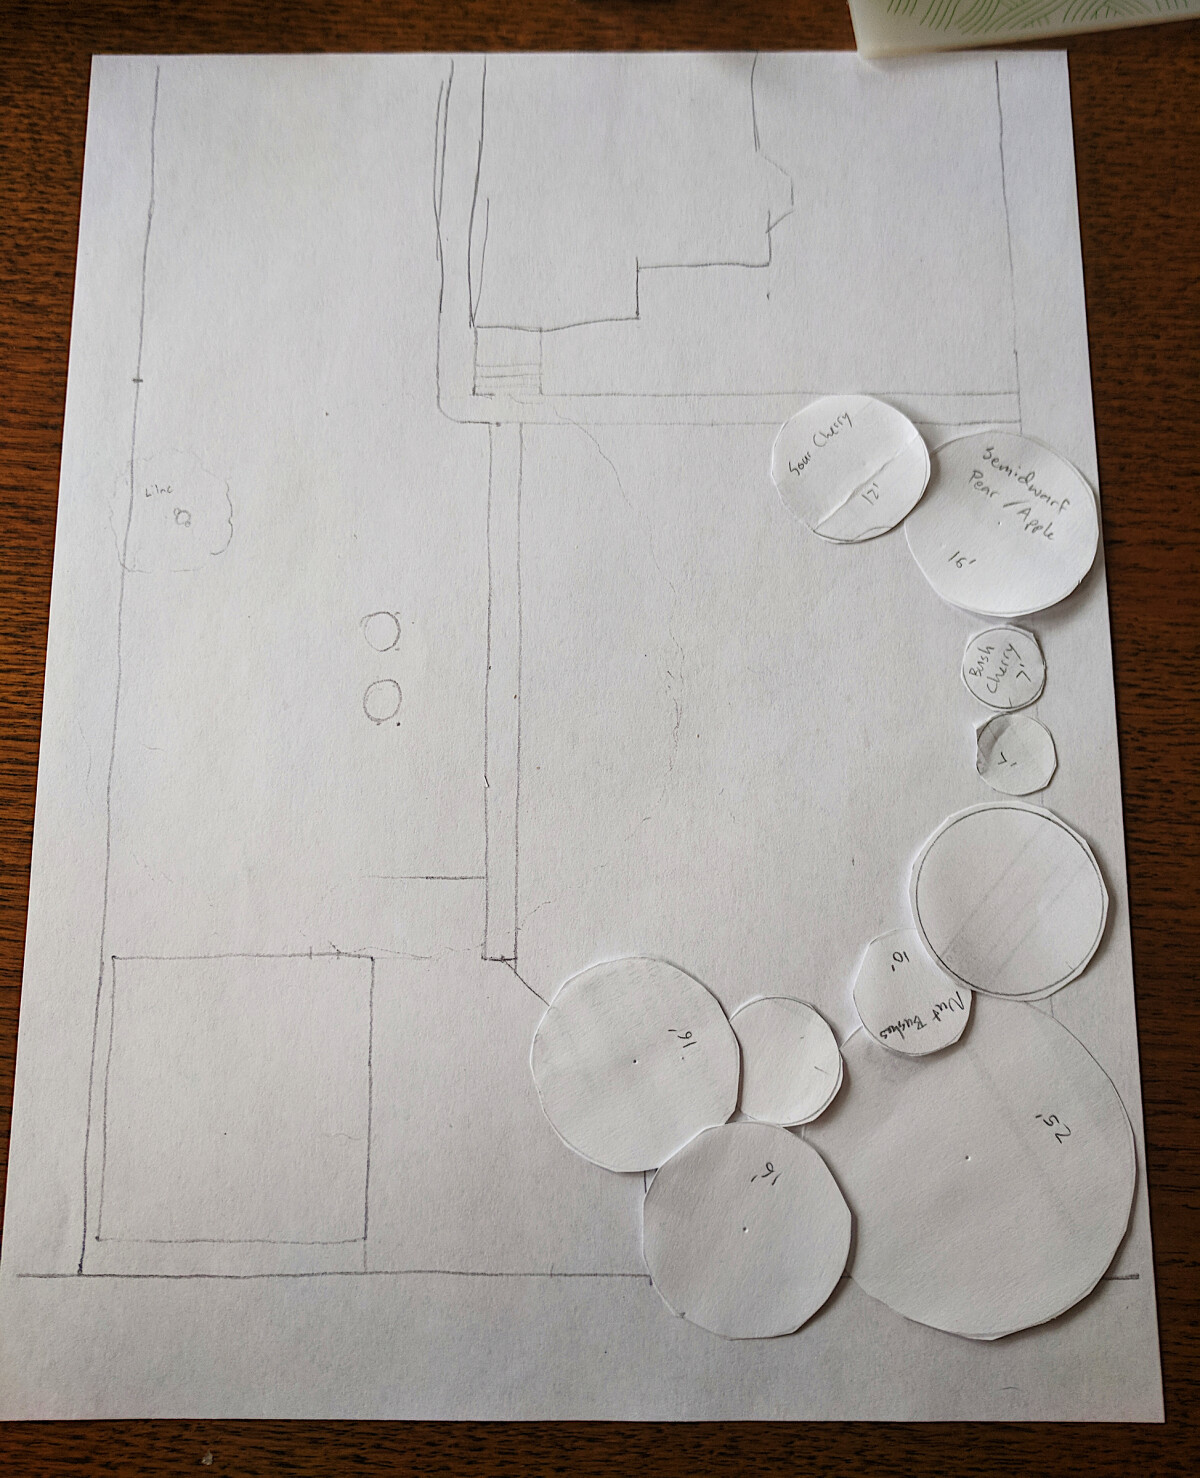
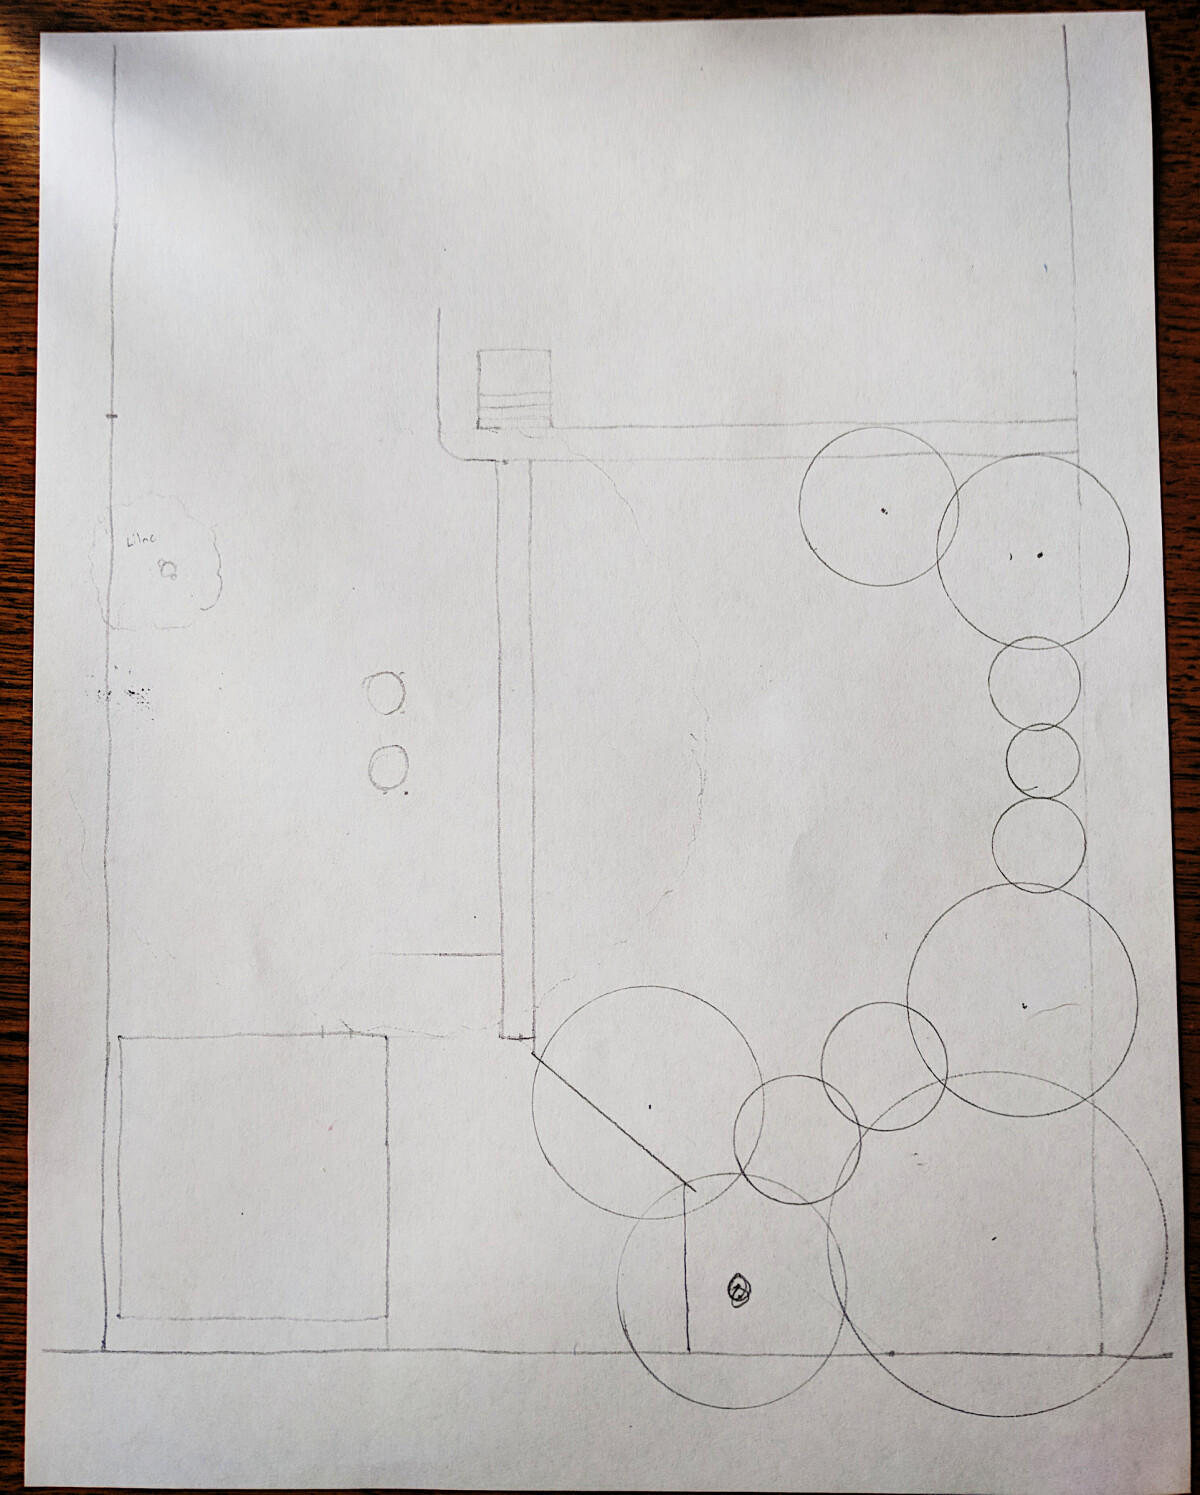
Once I had a base map, I could use tracing paper to quickly create copies of a map to sketch different ideas on. For the back of the lot, which had a lot of flexibility, I wanted to quickly visualize many different layouts and combinations of different plant sizes. I cut out a bunch of circles of different sizes representing standard, semi-dwarf, and dwarf fruit trees, as well as small and large shrubs. I could push these around on the map as I thought through how to best make use of that space.
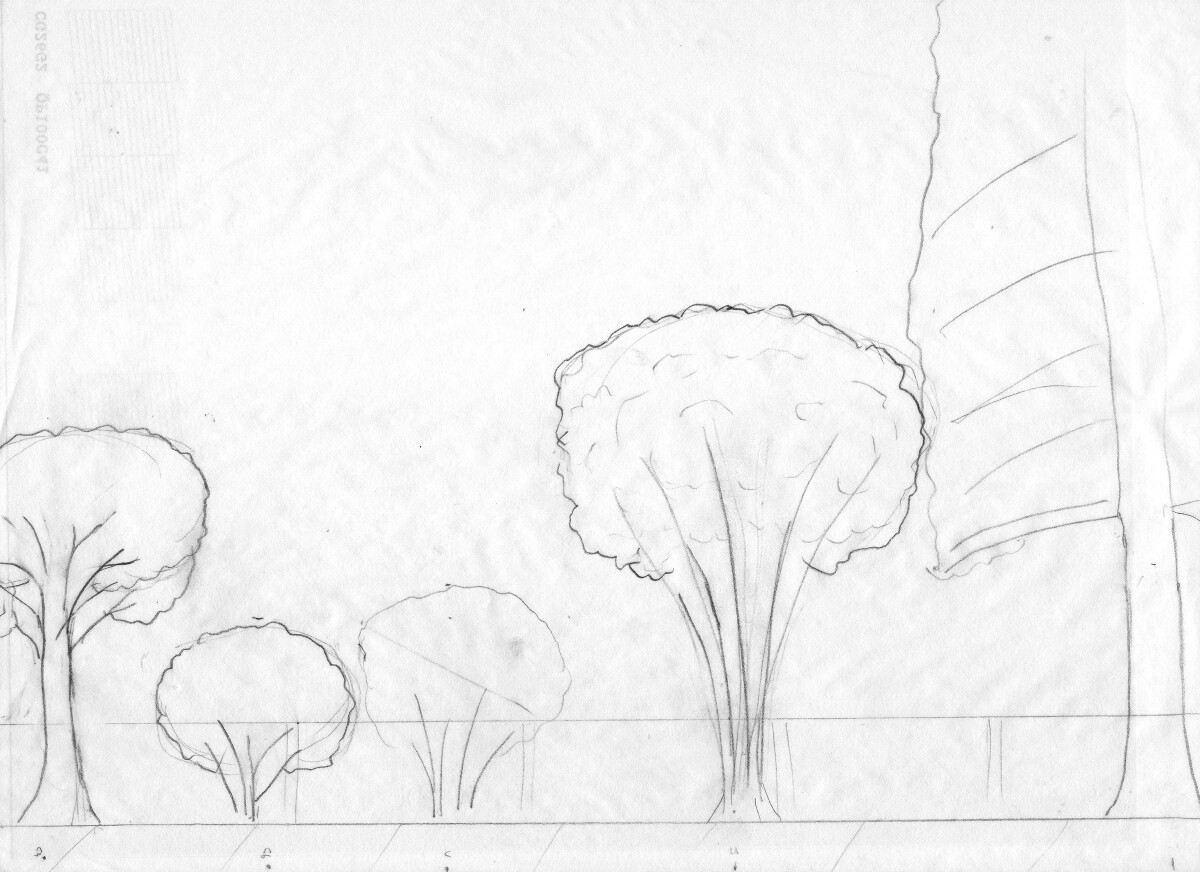
On the side of the house, I was also interested in the vertical dimension of the planting, as we wanted to partially screen our windows but not create an impenetrable wall. Once I had a layout that looked good from the “top-down” perspective, I drew a scaled side view to help me imagine what it would look like from the sidewalk.
In addition to making sure the plans looked good on paper, I vetted them on the ground itself to make sure they felt good there as well. I used stakes to mark the center of major elements and spray paint to mark the outlines of trees, bushes, or other structural elements. This helped me visualize the final result and gave me a chance to walk out potential borders and pathways.
-

Paint and stakes to mark the mature size of a tree canopy
-
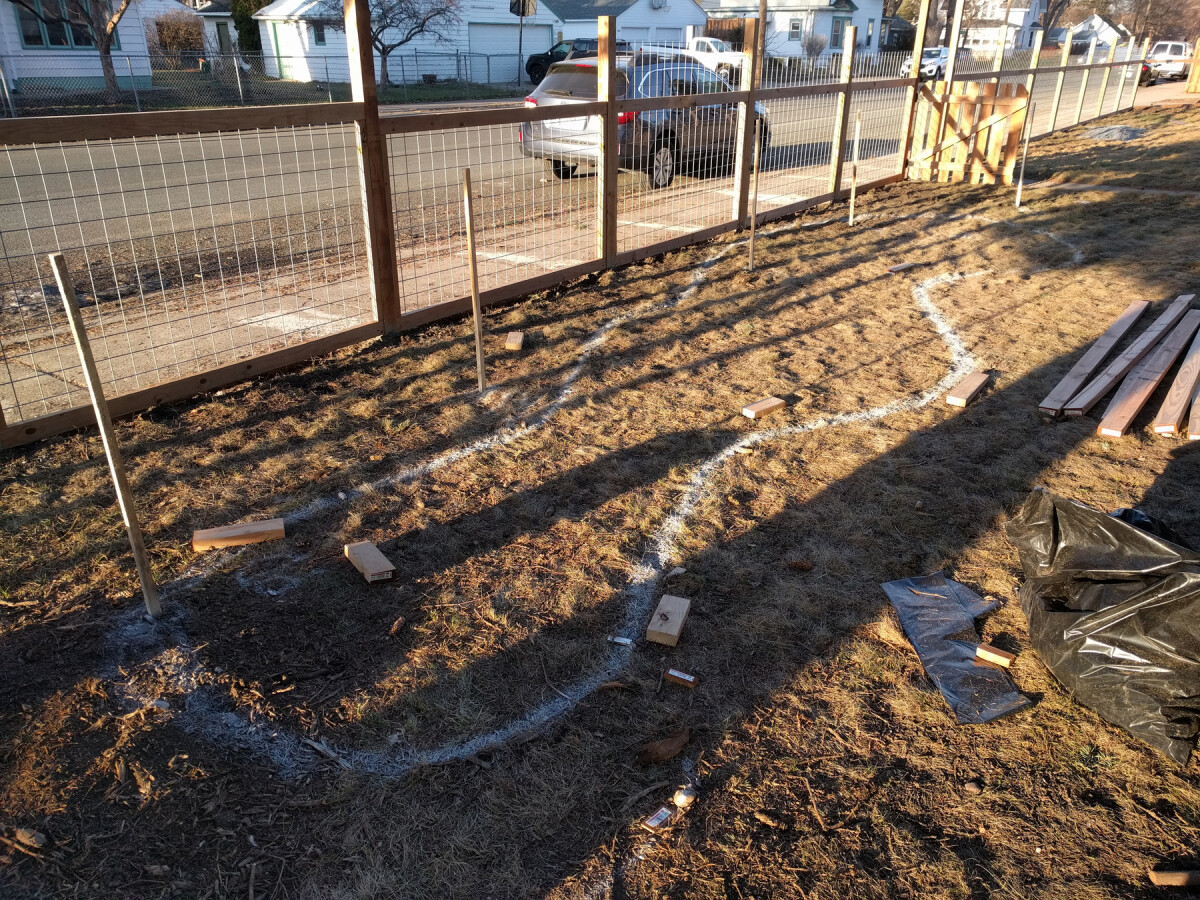
Paint for the outline of the rain garden depression, stakes for trees and shrubs
-

As an alternative, just stomp circles in the snow to mark tree locations!
With the “bones” of the landscape decided, I filled in the designs with the “forbs” (non-woody plants) I wanted. This process was similar to the trees and shrubs, though often easier because there is a lot more flexibility in placement of smaller plants. What plants went into the design depended on what plants I could source, so this part involved iterations of looking at plant lists from local vendors, adjusting the design, rechecking the plant lists, and so on.
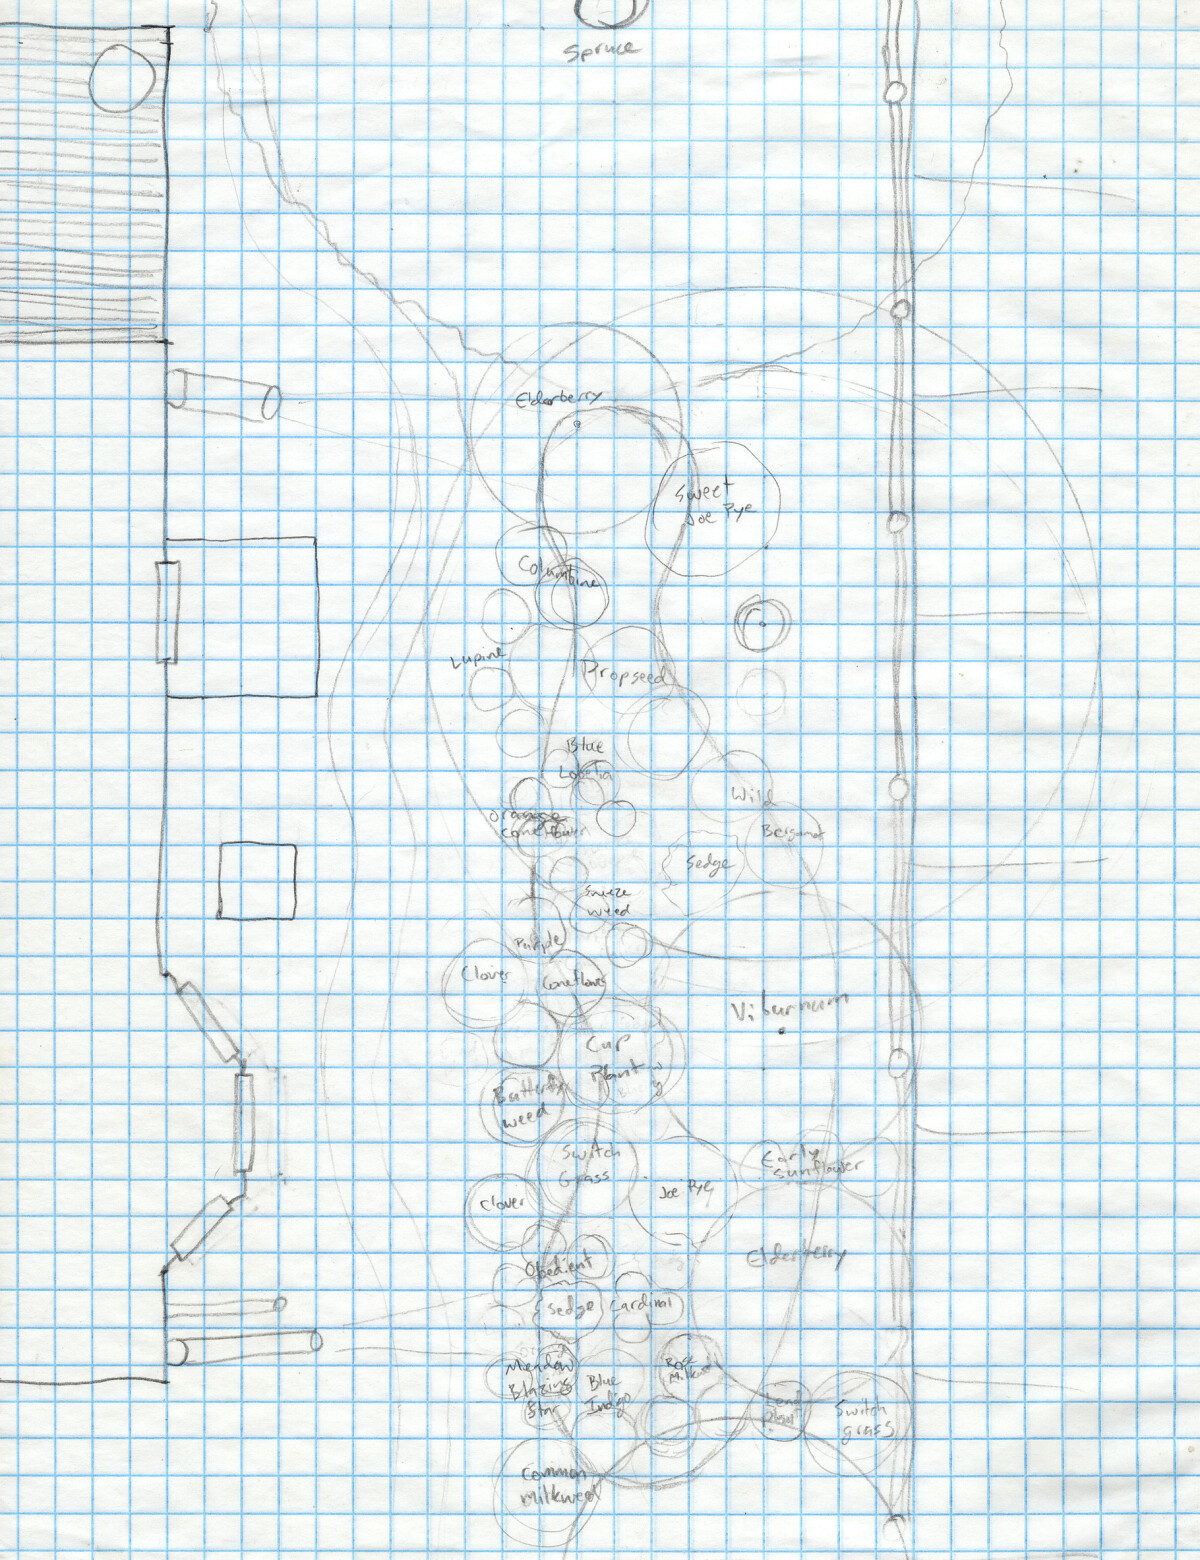
A not-quite-final version of the rain garden design, with forbs filled in.
Some areas didn’t get detailed schematics of every plant ahead of time, but rather a rough plan of plant selections and quantities that I’d finalize at planting time. And of course the iterative design process continued after planting, as I would realize I had more room to fill, or would need to replace a plant that wasn’t doing well, or would find a new exciting plant and need to figure out where to fit it in. I consider the maps living documents, and try to keep them updated as things change (though my track record on that has been spotty).
Time & Materials
I don’t have any idea how much time went into planning, as it was conducted in bits and pieces over many months. I will say, though, that I spent a very substantial amount of time on it—many tens of hours. Some of that was because I was learning a ton about plants and ecosystems and wildlife and landscape management as I went. Some of it was because I was very enthusiastic and went into way more depth than was strictly necessary. Still, planning a design of this magnitude is a definite commitment.
| Books | ||
|---|---|---|
| Gaia’s Garden | $30 | |
| Edible Forest Gardens, Volume Two | $62 | |
| Perennial Vegetables | $15 | |
| Birdscaping in the Midwest | library | |
| Attracting Butterflies & Hummingbirds to Your Backyard | library | |
| $107 | ||
| Drafting supplies | ||
| 4x4 graph paper | existing | |
| 10x10 graph paper | $6 | |
| Tracing paper | $6 | |
| Circle drawing template | $7 | |
| Triangular scale ruler | $6 | |
| Clutch pencil | $7 | |
| Compass | $9 | |
| Inverted marking paint | $6 | |
| $47 | ||
| Total | $154 | |