I hate lawns.
Okay, that’s not entirely true. Turfgrass excels at a few things and I do appreciate its utility in situations where it is called for. A significant section of our yard remains turf and we plan to leave it that way. However, we’ve killed a lot of grass since moving in and I think most people should kill most of their grass too.
What’s wrong with lawns? If you have 30 minutes, I refer you to this excellent and comprehensive piece for the answer. I know that seems like an awful lot of words to spend on lawns, but you really won’t be disappointed. If you want the shorter version, I think that lawns in America are a bullshit status symbol that started as aspirational imitation of old-world aristocracy and mutated into a bizarre reflection of our manifest destiny fable. And more to the point, they’re an ecological disaster, a maintenance liability, and worst of all, largely useless. Don’t want to hear it from me? How about a message from Chicago’s most Chicago botanist instead?
“But wait,” you say, “I use my lawn!” I believe you. Well, I believe that you get good use out of a small fraction of your lawn—maybe, say, 20%. Try a quick audit: think about the activities that take place on your lawn and where, specifically, they take place. Barbecues, movie nights, bonfires, child and/or dog playtime, hammocking… however you use your lawn, I’m willing to bet that the vast majority of it takes place in one concentrated area. Most likely, that area is in the back yard, in an area that feels semi-private and has convenient access to the house. Got it? Great! You’ve now identified the only area that is truly best served by turfgrass. Consider this: every other part of your yard would probably be better served by something else.
Here is a map of our property with the results of our usage audit notated (our house sits on a double lot, so we have more yard space than the typical city house, but the general idea holds true). When we bought our house, literally all of it was lawn.
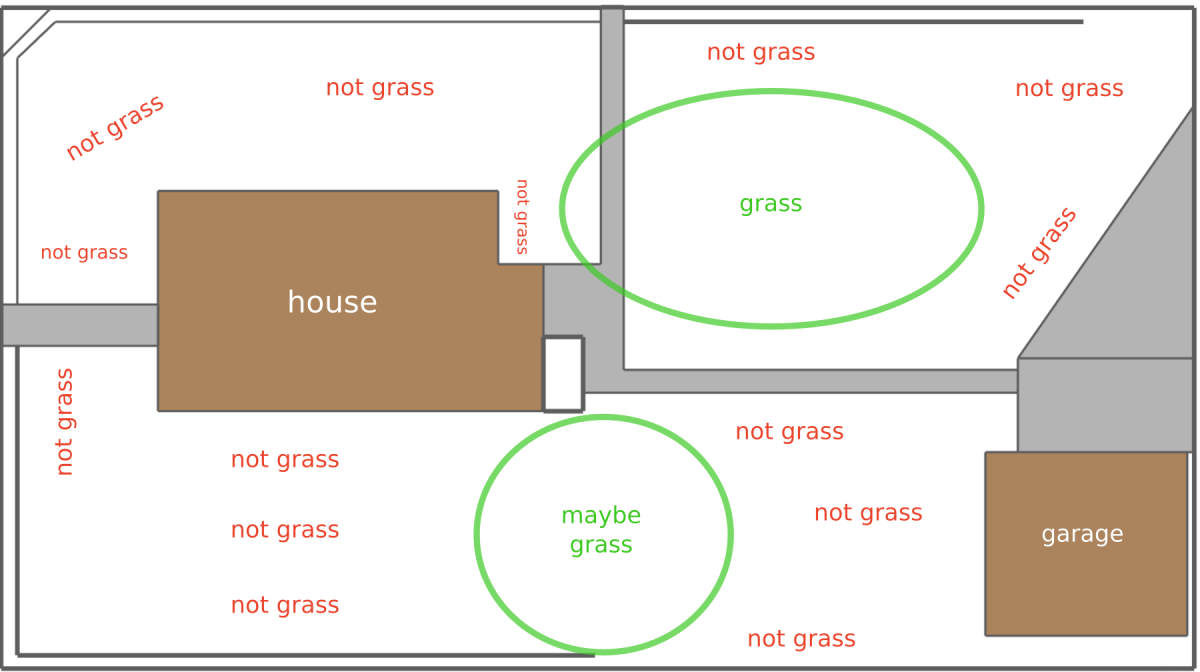
That one area in the back is the area that’s useful as grass. That’s where we set up chairs or blankets when we have outdoor gatherings. That’s where we relax outside on summer weekends. That’s where the dog rolls around and grunts (this is an important part of her day). That’s where the patio we intend to build will interface with the yard to provide a seamless transition between spaces. That’s where people can mingle and play yard games (as Katherine and I negotiated on proper lawn size, we eventually came to an agreement that “enough space to play Can Jam” was a reasonable metric to evaluate potential designs).
There’s a secondary area on the side that gets used for hammocks and general flex space. That will remain lawn for now, though it would be just as well served by a patio or by paths and groundcover.
Everything else, though? Everything else was doing absolutely nothing for us as lawn. It was just sitting there, demanding frequent mowing and being slowly overtaken by weeds since we weren’t participating in the endless cycle of herbicides and fertilizers.
Over several years, I’ve dramatically narrowed the gap between what was lawn and what should be lawn. I’ve killed a lot of grass. Of all the skills I’ve picked up while doing our landscaping, this is the one I feel most confident claiming expertise in. So, let me tell you about all the ways you can kill your grass.
Questions to ask when you’re ready to kill your grass
What do you want the site to look like when you’re done? Do you want it to be higher, lower, or equal to the current level of the ground? If you’re putting in a rain garden, for example, you’ll want to go below grade. If you’re preparing a raised bed, your final result will be well above the existing surface. If you’re simply looking to plant it with something other than grass, the height may not matter as much, but it’s still worth considering if anything will be affected by a change of an inch or two in either direction. Some grass killing techniques will change the final height of the surface, which may or may not be what you want.
How strong is the “weed seed bank” on the site? This refers to all the weed seeds that are lying dormant in the soil, ready to germinate if given the chance. In your typical urban lot, especially one that’s been a bit neglected, the weed seed bank is formidable. Turfgrass will suppress a lot of weed growth, but all those seeds are still present, biding their time. If the turfgrass goes away and nothing else shows up to compete, the weeds will happily take over.
How quickly and densely will you be growing replacement vegetation? Once you’ve “emptied” out the space, you should have a plan for filling it back up expeditiously. If you will be planting something dense and fast-growing, it can out-compete the weeds by getting established first and hogging all the space. The more sparse and/or slow to establish your plantings are, the more you will need to take precautions to suppress the weed seed bank.
How will you be planting? Will you be covering the area with mulch? Will you be planting transplants or direct-sowing seeds? Will you be broadcasting seeds evenly across the surface, or placing them only in specific locations?
How to kill your grass
Herbicide
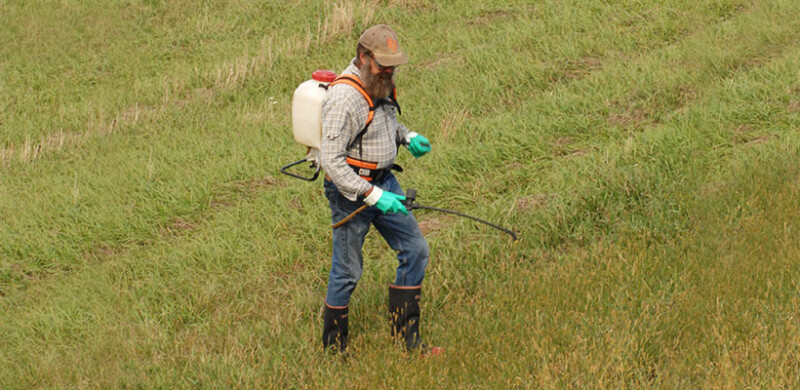
Photo from Prairie Moon's handy site prep resources.
This one I’ve never tried. The concept is pretty simple: get some glyphosate (aka RoundUp) and spray it evenly on all of the grass you want to be rid of. Glyphosate works on contact and kills just about everything, but doesn’t continue to have an effect after the initial application. After a few days, you should have a bunch of dead ground that you can proceed to plant with whatever else you want to put in. This is probably the quickest and least labor-intensive method.
I’m not a fan of poison, though, so I’ve never given it a try. In theory, this sort of glyphosate application done with proper safety precautions should be fairly safe and not present an ongoing danger. But that theory depends a little too heavily on taking the pesticide industry at their word and ignoring the many times this sort of thing turned out terrible in hindsight.
There are a couple other considerations that (I presume) are important to take into account with this method. First, it doesn’t remove any vegetative matter, so all the dead grass and weeds and “thatch” will still be there on the surface. Second, the glyphosate will not have any effect on the weed seed bank, so you must be prepared to act quickly to ensure that the weeds don’t get established before your replacement plantings do.
For me, this option feels like a last resort. If I had a site so large or difficult that no other option was practicable, I’d consider it. On a small urban lot, there are plenty of other choices, and many of them offer additional advantages.
Sod removal
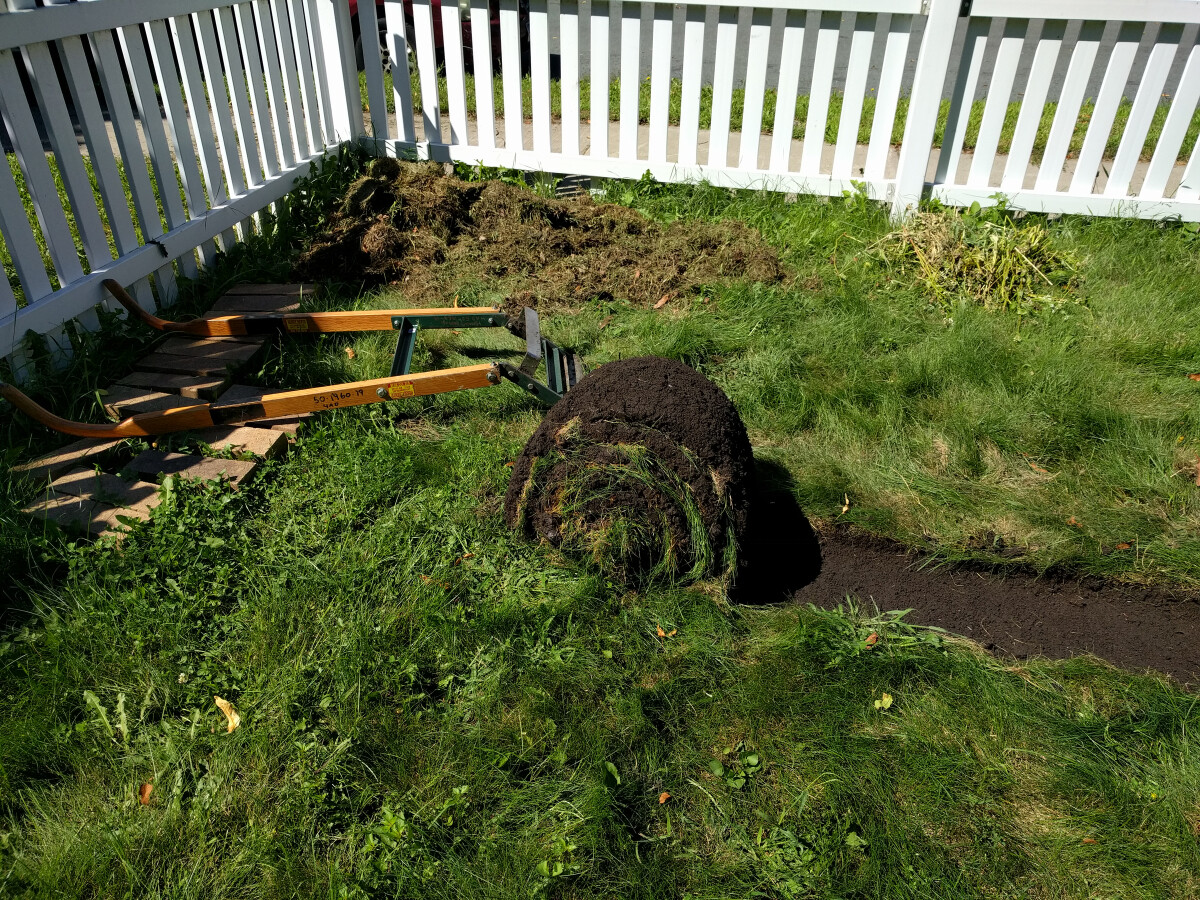
Find (probably rent) either a manual or powered sod cutter. These tools slice through the soil underneath the roots of the grass, and then you can roll the strips of sod up into big cylinders and remove them. I did a bit of sod removal and replacement with a manual sod kicker, which I’ll write about at some point, but I haven’t used this method to clear a large area for replacement planting.
In addition to removing the grass, this method takes about half an inch of soil with it, which may or may not be desired depending on your situation. By scraping off the entire top layer, you’ll also be removing a lot of the weed seed bank, which should dramatically decrease weed pressure (it won’t be effective on deep-rooted weeds like dandelions, though). And you’ll be left with nice flat clear soil, which would be perfect if you’re going to be broadcasting seed.
An important note: rolls of sod quickly become heavy and unwieldy. It will be hard work moving them, and you’ll definitely want to have a plan for disposing of them. You will generate more volume than you expect.
Also, rolling works best when it’s a dense layer of turf. If your grass is sparser or dominated by weeds (as often is the case in full shade, for example), it may crumble rather than rolling neatly. If that happens, the advantages of this method will largely be lost.
One alternative to removing the sod is to flip it over and leave it in place, smothering the grass and presenting the underside as the new surface. Unless you already have a sod cutter, this seems like a lot of bother for not a lot of return. In my experience, flipping sod does an imperfect job of killing the existing plant matter. The weed seed bank will remain a threat, and you’ll still have a thick mat of vegetative matter that’s difficult to plant into.
Digging
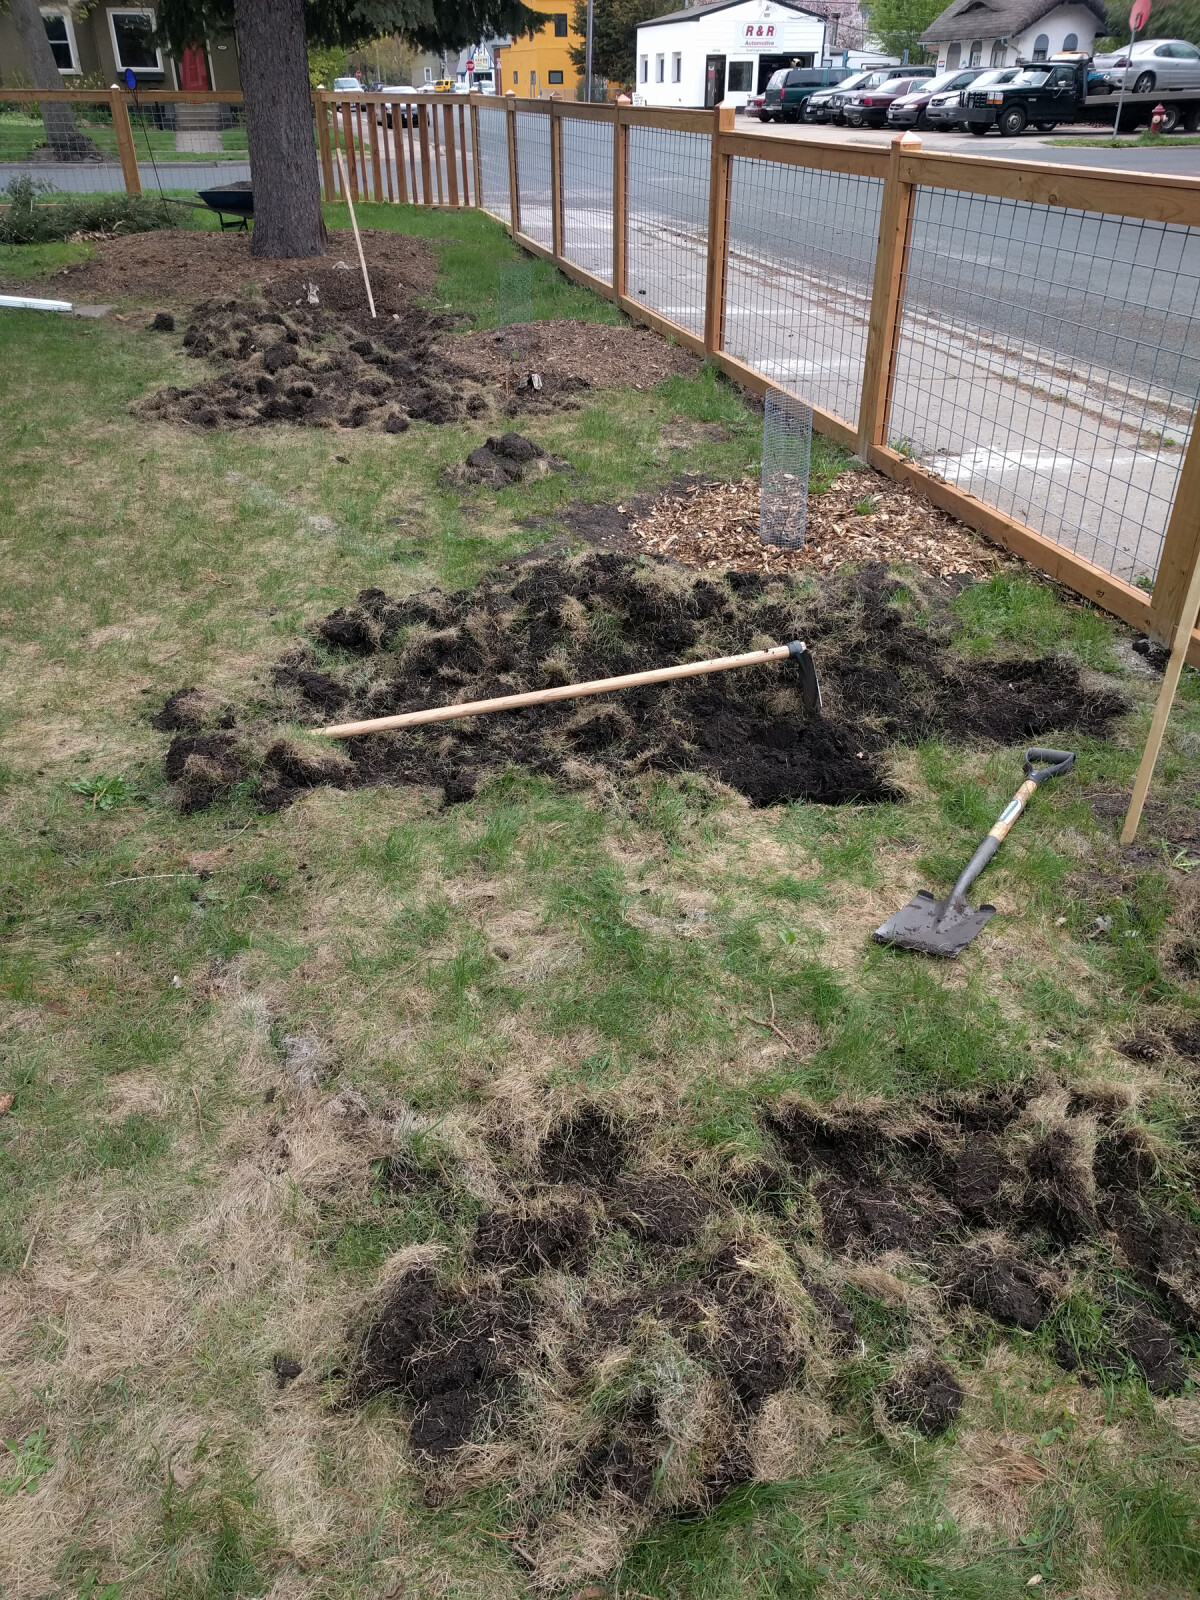
Get a shovel, dig up the grass, and remove it. Pretty straightforward!
Just about any digging tool can work, but the best is a standard square spade. You want to be able to give it a good kick to quickly chop through the turf. The flat edge is good for cutting sharp lines to outline and divide it into manageable pieces. Then you can angle it shallowly to chop underneath the roots and lever out chunks of sod. If you’re looking to remove more soil, that’s fine too, you can just dig deeper.
Bring a wheelbarrow or other container with you to throw the material in as you go. As with sod removal, expect to generate quite a large volume of removed dirt and plant matter, and realize that you will need to do something with all of that.
Flipping it over in place remains an alternative to removing it. While it still has the downsides I mentioned in the sod section, what this method has to recommend it is extreme simplicity. Digging and flipping can effectively prepare an area for planting without changing the height, requires no more than a shovel, and has no need for expensive or complicated disposal. I used this method to prepare some of our side beds, and will discuss it more there.
An alternative to the shovel is a grub hoe (a tool similar to the average garden hoe except bigger, tougher, and meaner). Rather than cutting out pieces of turf, with a grub hoe you move in a line, chopping out chunks of turf as you go. Once you get into a rhythm, you can cut up a lot of area very quickly, much faster than with a shovel. If you’re removing the material, you will still have to come back through with a shovel or your hands to pick up the pieces and chuck them in the wheelbarrow. I used a grub hoe to remove the turf in a number of our early plantings, including the rain garden. It’s a good compromise between efficiency and flexibility when working with areas of non-uniform vegetation and non-square shapes.
Smothering
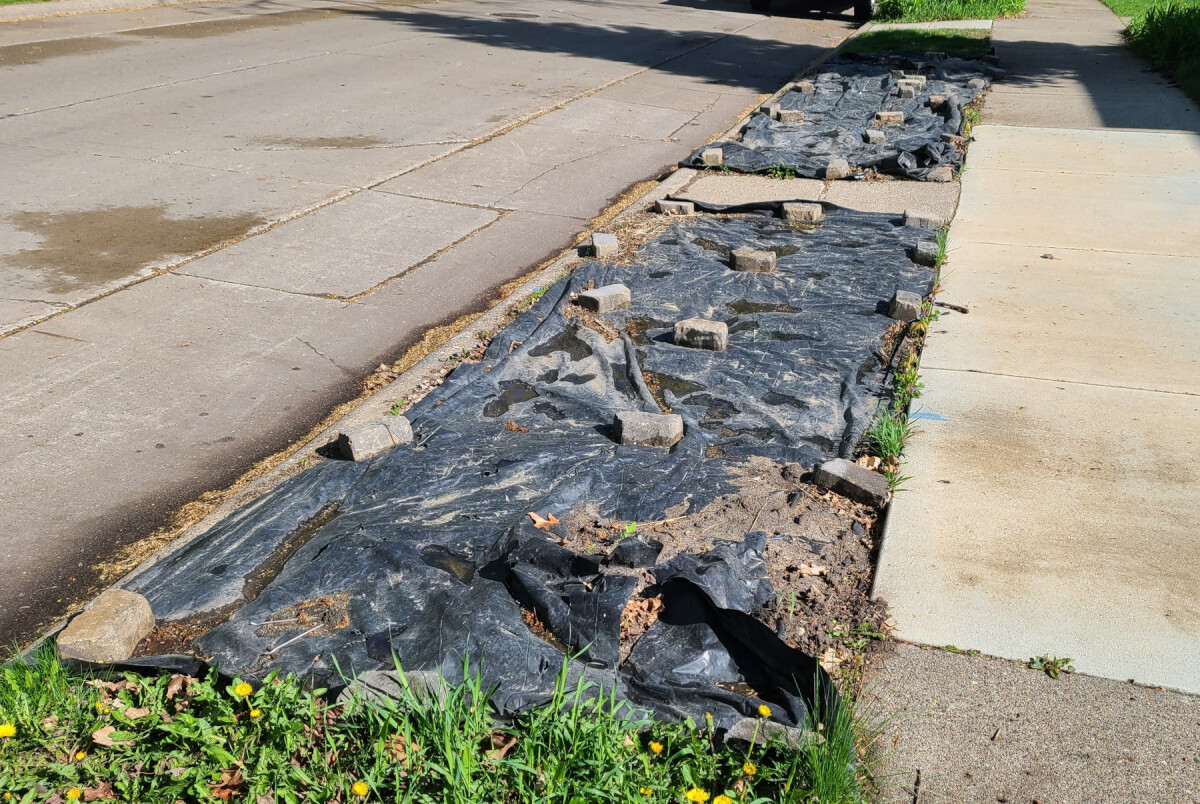
A neighbor's boulevard.
Cover your grass with something opaque. Black plastic sheeting is the standard choice, but old carpet, tarps, thick fabric, plywood sheets, or anything else that can hold up to the elements would also work fine. Weight it down with rocks or boards or something so it doesn’t blow away. Leave it on there long enough to kill everything from lack of sunlight, then take it off and you’re ready to plant.
This is a pretty popular method in both small- and large-scale plantings. I think the big benefit is that it is cheap, organic, and fairly light on labor. It does take some time, obviously—at least a month, and a whole season would be ideal. When the plastic comes off, all the vegetative matter and weed seeds are still going to be there, so don’t come unprepared.
I’ve used this method in a few small spots around the yard, but not for any major planting area. The sheet mulching methods I’ll describe work on a similar principle but mitigate some of the disadvantages, so I find those to be more useful in my small urban site.
Solarizing
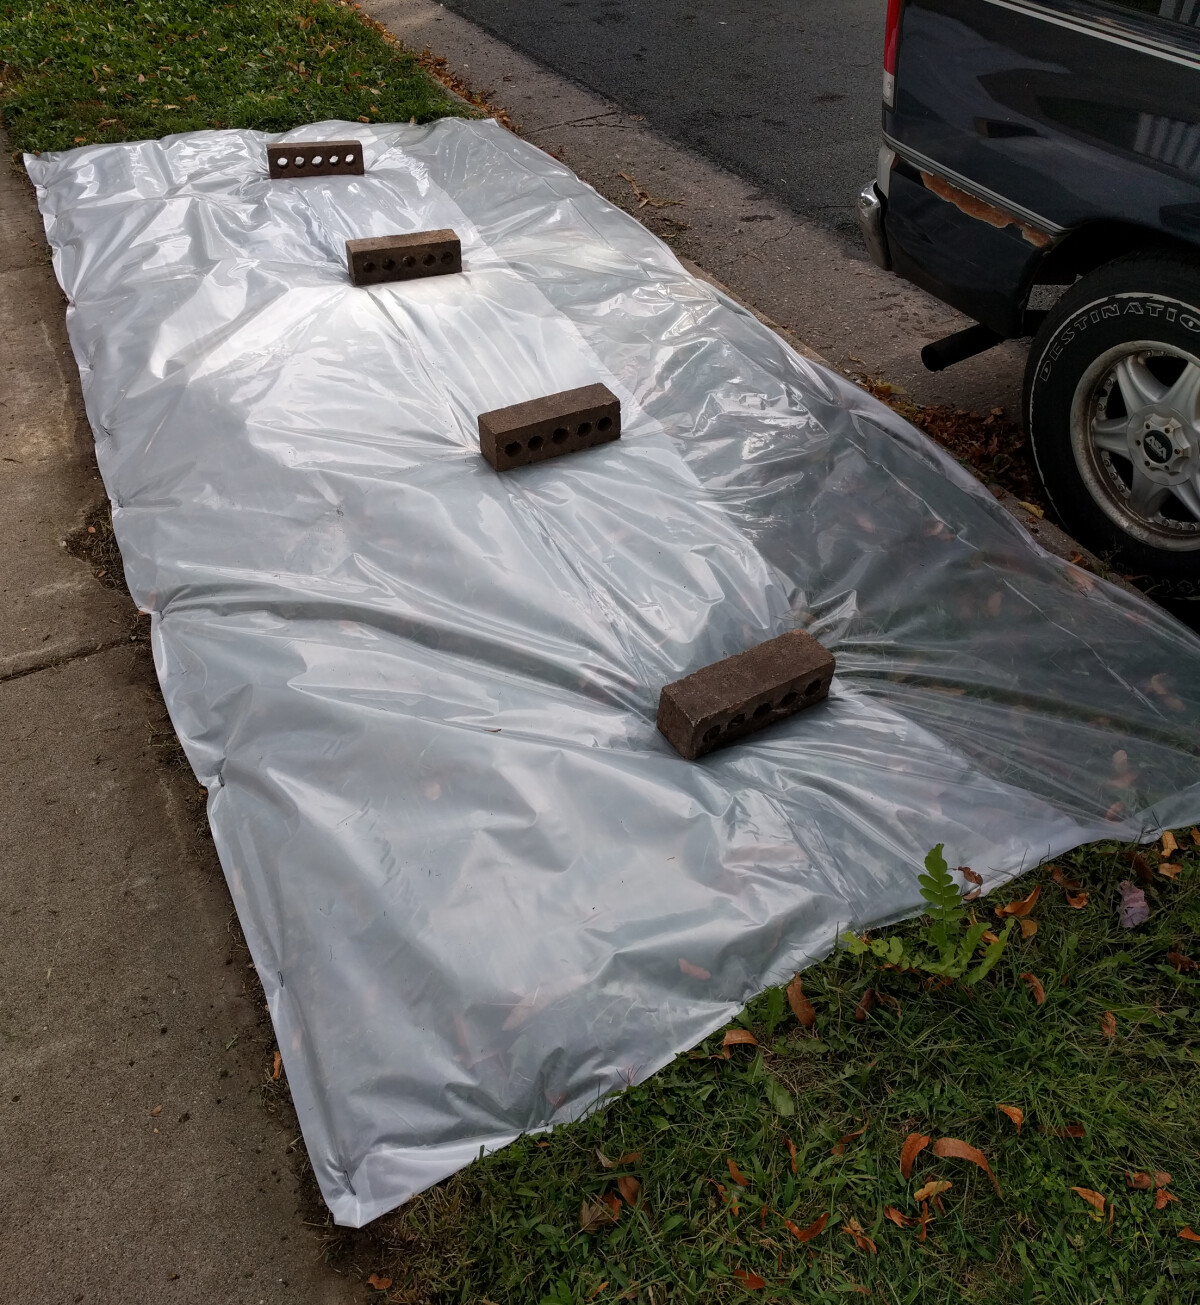
This looks very similar to smothering, with one key difference. Instead of using an opaque material like black plastic, you lay down clear plastic that lets sunlight through. This creates a greenhouse effect, trapping heat under the plastic. In warm temperatures and bright sunlight, it can get so hot under the plastic that it not only kills all the growing plants, but heats the top layer of soil to a temperature that kills weed seeds. It does also damage the soil’s biodiversity by killing all microorganisms in the top couple inches, but if you take good care of the site afterwards, that will likely be able to bounce back.
Similar to smothering, this method is cheap and easy, and scales up or down well. It’s a worthy alternative to smothering on sites where weed pressure is expected to be very high. It’s also probably a bit faster than smothering, though with a less flexible timeline.
I’ve tried solarizing twice in our yard and failed both times. I think my downfall is that this method, while promising, has more specific requirements than most of the other methods, and failing to get the conditions just right will render it completely ineffective. If your temperatures don’t get hot enough under the plastic to kill the plants, you’ve instead created a nice warm moist tropical environment that most weeds will love. Here’s the steps I think are crucial to success:
- Keep the edges of the plastic tight to the ground, perhaps by burying them in dirt. If there are gaps, they will act like vents and allow too much airflow that will moderate the temperatures.
- Mow the area before laying plastic. Lush plant growth can act like insulation, preventing heat from getting to the base of the plants to fully kill them.
- Most important of all: you have to achieve maximum sun intensity for this to work. Your area needs to have direct sunlight for at least several hours around midday, when the sun is straight overhead (approximately 10am-2pm). And you need to have this in place for the sunniest part of the season (summer solstice). Here in Minnesota, I’ve missed that window slightly and paid for it. Even late July and August is too late for us. It’s still hot and sunny weather, but the sun is too low in the sky by then and doesn’t radiate heat effectively enough to really get cooking. For the best odds of success, I would aim to have my plastic down no later than the beginning of June, and plan to leave it until the end of July.
Solarizing sounds like a very powerful method for certain site conditions. If you think it’s the perfect thing for you, by all means go for it. Just invest in a bit of planning to make sure you succeed.
Sheet mulching
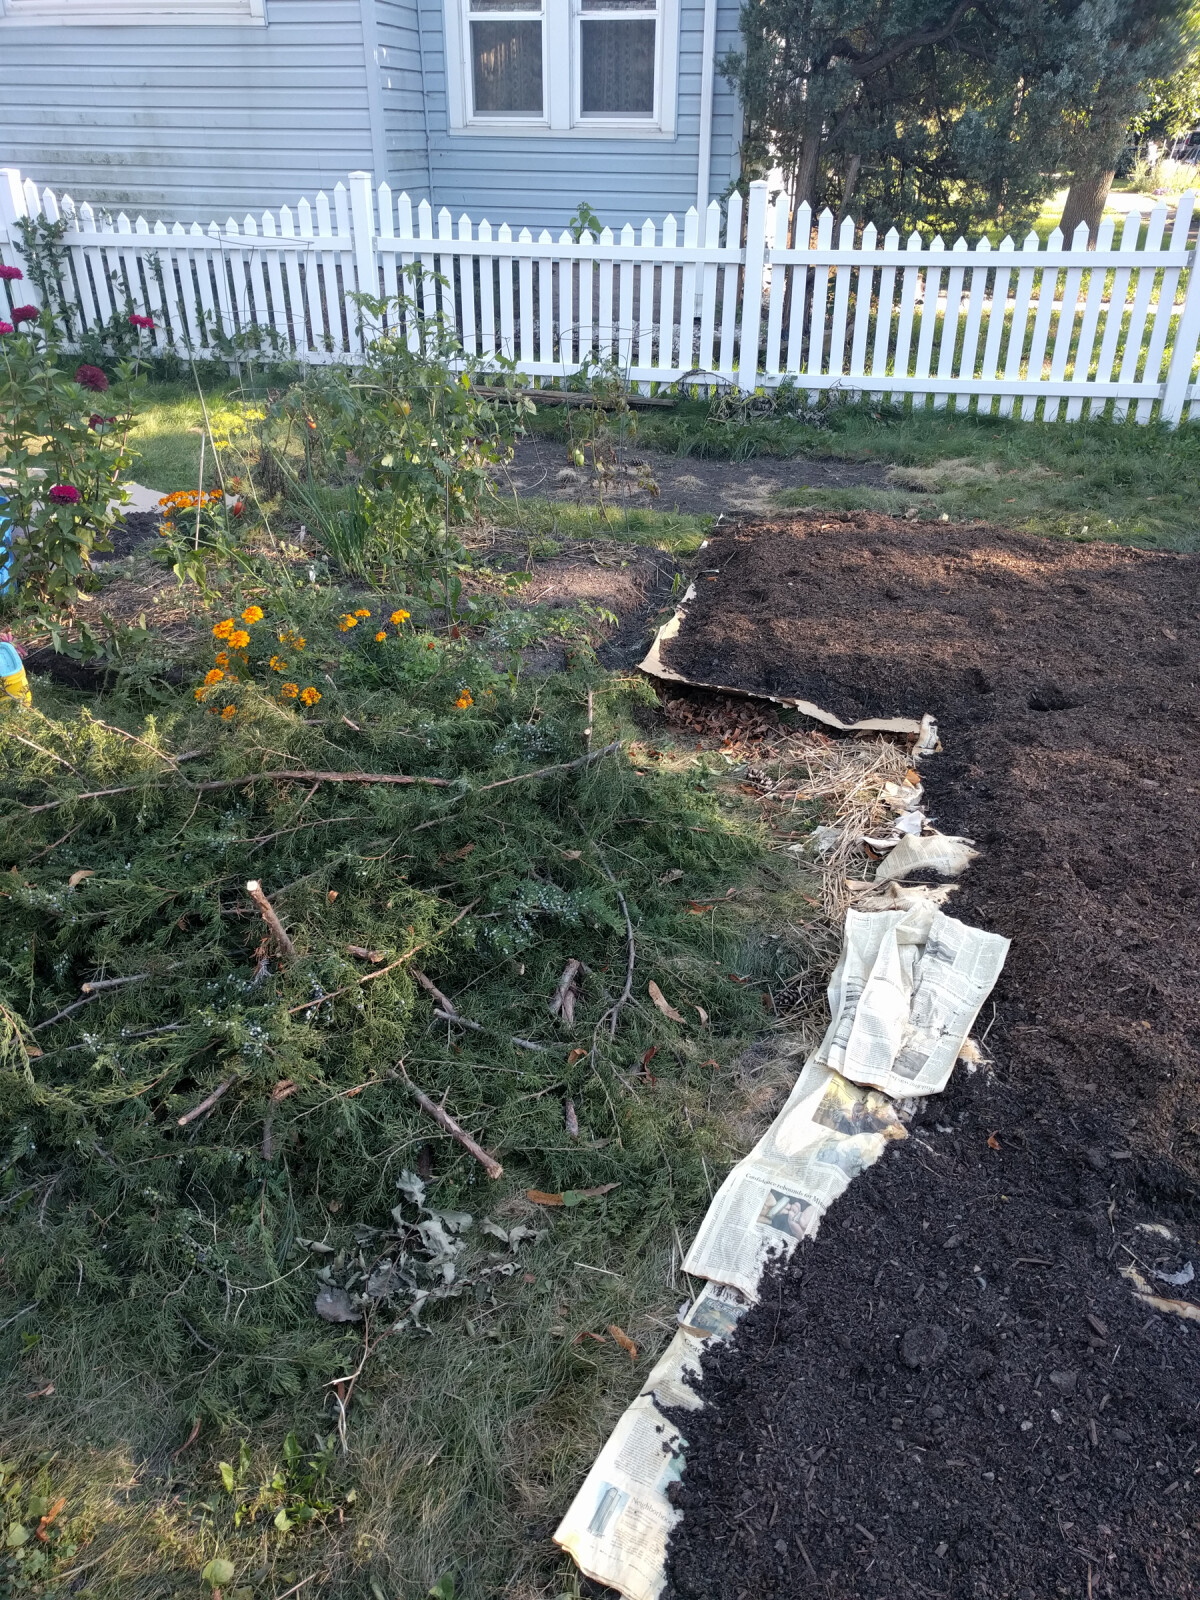
Sheet mulching (also sometimes called “lasagna gardening”) combines several techniques into one all-inclusive method for preparing a site. The basic idea is to layer material on top of your grass: first a biodegradable weed barrier to smother the existing vegetation, then a thick layer of organic material and mulch to hold it all down and provide fertility. This is all left to decompose, and planting is done without any further disturbance of the soil. Ideally, the sheet mulched area is given a few months to break down into nice fertile soil before planting. However, it is also possible to plant directly into a freshly sheet-mulched area by punching holes through the weed barrier for transplants, or by topping the layers with soil or compost and sowing seeds into that.
The weed barrier is usually newspaper or cardboard (I much prefer cardboard). There are many different “recipes” for the organic material layered on top. Some people like to create many thin striated layers of material, while others just do a couple thick layers. Usually some amount of compost is used, but there is a lot of flexibility in the other organic matter based on your preferences and what is easily available to you. Straw, leaves, manure, sawdust, wood chips, shredded paper, and just about anything else you can think of are options. You can also add soil amendments, or fertility boosters like used coffee grounds. And you can add uncomposted kitchen scraps under the weed barrier, where they will break down along with everything else.
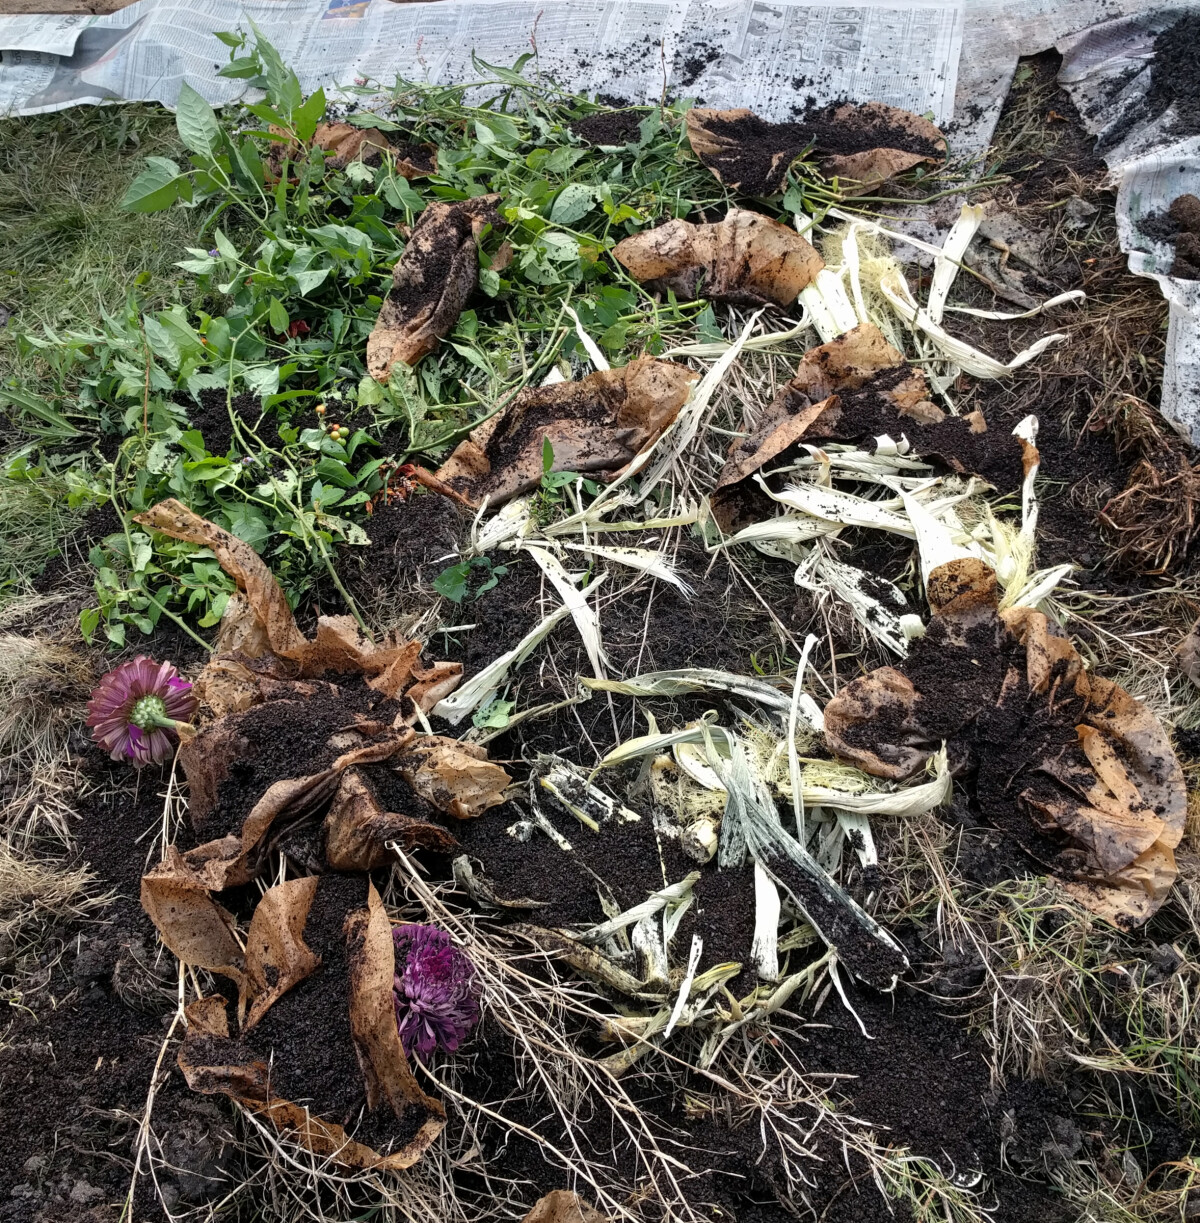
One of the benefits of sheet mulching is that you can add pretty much anything biodegradable underneath the weed barrier. Here is weeds, spent flowers, corn husks, plus coffee grounds I had collected from a local coffeeshop to boost decomposition.
By burying the former grass under a bunch of new material, the weed seed bank is kept away from the surface where it would germinate. The dead vegetation will be broken down under the surface by worms and microorganisms, converted to organic matter that’s helpful to the soil.
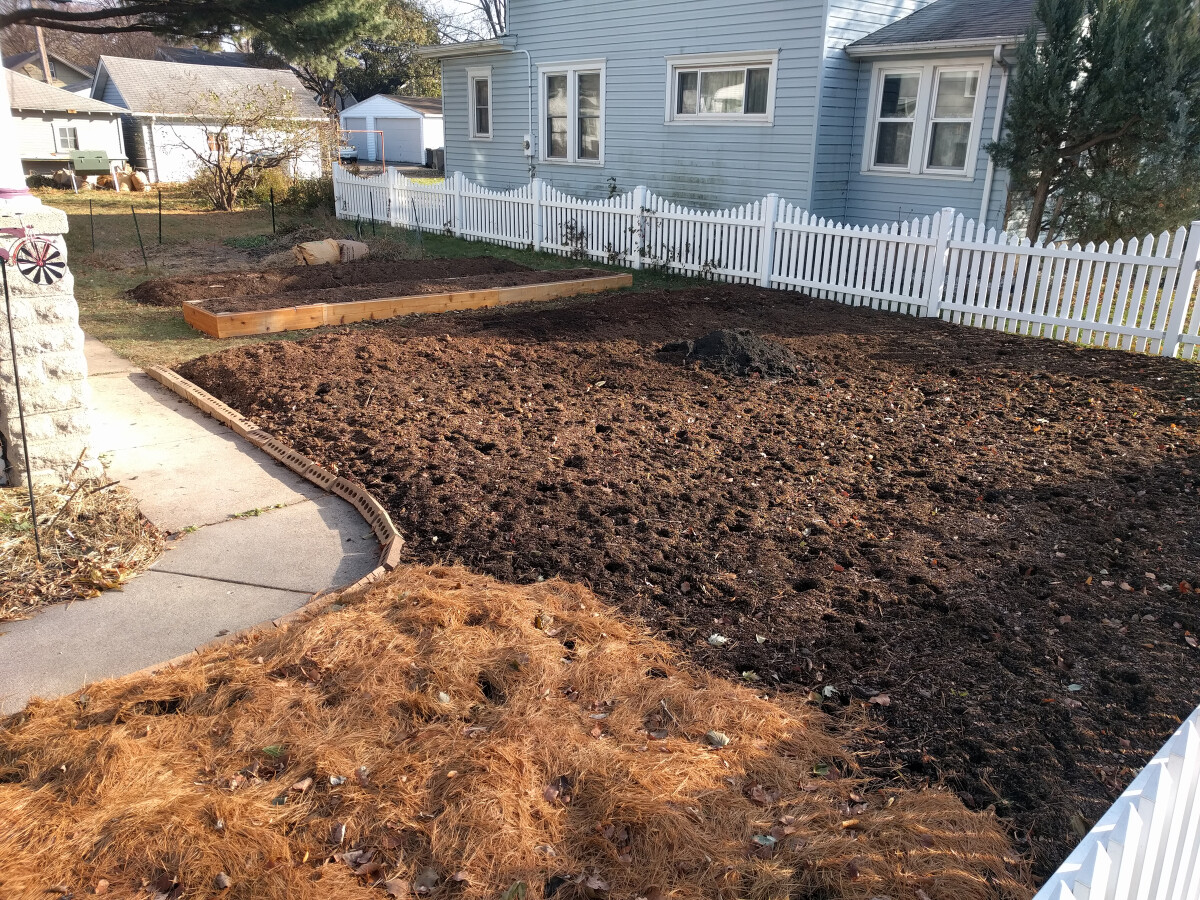
The new vegetable garden with a fresh layer of sheet mulch applied.
We used sheet mulching to prepare about 500 sq. ft. for our vegetable garden and have had a very good outcome. There are a couple things to get right for best results. You want a nice thick layer of weed barrier. If you’re using newspaper, use a lot, like 8 sheets or more thick, with generous overlap between sections. In areas where I went too thin, the more vigorous weeds (dandelions and quackgrass) sometimes managed to punch through the barrier. I have switched to preferring cardboard to newspaper in most situations because one layer of sturdy cardboard does the job, and it’s much faster to put down than all that newspaper (dealing with newspaper on a windy day is a real nuisance too). Second, whatever layers you put on top of the weed barrier should add up to a thick mulch. Too little material and the weed barrier will degrade quickly and patient weeds underneath it will escape. Third, this method works best on flat, even ground. It’s possible to do it on slopes but you’ll need to make sure the mulch doesn’t move around too much and lose coverage. The most weed trouble I had was near the edges of the garden where there’s an angle as the ground slopes down to the sidewalk. My weed barrier was prone to tearing on that transition and letting weeds through.
I think sheet mulching comes out ahead of other methods in terms of results. Done well, it can tame very rough conditions, and it effectively deals with the existing vegetation and weed seed bank. It also rolls a bunch of soil improvement into the preparation step, something that you would have to do separately with most of the other methods. It’s possible to do sheet mulching not only organically, but with also with local materials and materials almost exclusively reclaimed from the waste stream. It can be done quickly or slowly, and can be done well in advance or right before planting.
The big downside to sheet mulching is that it’s a lot of work. You’re looking at 3”-12” of organic material, which is a lot of stuff to haul in and spread over your site. You may also find it difficult to source all the materials needed. Living in the middle of a large metro area, I didn’t have easy access to straw or manure at a price that would have been cost-effective for the large amounts I needed. You are also unlikely to have a large quantity of compost lying around if you want to sheet mulch a big area all at once, so you may have to purchase some.
One more consideration: sheet mulching will raise the height of the area considerably. The freshly laid material may be as much as a foot thick, and the eventual settled height will probably be something like 3” above the former ground level. This caused a bit of hassle for me where our garden meets the sidewalks. Where the ground had previously been level with the sidewalk, it was now several inches higher and I had to install edging to keep it contained.
As long as you’re willing to do a bit of work, sheet mulching is an excellent solution for sites that you want to be very well prepared. For sites where soil fertility isn’t as important (for example, native plantings or unfussy perennials), or sites that are in okay condition to begin with, it might be overkill. I’m glad I did a thorough sheet mulching for the vegetable garden, but for most other areas of our yard, I’ve developed a “lazy” variant that works well with much less investment.
Lazy sheet mulching

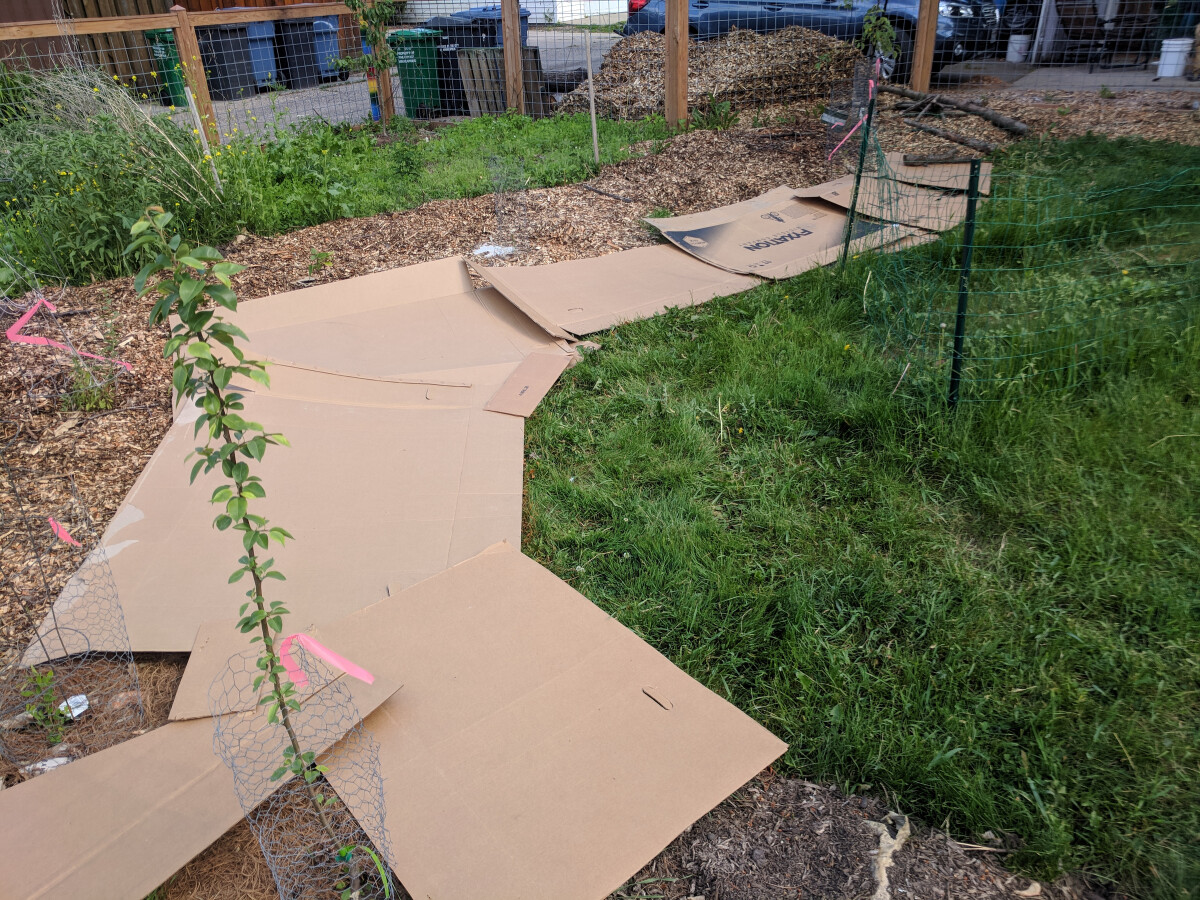
This is a stripped-down variation of sheet mulching that uses the same principle but drastically simplifies the materials. It’s quite simple. Lay cardboard on top of the existing grass. Top generously with wood chips. Leave for a while to decompose, or punch holes in the carboard to plant immediately.
This method reduces the required inputs to two materials that are very easy for me to source. Large sheets of cardboard can be gathered free from appliance stores, or my preference, bike shops. Arborist wood chips are sometimes available free from municipal sites, and some arborists will also drop a load off at your house for free (since it saves them a disposal fee).
-
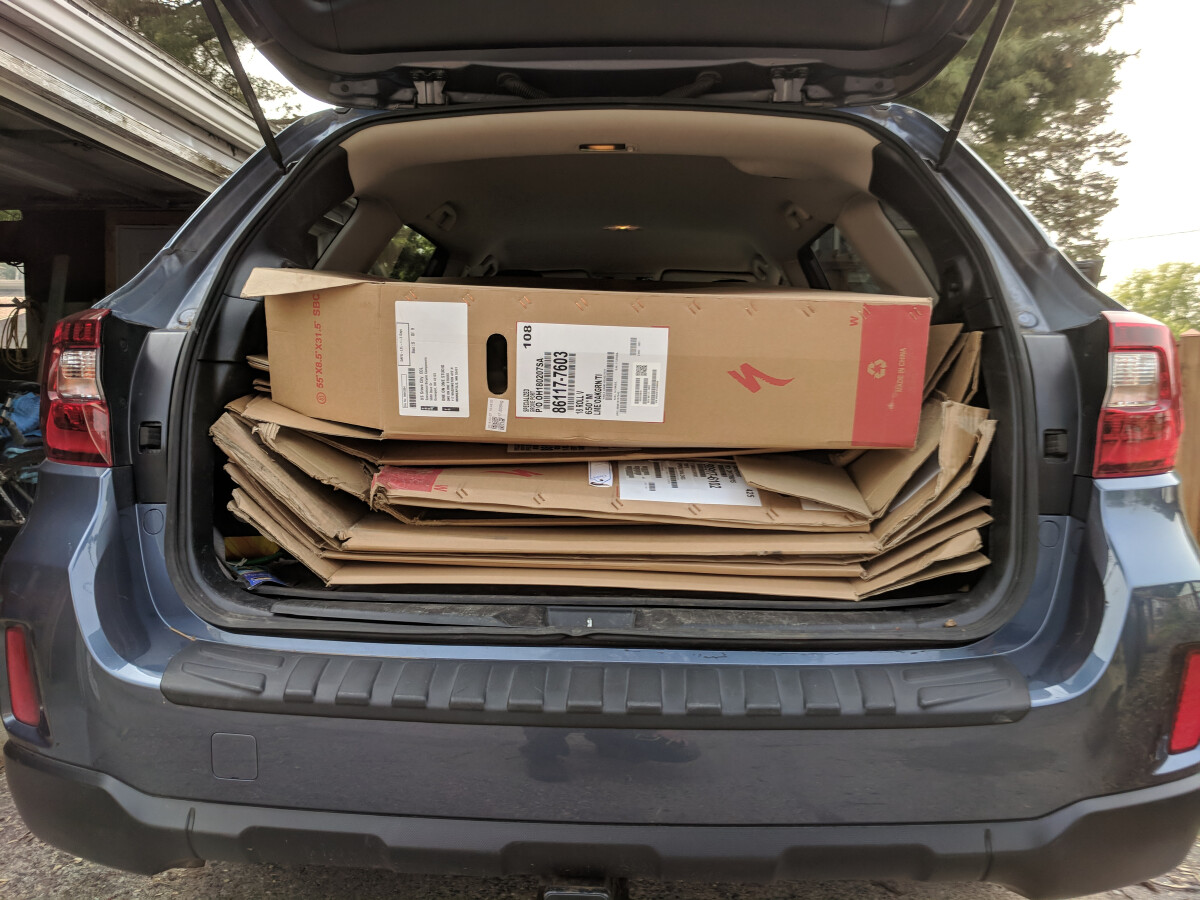
I had an insatiable need for bike boxes for a while.
-
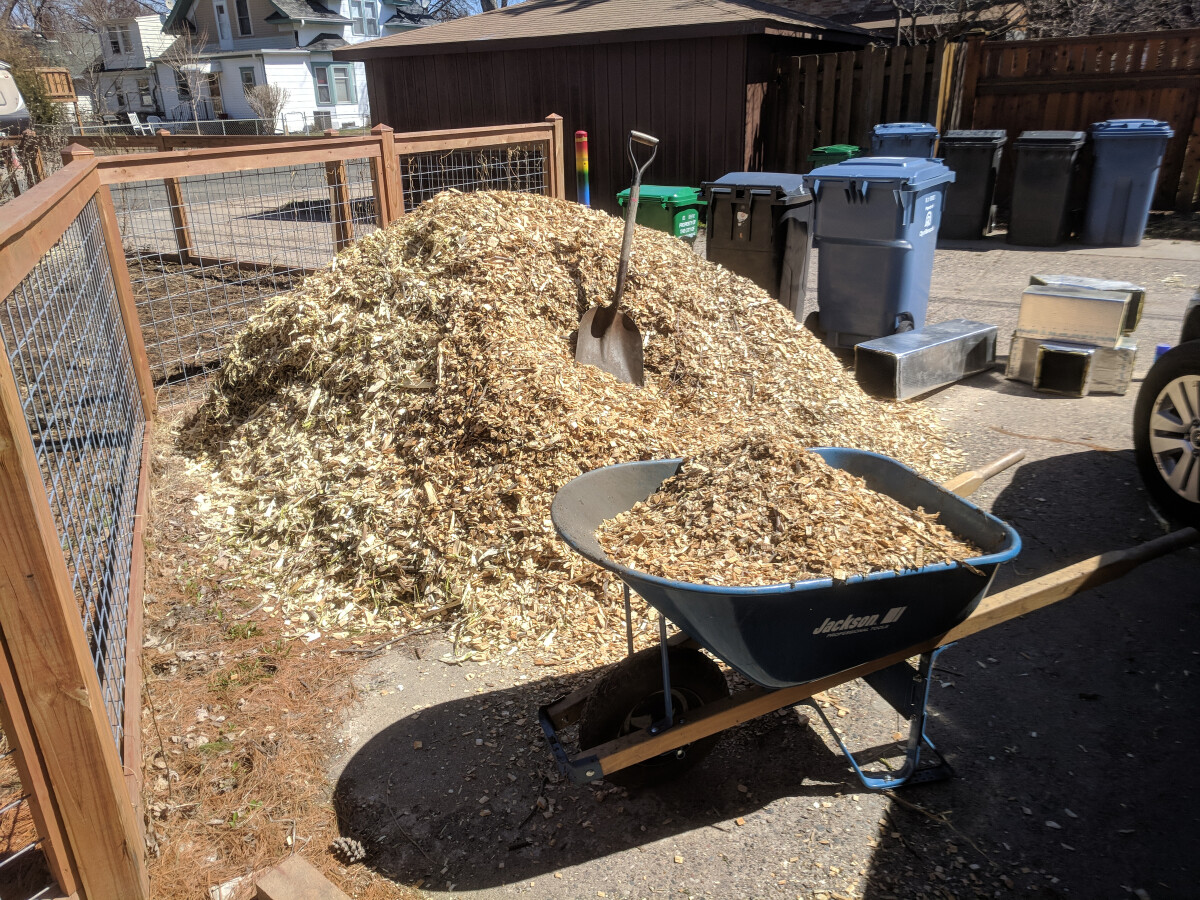
One of several loads of wood chips from arborists, all free.
The simple recipe and the light weight of the materials mean I can cover a lot of area fairly rapidly. It’s still more work than some of the other methods, but since the areas I’m working on would need mulch eventually anyhow, I come out ahead in the long run by having wood chips already in place to serve as mulch.
Like full sheet mulching, this offers a lot of flexibility in timing and scale. A good thick cardboard and a deep layer of wood chips can suppress just about all weeds successfully, so the existing site conditions aren’t a concern. As long as you like the wood chip aesthetic, the results look nice and need no further care.
As with full sheet mulching, the keys to success are a thick weed barrier and a thick layer of wood chips on top. I’d aim for at least 2″-4″ of uncompacted wood chips, or even more if you’re feeling like it (the only time where too much wood chips could hurt is if you’re mulching around existing trees, whose roots still need to be able to breathe. I don’t always plan ahead well enough for this, but the most pleasant timeline for sheet mulching is to mulch in late summer or fall, let it sit over winter, and plant the following spring. The weed barrier will be mostly gone by then, the weeds will be dead, the wood chips will have settled into a nice stationary layer, and you’ll be able to very conveniently dig into soil that’s all ready for new plants.
This method only works in places where wood chips are an acceptable final layer. It wouldn’t be suitable for areas that are dug frequently, like vegetables or ornamental annuals. It also doesn’t provide the immediate soil improvement of full sheet mulching, though over the course of several years, the wood chips will start to break down and provide a lot of benefits to the soil.
This method has become my go-to choice for most situations because for my yard, it presents the best path from grass to not-grass. I’ve converted roughly 1500 sq. ft. of grass using this method, an amount that was achievable specifically because of the simplicity and efficiency of this approach.
Two thumbs up for wood chip sheet mulch.
Go forth and kill your grass
There you have it: an arsenal of grass-killing techniques. Which one is right for you depends on the specifics of your situation and your preferences. Most importantly, pick the one that leads to you killing some grass. If your first attempt is small or imperfect, it’s still better than doing nothing.
At this very moment you, yes you, have some patch of grass sitting around that you never use. That grass is wasting your time, and it’s wasting the potential of a space that could be providing benefits you’ll never get out of grass. Go kill that grass, and put something useful in its place.